Difference between revisions of "Content Dev:CC Morph Creation"
Chuck (RL) (Talk | contribs) m (→Custom Morph Slider) |
Chuck (RL) (Talk | contribs) m (→Refining the Custom Morph) |
||
| Line 136: | Line 136: | ||
=== Refining the Custom Morph === | === Refining the Custom Morph === | ||
| + | |||
| + | The first time that you apply a custom morph is rarely perfect. We'll still need to make some adjustments such as resizing and moving the eyeballs to fit and checking if the upper and lower teeth are in the right places, | ||
| + | |||
| + | #With the custom character loaded in CC, zoom in on the face and perform '''Edit > Open Mouth''' to preview the position of the upper and lower teeth. | ||
| + | #Drill down to '''Modify > Morphs > Actor > Head > Cavity''' and adjust the size and position of the upper and lower teeth to match the size and position of the mouth. | ||
| + | #Select '''Eye''' and type in "eyeball" in the search box on the right pane of the Modify panel. | ||
| + | #Adjust the size and position of the left and right eyeballs to match the eye sockets of the custom character. | ||
| + | #Select '''Actor Parts > CC_Base_Eye''' and perform '''Appearance > Activate Appearance Editor'''. | ||
| + | #Drill down to '''CC_Base_Eye > Eye > Eye Ambient Occlusion''' and readjust the parameters to better fit the shape of the eye sockets. | ||
| + | #Continue to adjust the look of the eyeballs to your heart's content. | ||
| + | |||
| + | {{Single_Illustration|Morph_Creation_Refining.png|The refining process can be essential for exaggerated characters.}} | ||
| + | |||
| + | Your character may be highly exaggerated around the eyes making it unsuitable for eyelashes. You can turn them off by doing the following: | ||
| + | |||
| + | #Select '''Modify > Morphs > Head > Eye''' and type in "Eyelash" into the search box on the right pane. | ||
| + | #Maximize both the '''Eyelash Hide Layer 1''' and '''Eyelash Hide Layer 2''' sliders. | ||
| + | |||
| + | === Finalized Morph Slider === | ||
Revision as of 00:39, 10 August 2017
- Main article: CC Avatar.
Starting Out
Creating the neutral figure
Character Creator (CC) does not provide a neutral body shape. This is inconvenient because morph targets should be derived from a neutral form without the interference of other morph shapes. Starting from a neutral body gives the morph target the most flexibility when it comes to mix and matching with other morph shapes.
Reallusion provides the neutral body shape at Templates or you can make your own:
- Open CC and proceed to delete all the clothing on the default figure.
- Select Currently Used under Modify > Morphs and click on the Reset button near the bottom of the panel.
- Click on Appearance > Activate Appearance Editor to edit the body textures.
- For every Appearance Editor setting, double-click on the label to reset the parameter.
- Now you have the neutral template complete, save the Project for later reuse.
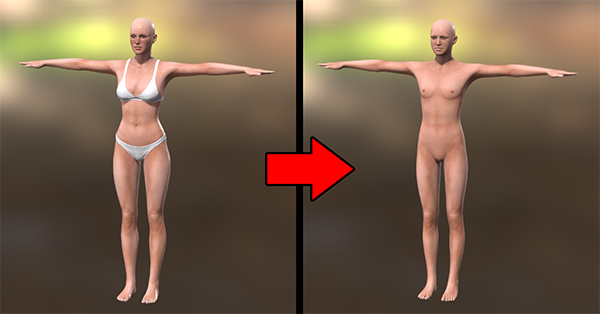 Neutral body should be devoid of morphs and customizations in the Appearance Editor.
Note:
- Wiping out the Appearance Editor settings is not necessary but makes for a cleaner neutral template.
- You can reuse the neutral template file whenever you need to make a custom morph target shape.
Concept phase
We strongly recommend concept drawing before 3D modeling as separating the concept and execution phase can save you time on bungling with really complicated software.
To create a simple concept image:
- Load the neutral template file in CC and turn the camera to face the figure.
- Screen grab or capture the neutral character and paste the image in an image editor like Photoshop.
- Create an empty layer on top of the figure and draw the look of the creature.
- Save the drawing for reference in CC.
- You can choose to generate images of different views such as the side and back.
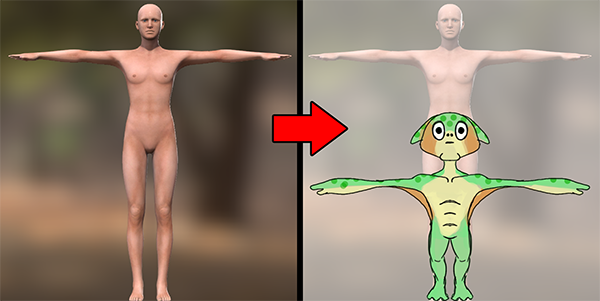 The neutral template becomes a semi-transparent background for the final concept image.
Note:
- Style is very much a matter of proportions, especially the head to body ratio.
- The point of concept drawing and model sheets is to save time by taking out the guesswork.
- Every minute spend conceptualizing can save 3 minutes in the production phase.
Creating the Morph Target
Morphing the base shape
With the concept drawing complete, we can start to use the morph sliders inside CC to achieve what we've set out to do. Before you begin, make sure to check out the CC ESSENTIAL MORPHS & SKIN pack available here. This essentials pack provides a lot of the much needed morph sliders such as Body Scale. However, keep in mind that all content created with the assistance of this pack will result in derivative content which has implications for DRM when sold in the Reallusion Marketplace and Content Store.
- Load the neutral template inside CC and the concept art as a reference.
- Use the morph sliders under the Modify panel to model the body according to the concept art. Try to achieve a strong resemblance.
- Perform File > Export to Obj > Nude Character and save out the base shape along with the ObjKey.
Upon character export, CC will produce an OBJKey or FBXKey, these DRM related files will contain skeleton scale, mesh orientation, and other important data. These files will help detail out the discrepancies between CC and other 3rd party software. Therefore, users are strongly encouraged to preserve these files for better technical support.
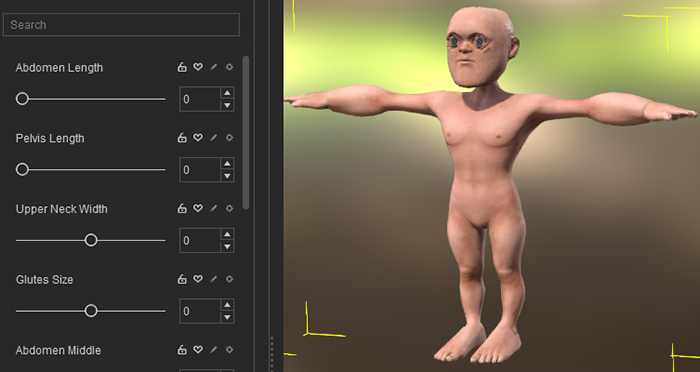 Figure doesn't have to be identical to the concept but must resemble its proportions.
Note:
- OBJ format will preserve the quad faces of the geometry whereas FBX will triangulate the mesh. It will always export in T-pose.
- Morph sliders can extend beyond its limits just by entering a larger number that is beyond the range of its minimum or maximum value.
- Focus on getting the proportions identical to the concept art. Getting exact textures and surface normals at this juncture is not important.
- You can consider using an image overlay software to superimpose the concept image on the CC workspace.
- Do not remove the ObjKey created by CC. It is needed during the re-import process for its bone scale data.
Enhancing the base shape
Now that the base shape is prepared from CC, we can attempt to make the character identical to the concept drawing. For this you'll need to work with a third party 3D modeling application such as Maya, 3ds Max, Sculptris, and so forth.
- Load the OBJ file exported from the previous section into your 3D modeling application.
- Use whatever tools necessarily to modify the shape of the character according to the concept art.
- Export the character in OBJ format with the same number of vertices and the same vertex ids that it went in with.
 For this tutorial, Zbrush was used for the base shape enhancement procedure.
Note:
- Do not change the vertex ids or the vertex number whatsoever upon export. Doing so will cause the morph import to fail in CC.
- If you are subdividing the geometry during the editing process, make sure to keep the original mesh resolution intact and revert to it before export.
- Avoid making changes to overall proportions which can create a mismatch between the bone and mesh placement. For example, extending the finger mesh beyond the bounds of the finger bones.
- If you are using Zbrush, avoid using merge group, Dynamesh, and any other tools that can change the vertex number and ids.
Custom Morph Slider
You'll need to create a custom morph slider in order to utilize the morph target made in the previous section.
- Load the CC project that contains the neutral figure created from the previous steps.
- Perform Create > Morph Slider to open the Morph Slider Editor.
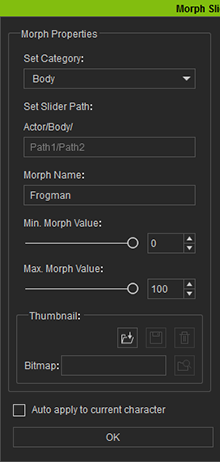
- Adjust the parameters of the Morph Slider Editor window (see below).
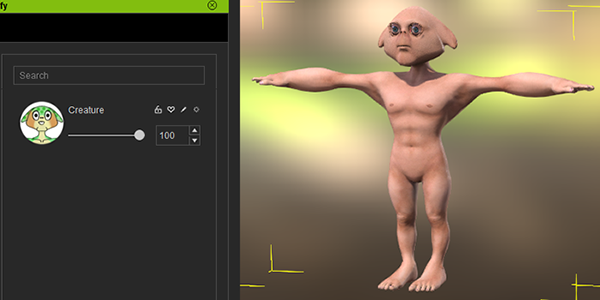
- Once you are done with the settings, enable Auto apply to current character and press the OK button to see the new morph in action.
Set Slider Path: Puts the slider in a custom subpath or let it be available under the body part parent path.
Morph Name: Please fill this out with a unique name.
Min. Morph Value: The minimum morph slider value from 0 to -100.
Max. Morph Value: The maximum morph slider value from 1 to 100.
Thumbnail: Assign a square image here if so desired.
Auto apply to current character: After the custom slider is created, its values will be set to max to preview the morph shape on the current character.
OK: Click to create the custom morph slider.
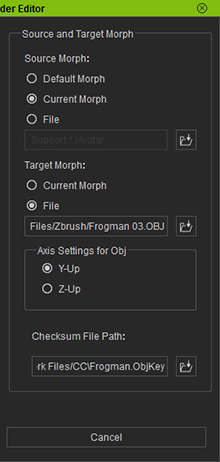
Target Morph: Set the morph target shape for the slider. Current Morph will gather all of the used morphs into one convenient slider. If you have customized a morph target in a third party application, you should use File to load it in.
Axis Settings for Obj: Applies for the Target Morph > File option. It should match the coordinate system settings of your third party application.
Checksum File Path: Load the ObjKey that was exported with the OBJ body shape file from the previous sections.
Cancel: Click to exit the Morph Editor without creating the custom morph slider.
 The slider thumbnail is cropped around the edges and saved in transparent PNG format.
Note:
- If so desired, you can separate the character morph into head and body morph for more flexible recombination of the morph sliders.
- You can acquire the slider thumbnail templates in the CC installation directory under \Reallusion\Character Creator 2 for iClone\Image\ where you will find Thumbnail_Template_Blank.png and Thumbnail_Template_Male.png.
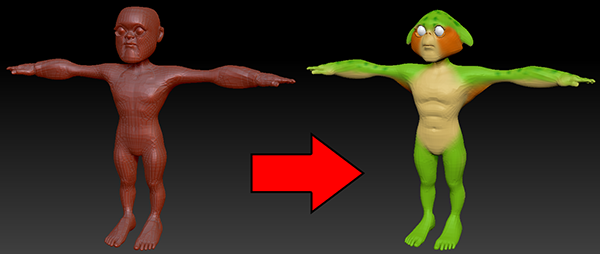
Refining the Custom Morph
The first time that you apply a custom morph is rarely perfect. We'll still need to make some adjustments such as resizing and moving the eyeballs to fit and checking if the upper and lower teeth are in the right places,
- With the custom character loaded in CC, zoom in on the face and perform Edit > Open Mouth to preview the position of the upper and lower teeth.
- Drill down to Modify > Morphs > Actor > Head > Cavity and adjust the size and position of the upper and lower teeth to match the size and position of the mouth.
- Select Eye and type in "eyeball" in the search box on the right pane of the Modify panel.
- Adjust the size and position of the left and right eyeballs to match the eye sockets of the custom character.
- Select Actor Parts > CC_Base_Eye and perform Appearance > Activate Appearance Editor.
- Drill down to CC_Base_Eye > Eye > Eye Ambient Occlusion and readjust the parameters to better fit the shape of the eye sockets.
- Continue to adjust the look of the eyeballs to your heart's content.
 The refining process can be essential for exaggerated characters.
Your character may be highly exaggerated around the eyes making it unsuitable for eyelashes. You can turn them off by doing the following:
- Select Modify > Morphs > Head > Eye and type in "Eyelash" into the search box on the right pane.
- Maximize both the Eyelash Hide Layer 1 and Eyelash Hide Layer 2 sliders.