Content Dev:CTA Accessories
- Main article: CTA Asset.
Before you Begin
Introduction to Accessories
Previously, Accessories were considered the same as Props; wherein, it must be applied onto a parent bone inside the Composer to behave like an accessory. In contrast, the new Accessory format inside CTA 3.2 allows for quick application of accessories via double-clicking. For example: Double-clicking on a pair of glasses accessory will automatically apply it to the nose of the character.
| Comparison Table | Prop Format | Accessory Format |
|---|---|---|
| Extension Name | *.ctProp | *.ctAcc |
| Content Location | Content Manager > Prop | Content Manager > Actor > Accessory |
| Saves Positioning | NO: Needs to be dragged and dropped onto the character. |
YES: Double click to apply to a predetermined position on the body. |
| Method for Saving | Prop Tab > save as Prop: Positioning data will be cleared. |
Accessory Tab > save as Accessory: Positioning data will be recorded. |
Basic Workflow
- Prepare the art materials.
- Create motion and establish the visual style.
- Save the motion in the Action Menu.
- Save the file as (*.ctProp).
- Set the position of the Prop on the character.
- Save the Prop as (*.ctAcc).
Step 2 & 3 are optional.
Software & Tools
| Software | Version | Usage |
|---|---|---|
| Adobe Illustrator | CC and above | Create vector art. |
| Animate CC | Save the vector drawings as SWF. | |
| CTA3 | 3.2 and above | Create the Accessory and set the attachment point. |
Content Creation Process
Drawing Precautions
- Make sure to have the style and tone determined beforehand.
- Draw the vector art in Illustrator
- Determine if the vector path needs to be set as Outline Stroke and set according to your needs.
- Bring the vector image into Flash and export a SWF file.
- Import the SWF file into CTA and open the Render Style menu to verify the Show outline settings.
Outline Stroke vs Regular Path
You can enable Outline Stroke in Illustrator via Object > Path > Outline Stroke.
 Outline Stroke turns the path into a shape.
- When Outline Stroke is applied, the Show outline option will also be enabled inside CTA.
- The opposite is true when Outline Stroke not applied.
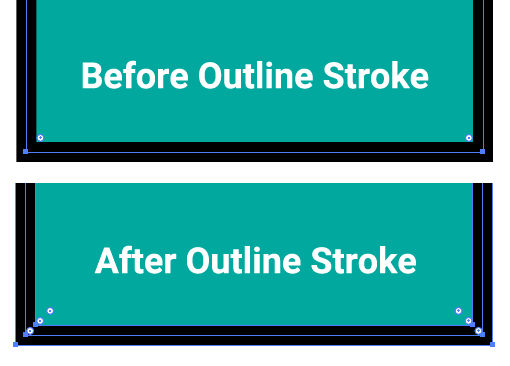
 Before Outline Stroke the Show outline option in CTA is disabled.
 After Outline Stroke the show outline option in CTA is enabled.
- When Show outline is enabled, the stroke will not scale with the object. Instead, it will maintain the same thickness.
- When Show outline is disabled, the stroke will scale with the object; causing it to get thinner and thicker in line with the scale of the object.
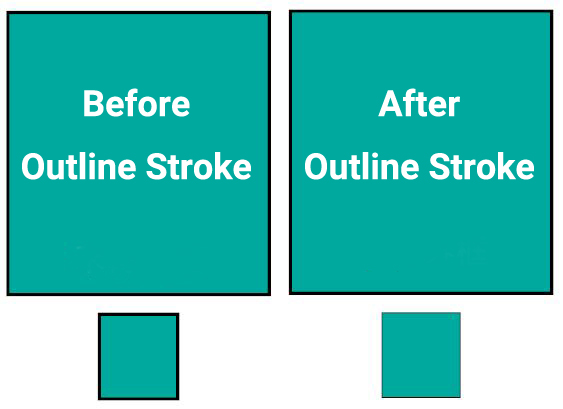 Left side box has Show outline enabled; the right side box does not.
Assembling the Parts
CTA 3.2 has a new tools for making composite Accessories with parts that carry motion. These motions can then be saved in the Action Menu with the ability of motions with the same names triggering at the same time. Parts creation process is the same as that of Props; for more details, take a look at the Prop Creation Process. A summary of the process is as follows:
- Drawn parts should be brought into Flash and exported as SWF.
- Bring the SWF file into CTA and save as a Prop.
- Create the motion for the parts according to your needs.
- Save the motion in the Action Menu.
- Save the file and create a thumbnail.
Accessory Creation Workflow
Ordinary Accessories
Regular Accessories can be made from props that have designated attachment points. Using the glasses as an example, you can set the attachment point by:
- Open a character and enter into the Composer.
- Drag and drop the glasses onto the nose.
- Further adjust the positioning of the glasses along with its scale values.
- Save the Prop via Content Manager > Actor > Accessory to finish.
Now you can double-click on the glasses accessory and it should snap onto the attachment point on the nose.

Compound Accessories
Compound Accessories can be composed of several parts; with each part able to carry motion. Hair compound accessory will be used in the examples below.
Creating Motions for Individual Parts
- Create the motion according to your needs.
- Use Collect Clip to export the motion.
- Save the motion in the Action Menu.
- Save the file in the Prop section.
Composing the Parts and Setting Attachment Points
There are two ways to compose a compound Accessory: in the Actor Composer or the Prop Composer.
Assembling in the Actor Composer
- Open an actor and enter the Composer mode.
- Delete the original hair.
- Drag and drop the scalp onto the character's head (the scalp will become the parent for the hair).
- Drag and drop the other parts of the hair over the scalp.
- Adjust their positioning, layer order, etc.
- Select each hair part and perform Attach to the scalp.
- Once assembled, save the object via Content Manager > Actor > Accessory.

Assembling in the Prop Composer
- Drag and drop the scalp onto the stage and enter the Composer mode.
- Drag and drop other parts for the hair and adjust the size and positioning.
- Once assembled, save the item as a Prop and go back to the stage.
- Open a character and enter the Composer mode.
- Take out the original hair of the character.
- Drag and drop the hair Prop that was just made onto the character.
- Adjust the Prop's size, positioning, etc.
- Save the Prop under Content Manager > Actor > Accessory.