Difference between revisions of "Content Dev:CTA Actor Publication"
(Created page with "{{Parent|Content Dev:CTA Actor|CTA Actor Creation}} The following information will help you save content in CrazyTalk Animator format and use the Uploader to bring it into th...") |
(→Sending Content to the Marketplace via the Uploader) |
||
| Line 13: | Line 13: | ||
== Sending Content to the Marketplace via the Uploader == | == Sending Content to the Marketplace via the Uploader == | ||
| + | |||
| + | Currently, any content that is to be sold on the Marketplace needs to be sent via the [https://city.reallusion.com/upload.html Content Uploader]. You can edit and save your content information before uploading, and once you upload the content, it will be accessible from your Marketplace account backend so you don’t have to wait for approval before you begin selling. Aside from the content files, you can set the name, description and price of the specific content, and upload all the promotional materials at the same time. | ||
| + | |||
| + | '''Step 1)''' Start the Uploader. | ||
| + | |||
| + | '''Step 2)''' Assign the Subfolder, which will be the categorical placement of the asset inside CTA's Content Manager to your local disk. | ||
| + | |||
| + | [[File:CTA Publish subfolder ex.png|none|frame|link=|'''Assign Subfolder:'''<br>'''Category''': Character | ||
| + | <br>'''Pack Name''': You can designate the item as part of a pack.]] | ||
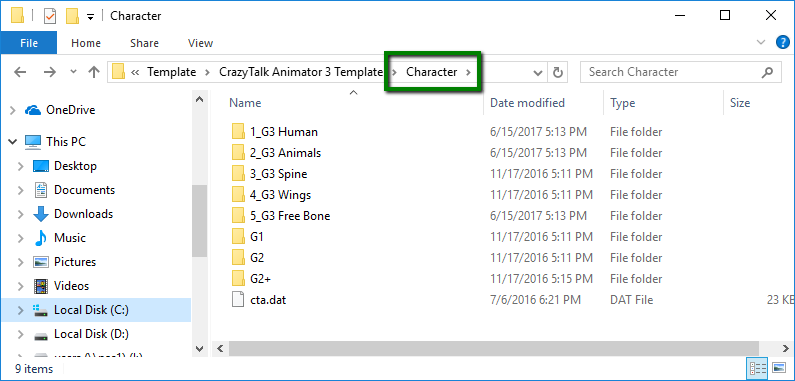
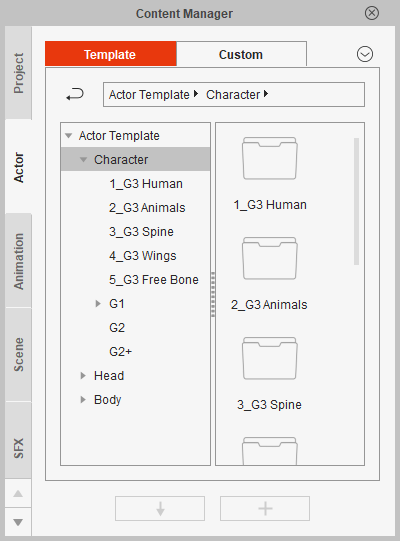
| + | [[File:CTA Publish local disk.png|none|frame|link=|The categorical placement of the asset inside CTA's Content Manager to your local disk.]] | ||
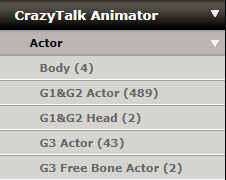
| + | [[File:CTA Publish character sub menu.png|none|frame|link=]] | ||
| + | |||
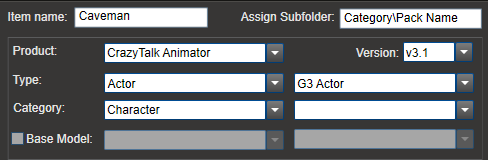
| + | '''Step 3)''' Select the right category when uploading. | ||
| + | |||
| + | [[File:CTA Publish uploader character.png|none|frame|link=|'''Type''' is the category of the asset when it is uploaded to the Marketplace.]] | ||
| + | [[File:CTA Publish type actor.png|none|frame|link=]] | ||
Revision as of 23:07, 24 July 2017
- Main article: CTA Actor Creation.
The following information will help you save content in CrazyTalk Animator format and use the Uploader to bring it into the Marketplace.
Create Content via CrazyTalk Animator Pipeline
To export CTA character from CrazyTalk Animator Pipeline, please select the character, and press the "+" icon on the right category of Content Manager. Once the content was successfully saved under the “Custom” zone, right click on the content to find the file. Take saving .ctTBactor for example:


Sending Content to the Marketplace via the Uploader
Currently, any content that is to be sold on the Marketplace needs to be sent via the Content Uploader. You can edit and save your content information before uploading, and once you upload the content, it will be accessible from your Marketplace account backend so you don’t have to wait for approval before you begin selling. Aside from the content files, you can set the name, description and price of the specific content, and upload all the promotional materials at the same time.
Step 1) Start the Uploader.
Step 2) Assign the Subfolder, which will be the categorical placement of the asset inside CTA's Content Manager to your local disk.
Category: Character
Pack Name: You can designate the item as part of a pack.
Step 3) Select the right category when uploading.