Difference between revisions of "Content Dev:CTA Uploader"
Chuck (RL) (Talk | contribs) m (→Uploader User Interface) |
Chuck (RL) (Talk | contribs) m (→Uploader User Interface) |
||
| Line 23: | Line 23: | ||
{| | {| | ||
|{{Single_Illustration|CTA_Uploader_UI_Shrunk.png}} | |{{Single_Illustration|CTA_Uploader_UI_Shrunk.png}} | ||
| − | |style="width: | + | |style="width:500px"| |
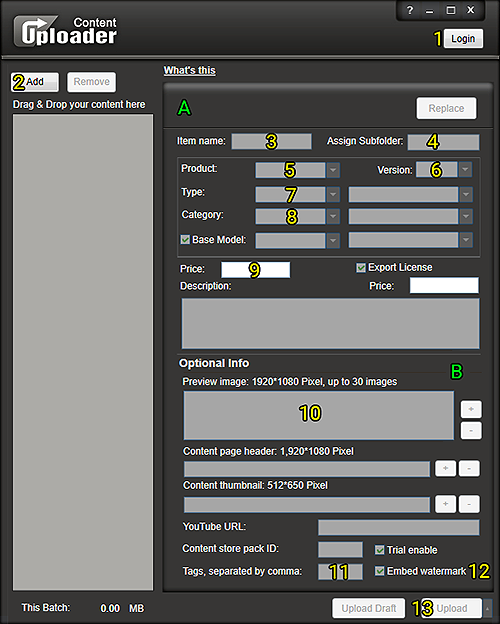
| − | A) Required information section. | + | '''A)''' Required information section. |
| − | B) Optional informations section. | + | '''B)''' Optional informations section. |
| − | + | '''1) Login:''' Enter your account name and password to begin the upload process. | |
| − | + | '''2) Add:''' choose the iContent that you want to upload, or drag the iContent onto this button. | |
| − | + | '''3) Item name:''' is the name on the website. Changing this value doesn't effect the actual content that is uploaded. | |
| − | + | '''4) Assign Subfolder:''' The installation directory for this content. Best practice is to use your brand name first and pack name second, for example: "Sappan Designs \ Speech Bubbles". | |
| − | + | ||
| − | When you start to upload content, | + | '''5) Product:''' Application type for the content. |
| − | + | ||
| + | '''6) Version:''' Application version that was used to create this content. | ||
| + | |||
| + | '''7) Type:''' Corresponds with the type of organization in the Marketplace (will affect installation path). | ||
| + | |||
| + | '''8) Category:''' Corresponds with the category organization in the Marketplace. | ||
| + | |||
| + | '''9) Price:''' Decide how much your content is worth. Usually, one actor is worth 300 DA points and one prop is 60 DA points. | ||
| + | |||
| + | '''10) Preview image:''' the same preview images can be used for all items of a single content pack. | ||
| + | |||
| + | '''11) Tags:''' helps to categorize items for the search function. We suggest using pack and item names. | ||
| + | |||
| + | '''12) Embed Watermark:''' Remember to check this option for DRM protection. | ||
| + | |||
| + | '''13) Upload:''' When you start to upload content, make sure to check "Upload and hide from my store", otherwise, the published items can not be removed from the store. | ||
| + | |} | ||
Revision as of 20:40, 5 December 2017
- Main article: Content Development.
General Process
- Finish your content with Reallusion approval.
- Finish your commercialization images with Reallusion approval.
- Upload the final content.
- Assemble the pack in the Marketplace.
- Download your own content for testing.
The Uploader
You can download the "Uploader" from https://city.reallusion.com/upload.html
The instructions are on the same download page.
Uploader User Interface
|
|
A) Required information section. B) Optional informations section. 1) Login: Enter your account name and password to begin the upload process. 2) Add: choose the iContent that you want to upload, or drag the iContent onto this button. 3) Item name: is the name on the website. Changing this value doesn't effect the actual content that is uploaded. 4) Assign Subfolder: The installation directory for this content. Best practice is to use your brand name first and pack name second, for example: "Sappan Designs \ Speech Bubbles". 5) Product: Application type for the content. 6) Version: Application version that was used to create this content. 7) Type: Corresponds with the type of organization in the Marketplace (will affect installation path). 8) Category: Corresponds with the category organization in the Marketplace. 9) Price: Decide how much your content is worth. Usually, one actor is worth 300 DA points and one prop is 60 DA points. 10) Preview image: the same preview images can be used for all items of a single content pack. 11) Tags: helps to categorize items for the search function. We suggest using pack and item names. 12) Embed Watermark: Remember to check this option for DRM protection. 13) Upload: When you start to upload content, make sure to check "Upload and hide from my store", otherwise, the published items can not be removed from the store. |