Content Dev:IC Maya Motion to iClone
- Main article: iClone.
Introduction
Important Precautions and Settings
- Make sure the FPS (frames per second) is set to 60.
- Use FBX 2012 to 2018 for export.
- Don't alter the skeleton proportions, e.g. scaling and stretching.
- Don't alter the skeleton bone names.
- Don't add or remove skeleton bones.
Simple Workflow
- Export an iAvatar from iClone 7 with the Maya preset.
- Import the iAvatar into Maya.
- Use the preexisting skeleton to adjust the motion.
- Bake the motion onto the skeleton and export the character in FBX.
- Bring the character into 3DXchange, re-target it to a Non-Standard character, and save as RLMotion.
- Open the same character in iClone 7 and apply the saved RLMotion.
- Check if the motion is consistent with the animation in Maya.
Provisional Files
We provide some pre-configured files to help you bring Maya animations into iClone. You can download them here.
- Ready to animate.mb: ready-to-use 2020 MB (Maya Binary) file for adjusting motion.
- mapping data.3dxProfile: 3DXchange mapping data for Maya exported motion FBX.
- Character.iAvatar: iAvatar character that can be used with iClone.
Usage Method
1) Inside Maya, perform Menu > Open Scene and select the provided Ready to animate.mb file.
If the imported character is laying flat on the floor then change Settings > World Coordinate System to Y under Windows > Settings/Preferences > Preferences.
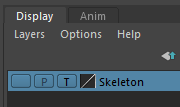
2) Too prevent us from moving the skeleton, we'll need to set the Display status to Template inside the Layer settings.
Motion Creation and Precautions
Control Rig Introduction
- Animate with the provided HumanIK system. You can also use a rigging system of your choice.
Wikipedia describes IK/FK with the following passage: In computer animation and robotics, inverse kinematics is the mathematical process of calculating the variable joint parameters needed to place the end of a kinematic chain, such as a robot manipulator or animation character's skeleton, in a given position and orientation relative to the start of the chain. Given joint parameters, the position and orientation of the chain's end, e.g. the hand of the character or robot, can typically be calculated directly using multiple applications of trigonometric formulas, a process known as forward kinematics. However, the reverse operation is, in general, much more challenging.
- The HumanIK system allows you to select controls within the view-port and the side panel. Selecting from the side panel is recommended because it makes it less likely that something will be mistakenly selected.
- The Character and Source settings have already been set. Under normal circumstances, these settings should be left untouched.
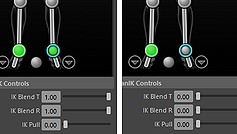
- The HumanIK includes both the IK and FK control modes, and it's possible to blend between the two with the IK Blend T/R attribute, with 0 as full FK and 1 as full IK.
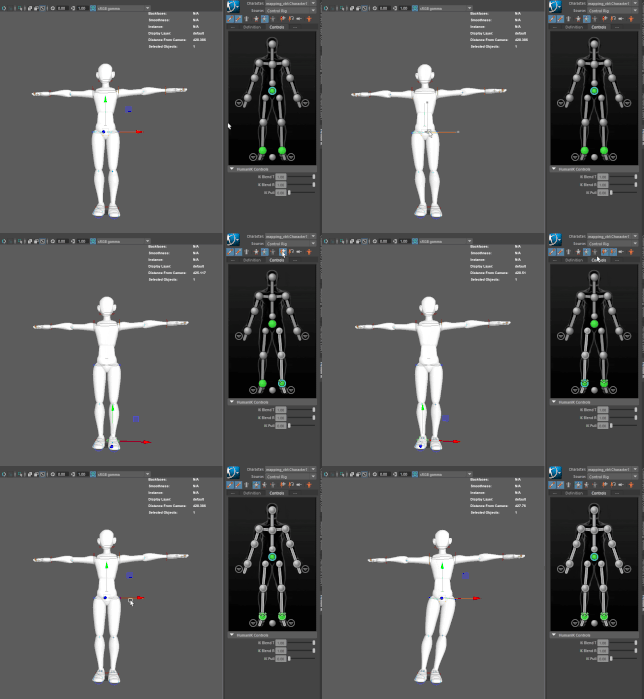
- You can use pins to lock the body parts in place. For example, both feet will be lifted when the hip is moved, however, when Pin Translation/Rotation is applied to both feet then they will stay locked in place when the hip is pulled.
Note: Full Body mode has to be on in order for the pins to take effect.
Applying Human IK System in Maya
1) With the target character loaded in iClone 7, perform File > Export > Export FBX with the preset set the Maya.
2) Import the exported target character into Maya.
3) Switch Maya's mode to Rigging and select Skeleton > HumanIK to input a HumanIK skeleton.
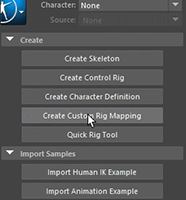
4) Press on the Create Custom Rig Mapping button to the right and click on Define' in the subsequent pop-up window.
5) In order to map iClone bones to HumanIK, you'll need to click twice on the target bone in the mapping window and select the corresponding bone in the view-port.
Using X-Ray mode is recommended to better access the joints.
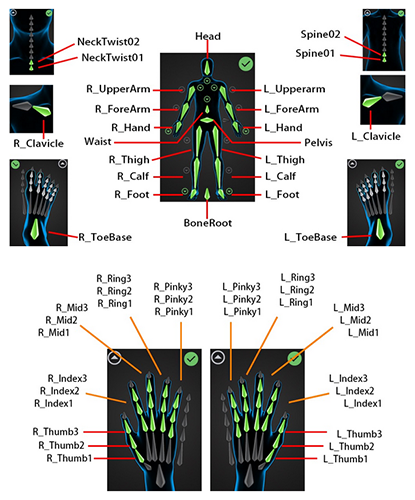
6) Map the entire body including the feet, fingers, spine, shoulders, neck, and other miscellaneous bones.
Beware: Even though automatic detail settings for the fingers are available, it will often cause the hand bones to offset.
7) Once the mapping is complete, press the Lock Skeleton Definition button on top, then click on the Create Control Rig button to the right of it. This will implement the control rig onto the iClone character.
Animation Precautions
- Make sure the FPS is set to 60.
- Animation keys should be applied to the control rig and not directly onto the skeleton bones. The skeleton is locked and invisible by default (do not alter these settings, unless under special circumstances).
- Squash and stretch animations should be avoided because it is not supported in iClone. Not only is the effect not able to import into iClone, but it can also cause some unexpected errors as well.
- You can use Maya's Graph Editor to help adjust animations.
File Export and Inspection
Exporting FBX from Maya
1) Select all of the bones (115 in total) and the meshes.
Note: Do not select any of the rig controls, custom bones, and Biped objects.
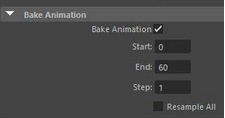
2) Open File > Export Selection > File type > FBX export and enable Bake Animation under Edit Preset > Animation.
3) Set Edit Preset > FBX File Format to FBX 2018 (any version from 2012 to 2018 is recommended).
4) Once the settings are complete, export the character.
RL Motion Conversion
1) Import the previously exported FBX file into 3DXchange with default import settings.
2) Press the Convert to Non-Standard button in the right Modify > Character menu.
3) Click on Load on the top right corner, select a RL mapping data file, and press the Convert button below.
4) Perform File > Export, enable Export Animation, and click on the OK button below to export a RL motion file.
Batch Export
1) Once the character is converted, drag a FBX for export from the Modify > Animation menu to the right.
2) Drag more animations to the Motion Library section, and click on Add All to Perform and all of the motions for export will show up inside Perform Editor.
3) Perform File > Export, enable Export Animation, and click on the OK button below to export all of the RL motion files.
Checking Animation Consistency in iClone
1) Open iClone and drag the character (*.iAvatar) into the view-port.
2) Drag the RL motion that was just exported onto the character or onto the timeline.
3) Check if the motions are different from the results in Maya.
Verification Process
1) Please provide the RL motion and Maya (*.mb) file.
2) Once an RL representative has reviewed your files, he/she will offer feedback when needed.

