Difference between revisions of "Content Dev:CC Morph Creation"
From Reallusion Wiki!
Chuck (RL) (Talk | contribs) (Created page with "{{TOC}} {{Parent|Content_Development#CC_Avatar|CC Avatar}} == Starting Out == === Creating the neutral figure === Character Creator (CC) does not provide a neutral body sh...") |
Chuck (RL) (Talk | contribs) m (→Concept phase) |
||
| Line 25: | Line 25: | ||
=== Concept phase === | === Concept phase === | ||
| + | |||
| + | We strongly recommend concept drawing before 3D modeling as separating the concept and execution phase can save you time on bungling with really complicated software. | ||
| + | |||
| + | To create a simple concept image: | ||
| + | |||
| + | #Load the neutral template file in CC and turn the camera to face the figure. | ||
| + | #Screen grab or capture the neutral character and paste the image in an image editor like Photoshop. | ||
| + | #Create an empty layer on top of the figure and draw the look of the creature. | ||
| + | #Save the drawing for reference in CC. | ||
| + | #You can choose to generate images of different views such as the side and back. | ||
| + | |||
| + | {{Single_Illustration|Morph_Creation_Concept_Art.png|The neutral template becomes a semi-transparent background for the final concept image.}} | ||
| + | |||
| + | Note: | ||
| + | |||
| + | *Style is very much a matter of proportions, especially the head to body ratio. | ||
| + | *The point of concept drawing and model sheets is to save time by taking out the guesswork. | ||
| + | *Every minute spend conceptualizing can save 3 minutes in the production phase. | ||
| + | |||
| + | == Creating the Morph Target == | ||
| + | |||
| + | === Morphing the base shape === | ||
Revision as of 01:32, 8 August 2017
- Main article: CC Avatar.
Starting Out
Creating the neutral figure
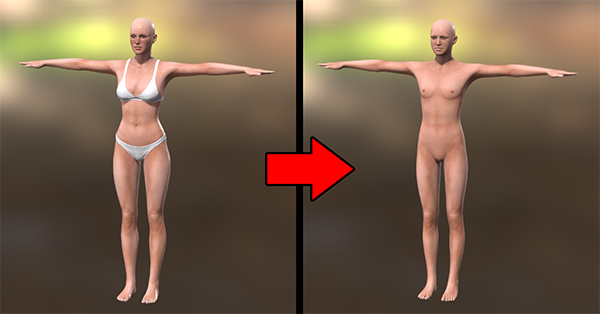
Character Creator (CC) does not provide a neutral body shape. This is inconvenient because morph targets should be derived from a neutral form without the interference of other morph shapes. Starting from a neutral body gives the morph target the most flexibility when it comes to mix and matching with other morph shapes.
Reallusion provides the neutral body shape at Templates or you can make your own:
- Open CC and proceed to delete all the clothing on the default figure.
- Select Currently Used under Modify > Morphs and click on the Reset button near the bottom of the panel.
- Click on Appearance > Activate Appearance Editor to edit the body textures.
- For every Appearance Editor setting, double-click on the label to reset the parameter.
- Now you have the neutral template complete, save the Project for later reuse.
 Neutral body should be devoid of morphs and customizations in the Appearance Editor.
Note:
- Wiping out the Appearance Editor settings is not necessary but makes for a cleaner neutral template.
- You can reuse the neutral template file whenever you need to make a custom morph target shape.
Concept phase
We strongly recommend concept drawing before 3D modeling as separating the concept and execution phase can save you time on bungling with really complicated software.
To create a simple concept image:
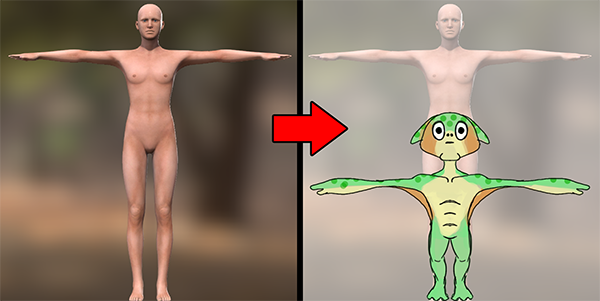
- Load the neutral template file in CC and turn the camera to face the figure.
- Screen grab or capture the neutral character and paste the image in an image editor like Photoshop.
- Create an empty layer on top of the figure and draw the look of the creature.
- Save the drawing for reference in CC.
- You can choose to generate images of different views such as the side and back.
 The neutral template becomes a semi-transparent background for the final concept image.
Note:
- Style is very much a matter of proportions, especially the head to body ratio.
- The point of concept drawing and model sheets is to save time by taking out the guesswork.
- Every minute spend conceptualizing can save 3 minutes in the production phase.

