Difference between revisions of "IC Python API:Align to Camera"
Chuck (RL) (Talk | contribs) m (→Required Modules) |
Chuck (RL) (Talk | contribs) m (→Creating the UI) |
||
| Line 51: | Line 51: | ||
== Creating the UI == | == Creating the UI == | ||
| + | |||
| + | [[File:Ic_python_api_align_to_camera_02.png|frame]] | ||
We'll need to load the configured QT UI file. You can download '''Align_to_Camera.ui''' [[Media:Align_to_Camera.ui | here]] -make sure this UI file is placed in the same script directory. | We'll need to load the configured QT UI file. You can download '''Align_to_Camera.ui''' [[Media:Align_to_Camera.ui | here]] -make sure this UI file is placed in the same script directory. | ||
Revision as of 22:50, 21 August 2019
- Main article: RL Python Samples.
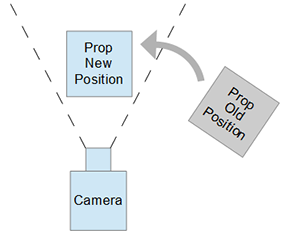
This article will go over a script that can align props in front of the current camera based on a user defined distance. We will go over using transform matrix calculations required to position and rotate world-space objects into transform space locations and orientations.
Required Modules
Besides the fundamental Reallusion Python module, we'll also need Pyside2 and os to read the QT UI file and build the user interface.
import RLPy
import os
from PySide2 import *
from PySide2.shiboken2 import wrapInstance
Align to Camera Function
The crux of this example is the calculation of the offset transformations based on another object's transform-space. This calculation is performed by the formula: offset matrix (local-space) x transform matrix = offset matrix (world-space). For simplicity, we will not be taking the object's scale into account. This is to say that this script will always reset the target prop size to 100 x 100 x 100.
def align_to_camera():
    items = RLPy.RScene.GetSelectedObjects()

    if len(items) > 0:
        if items[0].GetType() == RLPy.EObjectType_Prop:

            # Get the transform matrix of the current camera
            camera = RLPy.RScene.GetCurrentCamera()
            camera_transform = camera.WorldTransform()
            transform_matrix = camera_transform.Matrix()

            # Create a transform matrix for the offset values with no rotations
            offset_matrix = RLPy.RMatrix4()
            offset_matrix.MakeIdentity()
            offset_matrix.SetTranslate(RLPy.RVector3(0, 0, -widget.distance.value()))

            # Move the offset matrix into transform space of the camera by multiplying the two matrices
            transform_matrix = offset_matrix * transform_matrix

            # Create a new transform from the matrix values
            new_transform = RLPy.RTransform()
            new_transform.From(transform_matrix)

            # Apply the transform to the first selected prop
            transform_control = items[0].GetControl("Transform")
            transform_control.SetValue(RLPy.RGlobal.GetTime(), new_transform)
Creating the UI
We'll need to load the configured QT UI file. You can download Align_to_Camera.ui here -make sure this UI file is placed in the same script directory.
window = RLPy.RUi.CreateRDialog()
window.SetWindowTitle("Align Prop to Camera")

dialog = wrapInstance(int(window.GetWindow()), QtWidgets.QDialog)
dialog.setFixedWidth(350)

qt_ui_file = QtCore.QFile(os.path.dirname(__file__) + "/Align_to_Camera.ui")
qt_ui_file.open(QtCore.QFile.ReadOnly)
widget = QtUiTools.QUiLoader().load(qt_ui_file)
qt_ui_file.close()

dialog.layout().addWidget(widget)

widget.pushButton.clicked.connect(align_to_camera)

window.Show()
Everything Put Together
You can copy and paste the following code into a PY file and load it into iClone via Script > Load Python.
import RLPy
import os
from PySide2 import *
from PySide2.shiboken2 import wrapInstance


def align_to_camera():
    items = RLPy.RScene.GetSelectedObjects()

    if len(items) > 0:
        if items[0].GetType() == RLPy.EObjectType_Prop:

            # Get the transform matrix of the current camera
            camera = RLPy.RScene.GetCurrentCamera()
            camera_transform = camera.WorldTransform()
            transform_matrix = camera_transform.Matrix()

            # Create a transform matrix for the offset values with no rotations
            offset_matrix = RLPy.RMatrix4()
            offset_matrix.MakeIdentity()
            offset_matrix.SetTranslate(RLPy.RVector3(0, 0, -widget.distance.value()))

            # Move the offset matrix into transform space of the camera by multiplying the two matrices
            transform_matrix = offset_matrix * transform_matrix

            # Create a new transform from the matrix values
            new_transform = RLPy.RTransform()
            new_transform.From(transform_matrix)

            # Apply the transform to the first selected prop
            transform_control = items[0].GetControl("Transform")
            transform_control.SetValue(RLPy.RGlobal.GetTime(), new_transform)


window = RLPy.RUi.CreateRDialog()
window.SetWindowTitle("Align Prop to Camera")

dialog = wrapInstance(int(window.GetWindow()), QtWidgets.QDialog)
dialog.setFixedWidth(350)

qt_ui_file = QtCore.QFile(os.path.dirname(__file__) + "/Align_to_Camera.ui")
qt_ui_file.open(QtCore.QFile.ReadOnly)
widget = QtUiTools.QUiLoader().load(qt_ui_file)
qt_ui_file.close()

dialog.layout().addWidget(widget)

widget.pushButton.clicked.connect(align_to_camera)

window.Show()
APIs Used
You can research the following references for the APIs deployed in this code.


