Difference between revisions of "IC Python API:Linear Interpolation"
Chuck (RL) (Talk | contribs) m (→Required Modules) |
Chuck (RL) (Talk | contribs) m |
||
| (9 intermediate revisions by the same user not shown) | |||
| Line 1: | Line 1: | ||
| + | {{TOC}} | ||
| + | {{Parent|IC_Python_API#Python_of_the_Month|Python of the Month}} | ||
| + | |||
This article will introduce the concept of linear interpolation and it's usefulness. This lesson will use linear interpolation to build a staircase and customize it with simple to understand attributes. | This article will introduce the concept of linear interpolation and it's usefulness. This lesson will use linear interpolation to build a staircase and customize it with simple to understand attributes. | ||
| Line 24: | Line 27: | ||
== Creating a Box Prop == | == Creating a Box Prop == | ||
| + | |||
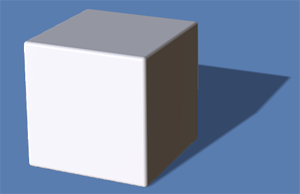
| + | [[File:Ic_python_api_linear_interpolation_01.png|frame|This code will yield a building block for the staircase.]] | ||
We'll need to create a box prop for constructing the staircase. This box prop will be used to construct the steps and the skirts (side panels) of the staircase. | We'll need to create a box prop for constructing the staircase. This box prop will be used to construct the steps and the skirts (side panels) of the staircase. | ||
| Line 39: | Line 44: | ||
box_db = box_control.GetDataBlock() | box_db = box_control.GetDataBlock() | ||
</syntaxhighlight> | </syntaxhighlight> | ||
| + | |||
| + | == Parameters == | ||
| + | |||
| + | We can drive the construction of the staircase with a few attributes. These attributes can then be used to create a variety of staircases. | ||
| + | |||
| + | <syntaxhighlight lang="Python"> | ||
| + | height = 2 # Total height of the entire staircase | ||
| + | width = 2 # Total width of the entire staircase | ||
| + | depth = 3 # Total depth of the entire staircase | ||
| + | steps = 10 # the number of steps for the staircase | ||
| + | rail = 0.5 # Height of the rail beside the staircase | ||
| + | thickness = 0.05 # Thickness of each step | ||
| + | </syntaxhighlight> | ||
| + | |||
| + | == Construction == | ||
| + | |||
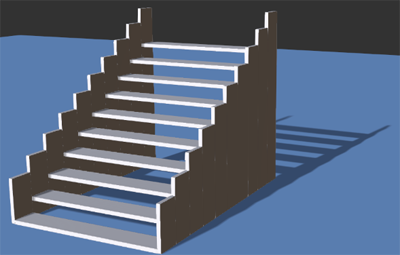
| + | [[File:Ic_python_api_linear_interpolation_02.png|frame|Voila! A staircase out of thin air!]] | ||
| + | |||
| + | Finally, we'll use a loop to create the steps the side skirts for each segment of the staircase. | ||
| + | |||
| + | <syntaxhighlight lang="Python"> | ||
| + | for x in range(0, steps): | ||
| + | t = x/steps | ||
| + | |||
| + | box_db.SetData("Position/PositionX", time, RLPy.RVariant(0)) | ||
| + | box_db.SetData("Position/PositionY", time, RLPy.RVariant(lerp(0, depth * 100, t))) | ||
| + | box_db.SetData("Position/PositionZ", time, RLPy.RVariant(lerp(0, height * 100, t))) # Vertical | ||
| + | box_db.SetData("Scale/ScaleX", time, RLPy.RVariant(width)) # Width | ||
| + | box_db.SetData("Scale/ScaleY", time, RLPy.RVariant(depth / steps)) # Depth | ||
| + | box_db.SetData("Scale/ScaleZ", time, RLPy.RVariant(thickness)) # Height | ||
| + | |||
| + | step = box.Clone() | ||
| + | step.SetName("Step "+str(x+1)) | ||
| + | |||
| + | box_db.SetData("Position/PositionX", time, RLPy.RVariant(width * 50)) | ||
| + | box_db.SetData("Position/PositionZ", time, RLPy.RVariant(0)) # Vertical | ||
| + | box_db.SetData("Scale/ScaleX", time, RLPy.RVariant(thickness)) # Width | ||
| + | box_db.SetData("Scale/ScaleZ", time, RLPy.RVariant(lerp(thickness + rail, height + thickness + rail, t))) # Height | ||
| + | |||
| + | skirt = box.Clone() | ||
| + | skirt.SetName("Skirt_R "+str(x+1)) | ||
| + | |||
| + | box_db.SetData("Position/PositionX", time, RLPy.RVariant(width * -50)) | ||
| + | |||
| + | skirt = box.Clone() | ||
| + | skirt.SetName("Skirt_L "+str(x+1)) | ||
| + | |||
| + | # Remove the initial prop, we don't need it anymore | ||
| + | RLPy.RScene.RemoveObject(box) | ||
| + | </syntaxhighlight> | ||
| + | |||
| + | == Variations == | ||
| + | |||
| + | We can create a diverse set of staircases by adjusting the parameters for construction. | ||
| + | {{Images3 | ||
| + | | image1 = Ic_python_api_linear_interpolation_03.png | ||
| + | | caption1 = height: 2.2, width: 2, depth: 3, steps: 12, rail: 0, thickness: 0.05 | ||
| + | |||
| + | | image2 = Ic_python_api_linear_interpolation_04.png | ||
| + | | caption2 = height: 1, width: 2, depth: 4, steps: 12, rail: 1, thickness: 0.05 | ||
| + | |||
| + | | image3 = Ic_python_api_linear_interpolation_05.png | ||
| + | | caption3 = height: 1.5, width: 2, depth: 4, steps: 8, rail: 0.2, thickness: 0.2 | ||
| + | }} | ||
| + | |||
| + | == Everything Put Together == | ||
| + | |||
| + | You can copy and paste the following code into a PY file and load it into iClone via '''Script > Load Python'''. | ||
| + | |||
| + | <syntaxhighlight lang="Python"> | ||
| + | import RLPy | ||
| + | import os | ||
| + | import winreg | ||
| + | |||
| + | def lerp(value_a, value_b, interpolation): | ||
| + | # Precise method, which guarantees v = v1 when t = 1 | ||
| + | return (1 - interpolation) * value_a + value_b * interpolation | ||
| + | |||
| + | # Get the iClone 7 default template path | ||
| + | registry = winreg.ConnectRegistry(None, winreg.HKEY_LOCAL_MACHINE) | ||
| + | rawKey = winreg.OpenKey(registry, r"SOFTWARE\Reallusion\iClone\7.0") | ||
| + | ic_template_path = os.path.abspath(winreg.QueryValueEx(rawKey, "Template Data")[0]) | ||
| + | |||
| + | # Load beveled Box.iProp and retrieve its control data block | ||
| + | RLPy.RFileIO.LoadFile(ic_template_path + "//iClone Template//Props//3D Blocks//Beveled//Box.iProp") | ||
| + | box = RLPy.RScene.FindObject(RLPy.EObjectType_Prop, "Box") | ||
| + | box_control = box.GetControl("Transform") | ||
| + | box_db = box_control.GetDataBlock() | ||
| + | |||
| + | height = 2 # Total height of the entire staircase | ||
| + | width = 2 # Total width of the entire staircase | ||
| + | depth = 3 # Total depth of the entire staircase | ||
| + | steps = 10 # the number of steps for the staircase | ||
| + | rail = 0.5 # Height of the rail beside the staircase | ||
| + | thickness = 0.05 # Thickness of each step | ||
| + | |||
| + | time = RLPy.RTime(0) | ||
| + | |||
| + | for x in range(0, steps): | ||
| + | t = x/steps | ||
| + | |||
| + | box_db.SetData("Position/PositionX", time, RLPy.RVariant(0)) | ||
| + | box_db.SetData("Position/PositionY", time, RLPy.RVariant(lerp(0, depth * 100, t))) | ||
| + | box_db.SetData("Position/PositionZ", time, RLPy.RVariant(lerp(0, height * 100, t))) # Vertical | ||
| + | box_db.SetData("Scale/ScaleX", time, RLPy.RVariant(width)) # Width | ||
| + | box_db.SetData("Scale/ScaleY", time, RLPy.RVariant(depth / steps)) # Depth | ||
| + | box_db.SetData("Scale/ScaleZ", time, RLPy.RVariant(thickness)) # Height | ||
| + | |||
| + | step = box.Clone() | ||
| + | step.SetName("Step "+str(x+1)) | ||
| + | |||
| + | box_db.SetData("Position/PositionX", time, RLPy.RVariant(width * 50)) | ||
| + | box_db.SetData("Position/PositionZ", time, RLPy.RVariant(0)) # Vertical | ||
| + | box_db.SetData("Scale/ScaleX", time, RLPy.RVariant(thickness)) # Width | ||
| + | box_db.SetData("Scale/ScaleZ", time, RLPy.RVariant(lerp(thickness + rail, height + thickness + rail, t))) # Height | ||
| + | |||
| + | skirt = box.Clone() | ||
| + | skirt.SetName("Skirt_R "+str(x+1)) | ||
| + | |||
| + | box_db.SetData("Position/PositionX", time, RLPy.RVariant(width * -50)) | ||
| + | |||
| + | skirt = box.Clone() | ||
| + | skirt.SetName("Skirt_L "+str(x+1)) | ||
| + | |||
| + | # Remove the initial prop, we don't need it anymore | ||
| + | RLPy.RScene.RemoveObject(box) | ||
| + | </syntaxhighlight> | ||
| + | |||
| + | === APIs Used === | ||
| + | You can research the following references for the APIs deployed in this code. | ||
| + | <div style="column-count:4; -moz-column-count:4; -webkit-column-count:4"> | ||
| + | * [[ IC_Python_API:RLPy_RFileIO#LoadFile | RLPy.RFileIO.LoadFile() ]] | ||
| + | * [[ IC_Python_API:RLPy_RScene#FindObject | RLPy.RScene.FindObject() ]] | ||
| + | * [[ IC_Python_API:RLPy_RTime | RLPy.RTime() ]] | ||
| + | * [[ IC_Python_API:RLPy_RVariant | RLPy.RVariant() ]] | ||
| + | * [[ IC_Python_API:RLPy_RScene#RemoveObject | RLPy.RScene.RemoveObject() ]] | ||
| + | </div> | ||
Latest revision as of 19:37, 18 October 2020
- Main article: Python of the Month.
This article will introduce the concept of linear interpolation and it's usefulness. This lesson will use linear interpolation to build a staircase and customize it with simple to understand attributes.
Required Modules
Besides the rudimentary iClone Python module, we'll also be using os and winreg as a means to import a box prop to build the staircase.
import RLPy
import os
import winreg
Linear Interpoloation (Lerp) Formula
In mathematics, linear interpolation is a method of curve fitting using linear polynomials to construct new data points within the range of a discrete set of known data points. Simply put, linear interpolation can be used to retrieve the location of point along a line. Programmatically, we can reduce the complexity of this formula to simply give us a value between two given values based on far along the line we proceed.
def lerp(value_a, value_b, interpolation):
    # Precise method, which guarantees v = v1 when t = 1
    return (1 - interpolation) * value_a + value_b * interpolation
The interpolation value is always normalized for the size of the line i.e. it is always a value clamped between 0 and 1.
Creating a Box Prop
We'll need to create a box prop for constructing the staircase. This box prop will be used to construct the steps and the skirts (side panels) of the staircase.
# Get the iClone 7 default template path
registry = winreg.ConnectRegistry(None, winreg.HKEY_LOCAL_MACHINE)
rawKey = winreg.OpenKey(registry, r"SOFTWARE\Reallusion\iClone\7.0")
ic_template_path = os.path.abspath(winreg.QueryValueEx(rawKey, "Template Data")[0])

# Load beveled Box.iProp and retrieve its control data block
RLPy.RFileIO.LoadFile(ic_template_path + "//iClone Template//Props//3D Blocks//Beveled//Box.iProp")
box = RLPy.RScene.FindObject(RLPy.EObjectType_Prop, "Box")
box_control = box.GetControl("Transform")
box_db = box_control.GetDataBlock()
Parameters
We can drive the construction of the staircase with a few attributes. These attributes can then be used to create a variety of staircases.
height = 2 # Total height of the entire staircase
width = 2 # Total width of the entire staircase
depth = 3 # Total depth of the entire staircase
steps = 10 # the number of steps for the staircase
rail = 0.5 # Height of the rail beside the staircase
thickness = 0.05 # Thickness of each step
Construction
Finally, we'll use a loop to create the steps the side skirts for each segment of the staircase.
for x in range(0, steps):
    t = x/steps

    box_db.SetData("Position/PositionX", time, RLPy.RVariant(0))
    box_db.SetData("Position/PositionY", time, RLPy.RVariant(lerp(0, depth * 100, t)))
    box_db.SetData("Position/PositionZ", time, RLPy.RVariant(lerp(0, height * 100, t))) # Vertical
    box_db.SetData("Scale/ScaleX", time, RLPy.RVariant(width)) # Width
    box_db.SetData("Scale/ScaleY", time, RLPy.RVariant(depth / steps)) # Depth
    box_db.SetData("Scale/ScaleZ", time, RLPy.RVariant(thickness)) # Height

    step = box.Clone()
    step.SetName("Step "+str(x+1))

    box_db.SetData("Position/PositionX", time, RLPy.RVariant(width * 50))
    box_db.SetData("Position/PositionZ", time, RLPy.RVariant(0)) # Vertical
    box_db.SetData("Scale/ScaleX", time, RLPy.RVariant(thickness)) # Width
    box_db.SetData("Scale/ScaleZ", time, RLPy.RVariant(lerp(thickness + rail, height + thickness + rail, t))) # Height

    skirt = box.Clone()
    skirt.SetName("Skirt_R "+str(x+1))

    box_db.SetData("Position/PositionX", time, RLPy.RVariant(width * -50))

    skirt = box.Clone()
    skirt.SetName("Skirt_L "+str(x+1))

# Remove the initial prop, we don't need it anymore
RLPy.RScene.RemoveObject(box)
Variations
We can create a diverse set of staircases by adjusting the parameters for construction.
-
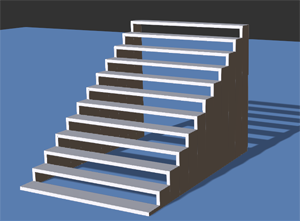 height: 2.2, width: 2, depth: 3, steps: 12, rail: 0, thickness: 0.05
 -
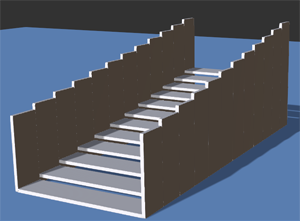 height: 1, width: 2, depth: 4, steps: 12, rail: 1, thickness: 0.05
 -
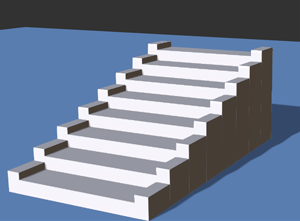 height: 1.5, width: 2, depth: 4, steps: 8, rail: 0.2, thickness: 0.2
Everything Put Together
You can copy and paste the following code into a PY file and load it into iClone via Script > Load Python.
import RLPy
import os
import winreg

def lerp(value_a, value_b, interpolation):
    # Precise method, which guarantees v = v1 when t = 1
    return (1 - interpolation) * value_a + value_b * interpolation

# Get the iClone 7 default template path
registry = winreg.ConnectRegistry(None, winreg.HKEY_LOCAL_MACHINE)
rawKey = winreg.OpenKey(registry, r"SOFTWARE\Reallusion\iClone\7.0")
ic_template_path = os.path.abspath(winreg.QueryValueEx(rawKey, "Template Data")[0])

# Load beveled Box.iProp and retrieve its control data block
RLPy.RFileIO.LoadFile(ic_template_path + "//iClone Template//Props//3D Blocks//Beveled//Box.iProp")
box = RLPy.RScene.FindObject(RLPy.EObjectType_Prop, "Box")
box_control = box.GetControl("Transform")
box_db = box_control.GetDataBlock()

height = 2 # Total height of the entire staircase
width = 2 # Total width of the entire staircase
depth = 3 # Total depth of the entire staircase
steps = 10 # the number of steps for the staircase
rail = 0.5 # Height of the rail beside the staircase
thickness = 0.05 # Thickness of each step

time = RLPy.RTime(0)

for x in range(0, steps):
    t = x/steps

    box_db.SetData("Position/PositionX", time, RLPy.RVariant(0))
    box_db.SetData("Position/PositionY", time, RLPy.RVariant(lerp(0, depth * 100, t)))
    box_db.SetData("Position/PositionZ", time, RLPy.RVariant(lerp(0, height * 100, t))) # Vertical
    box_db.SetData("Scale/ScaleX", time, RLPy.RVariant(width)) # Width
    box_db.SetData("Scale/ScaleY", time, RLPy.RVariant(depth / steps)) # Depth
    box_db.SetData("Scale/ScaleZ", time, RLPy.RVariant(thickness)) # Height

    step = box.Clone()
    step.SetName("Step "+str(x+1))

    box_db.SetData("Position/PositionX", time, RLPy.RVariant(width * 50))
    box_db.SetData("Position/PositionZ", time, RLPy.RVariant(0)) # Vertical
    box_db.SetData("Scale/ScaleX", time, RLPy.RVariant(thickness)) # Width
    box_db.SetData("Scale/ScaleZ", time, RLPy.RVariant(lerp(thickness + rail, height + thickness + rail, t))) # Height

    skirt = box.Clone()
    skirt.SetName("Skirt_R "+str(x+1))

    box_db.SetData("Position/PositionX", time, RLPy.RVariant(width * -50))

    skirt = box.Clone()
    skirt.SetName("Skirt_L "+str(x+1))

# Remove the initial prop, we don't need it anymore
RLPy.RScene.RemoveObject(box)
APIs Used
You can research the following references for the APIs deployed in this code.
