Difference between revisions of "Content Dev:CTA Uploader"
(→Creating Packs in the Marketplace) |
Chuck (RL) (Talk | contribs) m |
||
| (8 intermediate revisions by one other user not shown) | |||
| Line 1: | Line 1: | ||
{{TOC}} | {{TOC}} | ||
| − | + | {{Parent|Content_Dev:Cartoon_Animator|Cartoon Animator}} | |
| − | {{Parent| | + | |
== General Process == | == General Process == | ||
| Line 13: | Line 12: | ||
== The Uploader == | == The Uploader == | ||
| − | You can download the '''Uploader''' application from https:// | + | You can download the '''Uploader''' application from https://developer.reallusion.com/submit.html |
The instructions are on the same download page. | The instructions are on the same download page. | ||
| Line 48: | Line 47: | ||
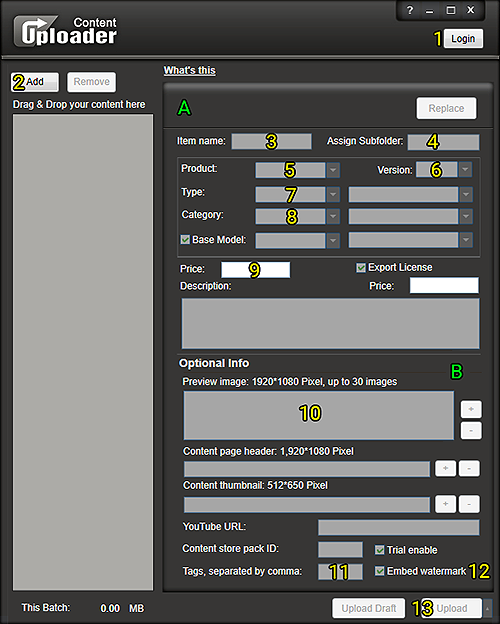
'''11) Tags:''' helps to categorize items for the search function. We suggest using pack and item names. | '''11) Tags:''' helps to categorize items for the search function. We suggest using pack and item names. | ||
<br> | <br> | ||
| − | '''12) Embed Watermark:''' Remember to check this option for DRM protection. | + | '''12) Embed Watermark (auto-enabled):''' Remember to check this option for DRM protection. -- this option has been automatically enabled in Uploader v1.56, no setting is required. |
<br> | <br> | ||
'''13) Upload:''' When you start to upload content, make sure to check "Upload and hide from my store", otherwise, the published items can not be removed from the store. | '''13) Upload:''' When you start to upload content, make sure to check "Upload and hide from my store", otherwise, the published items can not be removed from the store. | ||
<br> | <br> | ||
| − | |||
|} | |} | ||
| + | |||
| + | === Batch Uploade === | ||
| + | You can select multiple content and change their parameters at the same time. | ||
| + | |||
| + | {{Single_Illustration | ||
| + | |CTA_Uploader_Batch.png|| | ||
| + | }} | ||
| + | |||
| + | *If you have a lot of same type items(Characters or props), you can choose all of them and type information (like same subfolder or preview images) one time. | ||
| + | *If you want to input the same information for multiple content entries, you can choose all of the content assets and start editing. Only the information with inputs will be updated, while the other items will stay with the current value. | ||
== Editing Content in the Marketplace == | == Editing Content in the Marketplace == | ||
| Line 66: | Line 74: | ||
'''2) Multi-edit:''' If you want to input the same information for multiple content entries, you can tick off the checkboxes to the left of the contents and click on '''Batch Edit Selected'''. In the following form, you'll notice the copy icon to the right of every entry field. You can click on this icon to replace the entry field of the other selected items with the current value. When you have finished, make sure to click on '''Save and Exit''' to preserve the modifications. | '''2) Multi-edit:''' If you want to input the same information for multiple content entries, you can tick off the checkboxes to the left of the contents and click on '''Batch Edit Selected'''. In the following form, you'll notice the copy icon to the right of every entry field. You can click on this icon to replace the entry field of the other selected items with the current value. When you have finished, make sure to click on '''Save and Exit''' to preserve the modifications. | ||
| + | |||
| + | {{Single_Illustration | ||
| + | |CTA_Uploader_Marketplace_Batch.png|| | ||
| + | }} | ||
{{Notice|Once something is published, it will be sold in the Marketplace and can not be removed.}} | {{Notice|Once something is published, it will be sold in the Marketplace and can not be removed.}} | ||
| Line 89: | Line 101: | ||
Notice for Featured Developers: | Notice for Featured Developers: | ||
{{Single_Illustration | {{Single_Illustration | ||
| − | | | + | |CTA_Uploader_URL2.png|Visit the store page where your Item is located then copy the 20 character ID number by right-clicking the image(s) on the page and select "Inspect". When you create a new pack, please provide your pack's ID to Reallusion and we will create the Content Store PID to connect to your Marketplace PID.|}} |
== Downloading your own Content == | == Downloading your own Content == | ||
| Line 95: | Line 107: | ||
You can download your own content for verification. Follow the steps below to do so: | You can download your own content for verification. Follow the steps below to do so: | ||
| − | {{Single_Illustration| | + | {{Single_Illustration|CTA_Uploader_Download_Content_01_2.png||}} |
#Log into your account for the Marketplace. | #Log into your account for the Marketplace. | ||
| − | #Click on ''' | + | #Click on '''Management Backend'''. |
| − | #Click on ''' | + | #Click on '''Edit Content''' or '''Edit Pack'''. |
| − | + | #Choose the content item or pack that you want to download. | |
| − | + | #Click on '''Download Selected'''. | |
| − | + | ||
| − | + | ||
| − | #Choose the content item or pack that you want to download | + | |
| − | #Click on '''Download | + | |
#A RLContent file will be created, double click it and start to download. | #A RLContent file will be created, double click it and start to download. | ||
#Please check if the items are installed in the correct folder directory. | #Please check if the items are installed in the correct folder directory. | ||
| − | |||
== Replacing Marketplace Content == | == Replacing Marketplace Content == | ||
| Line 122: | Line 129: | ||
{{Single_Illustration | {{Single_Illustration | ||
| − | | | + | |CTA_Uploader_URL2.png|Visit the store page where your Item is located then copy the 20 character ID number by right-clicking the image(s) on the page and select "Inspect".|}} |
Latest revision as of 22:09, 7 June 2021
- Main article: Cartoon Animator.
General Process
- Finish your content with Reallusion approval.
- Finish your commercialization images with Reallusion approval.
- Upload the final content.
- Assemble the pack in the Marketplace.
- Download your own content for testing.
The Uploader
You can download the Uploader application from https://developer.reallusion.com/submit.html
The instructions are on the same download page.
Uploader User Interface
|
|
A) Required information section.
|
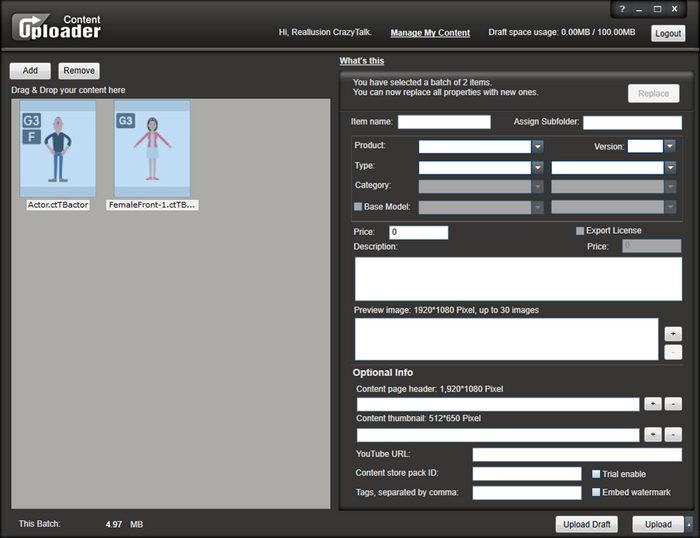
Batch Uploade
You can select multiple content and change their parameters at the same time.
- If you have a lot of same type items(Characters or props), you can choose all of them and type information (like same subfolder or preview images) one time.
- If you want to input the same information for multiple content entries, you can choose all of the content assets and start editing. Only the information with inputs will be updated, while the other items will stay with the current value.
Editing Content in the Marketplace
In order to change modify your content for the Marketplace, you can click on Manage My Content in the Uploader to open the webpage to your Marketplace account. Inside your account, you'll find all of the items that you have uploaded.
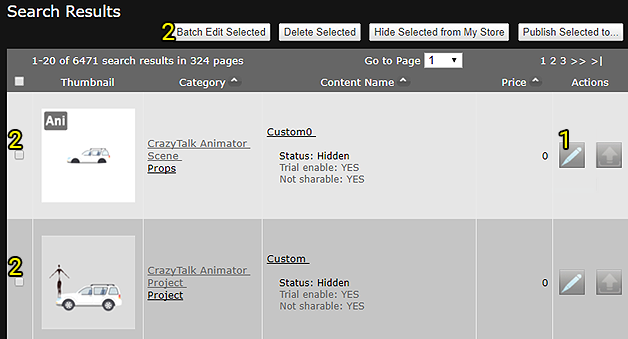
1) Edit: Allows for the editing of prices, names, thumbnails, etc. Once editing is complete, click on Save as Current Status to preserve the changes.
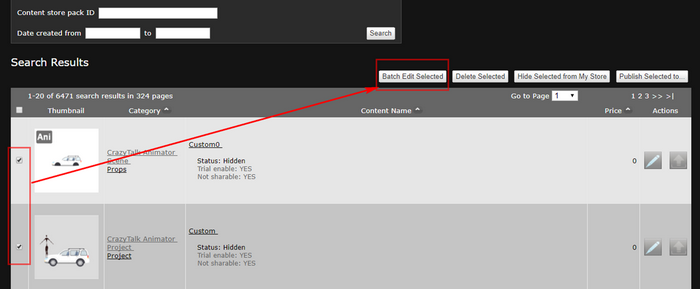
2) Multi-edit: If you want to input the same information for multiple content entries, you can tick off the checkboxes to the left of the contents and click on Batch Edit Selected. In the following form, you'll notice the copy icon to the right of every entry field. You can click on this icon to replace the entry field of the other selected items with the current value. When you have finished, make sure to click on Save and Exit to preserve the modifications.
- ⚠ Once something is published, it will be sold in the Marketplace and can not be removed.
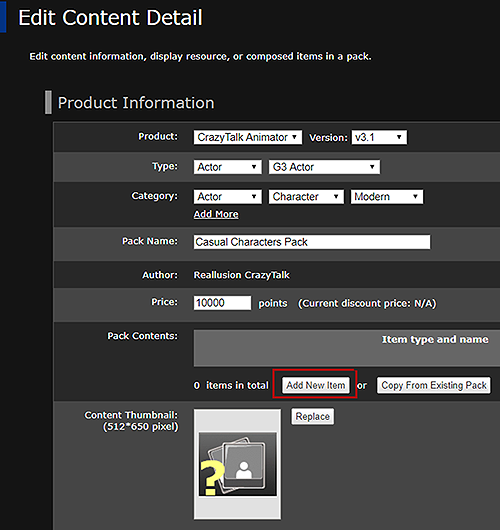
Creating Packs in the Marketplace
Follow the steps below to create a pack for the Marketplace:
|
|
|
- You can find the finished pack by click on Edit Pack on the left-hand side.
- When you click on the thumbnail of the pack, you can see the webpage that you've just created.
Notice for Featured Developers:
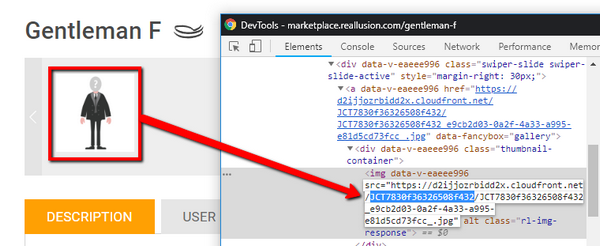 Visit the store page where your Item is located then copy the 20 character ID number by right-clicking the image(s) on the page and select "Inspect". When you create a new pack, please provide your pack's ID to Reallusion and we will create the Content Store PID to connect to your Marketplace PID.
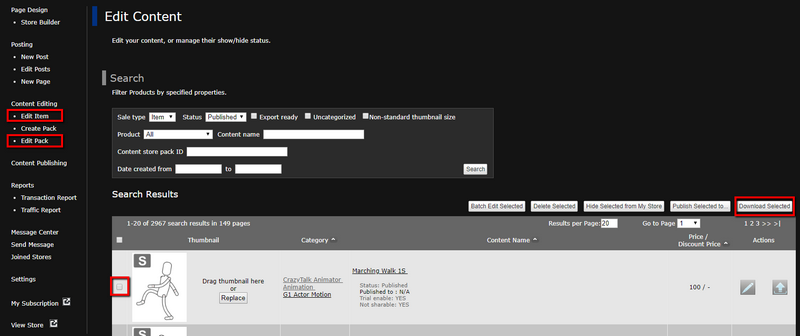
Downloading your own Content
You can download your own content for verification. Follow the steps below to do so:
- Log into your account for the Marketplace.
- Click on Management Backend.
- Click on Edit Content or Edit Pack.
- Choose the content item or pack that you want to download.
- Click on Download Selected.
- A RLContent file will be created, double click it and start to download.
- Please check if the items are installed in the correct folder directory.
Replacing Marketplace Content
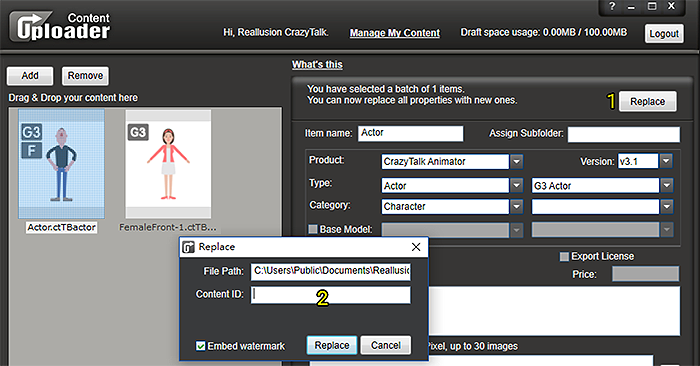
If you have not published your content on the Marketplace or the Content Store, then you still have a chance to modify the content pack by removing and adding items. However, if the content pack is already published, then removing any item from the pack will cause watermarks to appear when the user tries to use it. This is because the specific item ID for the removed item can no longer be found by our servers. Therefore, if you want to adjust the problematic published content, you must use the Replace function.
In order to replace content, retrieve the original files that were used to create your custom content and start to upload the content by using the Content Uploader.
1) Replace: Click on this button to start the replacement process.
2) Item ID: Fill in the appropriate item ID which can be found from the URL of the content pack. Finish up by clicking the Replace button.
 Visit the store page where your Item is located then copy the 20 character ID number by right-clicking the image(s) on the page and select "Inspect".
