Difference between revisions of "Content Dev:CC Morph Creation 3.0"
Chuck (RL) (Talk | contribs) (Created page with "{{TOC}} {{Parent|Content_Dev:CC_Avatar|CC Avatar}} === Step 1 (Reset the Morphs) === {{Text_Block| Prepare a clean avatar (without activated morphs) by pressing the '''Reset...") |
Chuck (RL) (Talk | contribs) m |
||
| (24 intermediate revisions by the same user not shown) | |||
| Line 2: | Line 2: | ||
{{Parent|Content_Dev:CC_Avatar|CC Avatar}} | {{Parent|Content_Dev:CC_Avatar|CC Avatar}} | ||
| − | === Step 1 | + | In order to create a morph slider prior to CC 3.0, one would have to import a rigged FBX file. Post CC 3.0, one can simply input an OBJ file of the base model and the bone structure will automatically reposition themselves with the help of the auto-rig algorithm. |
| + | |||
| + | |||
| + | === Step 1: Resetting the Morphs === | ||
{{Text_Block| | {{Text_Block| | ||
| − | Prepare a clean avatar (without activated morphs) by pressing the '''Reset''' button under ''Modify > Currently Used'''. | + | #Prepare a clean avatar (without activated morphs) by pressing the '''Reset''' button under '''Modify > Currently Used'''. This will in effect, reset all of the morph sliders to zero. |
| − | This will in effect, reset all of the morph sliders to zero. | + | #Export the character in FBX format for sculpting/modification in a 3D application of your choice. |
}} | }} | ||
{{Single_Illustration|Cc_morph_creation_3.0_01.jpg}} | {{Single_Illustration|Cc_morph_creation_3.0_01.jpg}} | ||
| − | === Step 2 | + | === Step 2: Adjusting in 3rd Party Application === |
| − | + | ||
| − | + | ||
| − | + | ||
| − | + | ||
{{Text_Block| | {{Text_Block| | ||
| − | During the course of your editing in another 3D application, make sure the models' poly count and poly IDs do not deviate from the original model. | + | #During the course of your editing in another 3D application, make sure the models' poly count and poly IDs do not deviate from the original model. |
| + | #Export the modified model in OBJ format. | ||
}} | }} | ||
{{Single_Illustration|Cc_morph_creation_3.0_02.jpg}} | {{Single_Illustration|Cc_morph_creation_3.0_02.jpg}} | ||
| − | |||
| − | + | === Step 3: Creating New Morph Sliders === | |
| − | + | ||
| − | + | ||
| − | === Step | + | |
{{Text_Block|Start the morph creation process: '''Create > New Morph Slider'''.}} | {{Text_Block|Start the morph creation process: '''Create > New Morph Slider'''.}} | ||
| Line 42: | Line 38: | ||
#'''Auto apply to current character:''' enable this option and press the '''OK''' button to finish. | #'''Auto apply to current character:''' enable this option and press the '''OK''' button to finish. | ||
| − | + | * If a custom thumbnail is needed then make edits to or overwrite '''Thumbnail_Template_Blank.png''' under the install directory: '''\Reallusion\Character Creator3\Image\'''. | |
|400px}} | |400px}} | ||
{{Single_Illustration|Cc_morph_creation_3.0_04.jpg}} | {{Single_Illustration|Cc_morph_creation_3.0_04.jpg}} | ||
| − | === Step 6 === | + | === Step 4: Changing out Textures === |
| + | |||
| + | #You can see the morph slider that was just created under '''Modify > Currently Used'''. | ||
| + | #Use an image editor to change the look of the texture and reassign them according to the material channels. | ||
| + | |||
| + | {{Duo_Illustration|Cc_morph_creation_3.0_05.jpg|||Cc_morph_creation_3.0_06.jpg}} | ||
| + | |||
| + | === Step 5: Examining the Teeth and Eyeballs === | ||
| + | |||
| + | Due to changes to the body shape, the eyes and teeth may need some manual readjustments. Go to the '''Scene Manager''' and turn the display of the mesh to wire-frame or x-ray for better observation of the body parts in question. | ||
| + | |||
| + | {{Duo_Illustration|Cc_morph_creation_3.0_07.jpg|||Cc_morph_creation_3.0_08.jpg}} | ||
| + | |||
| + | === Step 6: Realigning the Teeth and Eyeballs === | ||
| + | |||
| + | #Enter the '''Adjust Bones''' mode. | ||
| + | #Change '''Bone Type:''' to '''Face'''. | ||
| + | #Change '''Target:''' to '''Include Eyes or Teeth'''. | ||
| + | #Move the eyes and teeth to their proper locations. | ||
| + | #Scale the eyes and teeth appropriately. | ||
| + | |||
| + | {{Duo_Illustration|Cc_morph_creation_3.0_09.jpg|||Cc_morph_creation_3.0_10.jpg}} | ||
| + | |||
| + | === Step 7: Detecting Problems with Facial Expressions === | ||
| + | |||
| + | If there are any problems with the morphs, such as the inability for blinks to come to a full close, then we'll have to make changes to the blend-shapes. | ||
| + | |||
| + | # Open the '''Edit Facial''' panel and check the following morph sliders for errors: '''Eyes Blink''' - '''Eye Blink L''' - '''Eye Blink R'''. | ||
| + | # In 3DXchange, select the problematic morph targets under the '''Face Setup''' section. | ||
| + | # Export the selected morph targets in OBJ format. | ||
| + | |||
| + | {{Duo_Illustration|Cc_morph_creation_3.0_11.jpg|||Cc_morph_creation_3.0_12.jpg}} | ||
| + | |||
| + | === Step 8: Fixing Facial Expressions === | ||
| + | |||
| + | # Adjust/fix the blend-shape in a 3rd party 3D application like 3DS Max. | ||
| + | # Export the correct shape in OBJ format. | ||
| + | # Select the problematic blen-shape under '''Face Setup''' and press the '''Replace''' button. | ||
| + | # Load the corresponding correction shape. | ||
| + | # Revert the name of the replaced facial expression by pressing the '''Rename''' button. | ||
| + | |||
| + | {{Duo_Illustration|Cc_morph_creation_3.0_13.jpg|||Cc_morph_creation_3.0_14.jpg}} | ||
| + | |||
| + | === Step 9: Updating the Facial Expression Profile === | ||
| + | |||
| + | In order to use the corrective blend-shapes, we must replace the original facial expression profile for the character in CC. | ||
| + | |||
| + | # Open the '''Expression Editor''' and press the '''Save''' button. | ||
| + | # Save out a 3dxFaceAnimProfile. | ||
| + | # Drag and drop the exported 3dxFaceAnimProfile file into the view-port to update the facial expression profile. | ||
| + | |||
| + | {{Duo_Illustration|Cc_morph_creation_3.0_15.jpg|||Cc_morph_creation_3.0_16.jpg}} | ||
Latest revision as of 20:26, 20 March 2019
Contents
- 1 Step 1: Resetting the Morphs
- 2 Step 2: Adjusting in 3rd Party Application
- 3 Step 3: Creating New Morph Sliders
- 4 Step 4: Changing out Textures
- 5 Step 5: Examining the Teeth and Eyeballs
- 6 Step 6: Realigning the Teeth and Eyeballs
- 7 Step 7: Detecting Problems with Facial Expressions
- 8 Step 8: Fixing Facial Expressions
- 9 Step 9: Updating the Facial Expression Profile
- Main article: CC Avatar.
In order to create a morph slider prior to CC 3.0, one would have to import a rigged FBX file. Post CC 3.0, one can simply input an OBJ file of the base model and the bone structure will automatically reposition themselves with the help of the auto-rig algorithm.
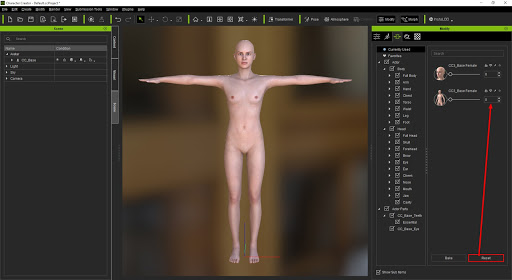
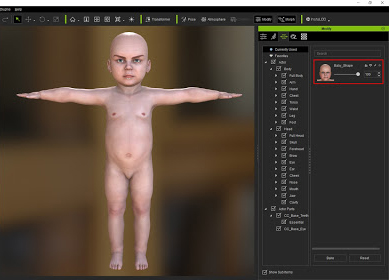
Step 1: Resetting the Morphs
- Prepare a clean avatar (without activated morphs) by pressing the Reset button under Modify > Currently Used. This will in effect, reset all of the morph sliders to zero.
- Export the character in FBX format for sculpting/modification in a 3D application of your choice.
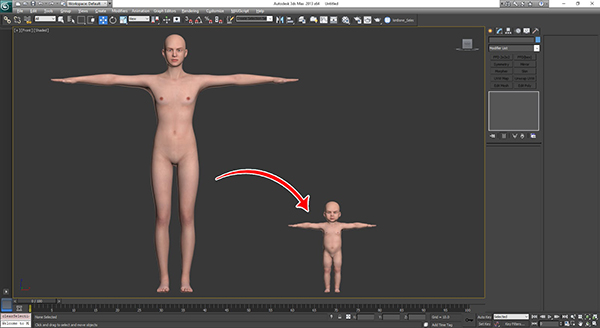
Step 2: Adjusting in 3rd Party Application
- During the course of your editing in another 3D application, make sure the models' poly count and poly IDs do not deviate from the original model.
- Export the modified model in OBJ format.
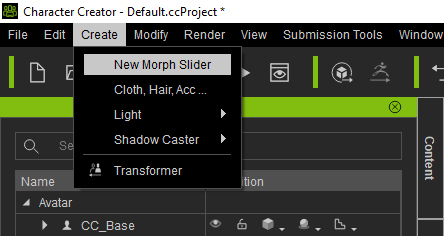
Step 3: Creating New Morph Sliders
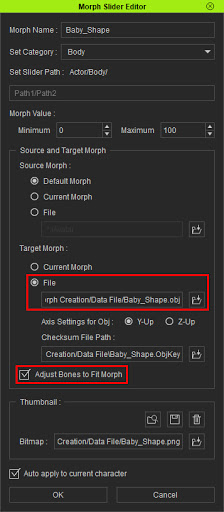
- Morph Name: give an easily recognizable name for the morph target.
- Set Category: classify this specific type of morph into a logical category.
- Source Morph: In most cases, the Default option will suffice. However, the Current Morph option is recommended for instances where the body proportions have deviated from the original.
- Target Morph: Switch to File and load the previously exported OBJ file.
- Adjust Bones to Fit Morph: check option to have the bones readjust their positions to suit the new shape of the body.
- Auto apply to current character: enable this option and press the OK button to finish.
- If a custom thumbnail is needed then make edits to or overwrite Thumbnail_Template_Blank.png under the install directory: \Reallusion\Character Creator3\Image\.
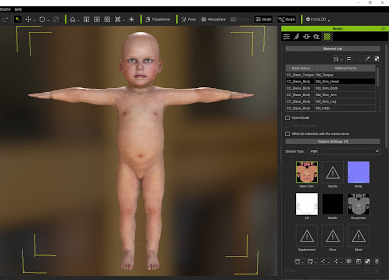
Step 4: Changing out Textures
- You can see the morph slider that was just created under Modify > Currently Used.
- Use an image editor to change the look of the texture and reassign them according to the material channels.
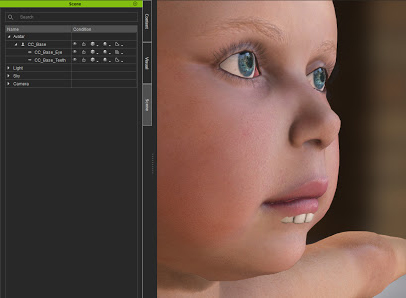
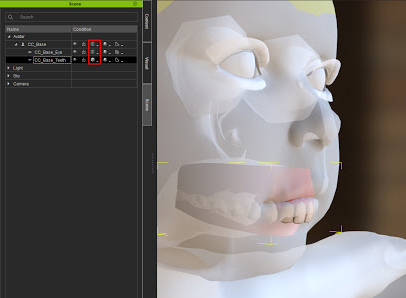
Step 5: Examining the Teeth and Eyeballs
Due to changes to the body shape, the eyes and teeth may need some manual readjustments. Go to the Scene Manager and turn the display of the mesh to wire-frame or x-ray for better observation of the body parts in question.
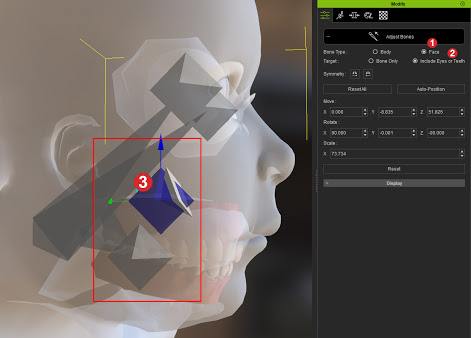
Step 6: Realigning the Teeth and Eyeballs
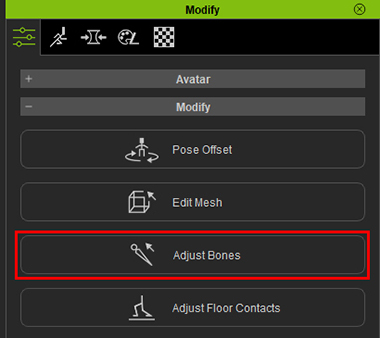
- Enter the Adjust Bones mode.
- Change Bone Type: to Face.
- Change Target: to Include Eyes or Teeth.
- Move the eyes and teeth to their proper locations.
- Scale the eyes and teeth appropriately.
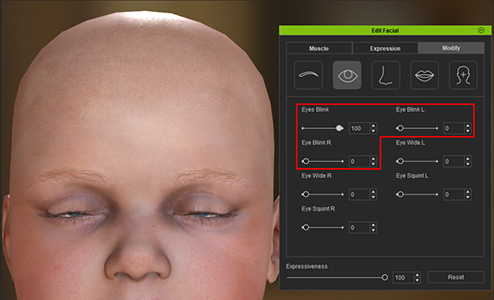
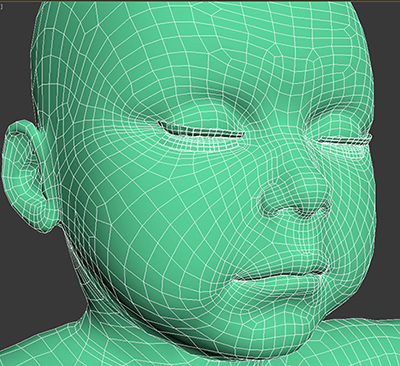
Step 7: Detecting Problems with Facial Expressions
If there are any problems with the morphs, such as the inability for blinks to come to a full close, then we'll have to make changes to the blend-shapes.
- Open the Edit Facial panel and check the following morph sliders for errors: Eyes Blink - Eye Blink L - Eye Blink R.
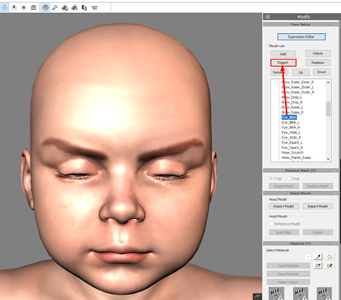
- In 3DXchange, select the problematic morph targets under the Face Setup section.
- Export the selected morph targets in OBJ format.
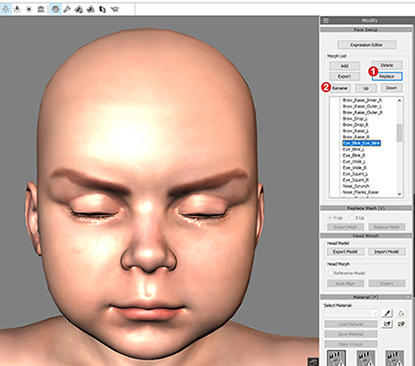
Step 8: Fixing Facial Expressions
- Adjust/fix the blend-shape in a 3rd party 3D application like 3DS Max.
- Export the correct shape in OBJ format.
- Select the problematic blen-shape under Face Setup and press the Replace button.
- Load the corresponding correction shape.
- Revert the name of the replaced facial expression by pressing the Rename button.
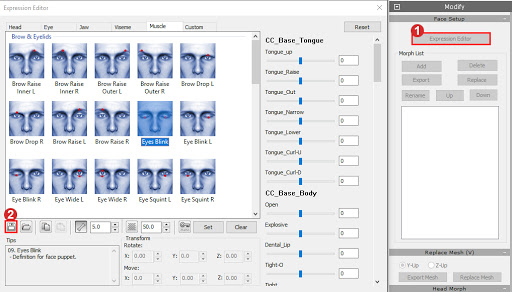
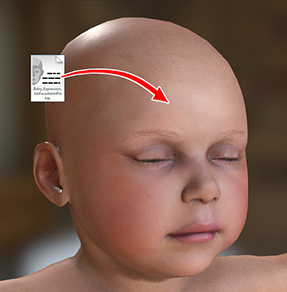
Step 9: Updating the Facial Expression Profile
In order to use the corrective blend-shapes, we must replace the original facial expression profile for the character in CC.
- Open the Expression Editor and press the Save button.
- Save out a 3dxFaceAnimProfile.
- Drag and drop the exported 3dxFaceAnimProfile file into the view-port to update the facial expression profile.
