Difference between revisions of "IC Python API:Using Pyside2 For Creating User Interface"
From Reallusion Wiki!
Chuck (RL) (Talk | contribs) m (→Creating a Simple iClone Dialog Window) |
Chuck (RL) (Talk | contribs) m (→Loading and Editing a Qt Designer UI Widget) |
||
| Line 47: | Line 47: | ||
This sample demonstrates how to load a Qt Designer UI file and edit the loaded widgets. You must first use [http://doc.qt.io/qt-5/qtdesigner-manual.html Qt Designer] to create a *.ui file that represents the widget tree. | This sample demonstrates how to load a Qt Designer UI file and edit the loaded widgets. You must first use [http://doc.qt.io/qt-5/qtdesigner-manual.html Qt Designer] to create a *.ui file that represents the widget tree. | ||
| − | + | <syntaxhighlight lang="Python"> | |
import PySide2, RLPy, os | import PySide2, RLPy, os | ||
from PySide2 import * | from PySide2 import * | ||
| Line 76: | Line 76: | ||
sample_layout.addWidget(qtui_widget) | sample_layout.addWidget(qtui_widget) | ||
sample_dialog.Show() | sample_dialog.Show() | ||
| − | </ | + | </syntaxhighlight> |
{{Single_Illustration|Python_api_sample_dialog_02.png}} | {{Single_Illustration|Python_api_sample_dialog_02.png}} | ||
Revision as of 00:21, 9 April 2019
- Main article: iClone Python API.
iClone ships with a pre-built version of PySide 2.0 compatible with Python 3.6.2. This version includes all standard PySide2 modules.
Creating a Simple iClone Dialog Window
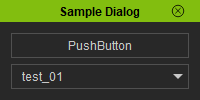
The following simple example shows how to obtain a handle for the PySide application object and create a dialog window:
import PySide2, RLPy
from PySide2 import *
from PySide2.shiboken2 import wrapInstance

#-- Make a global variable contain dialog --#
sample_dialog = None

def run_script():
    global sample_dialog

    sample_dialog = RLPy.RUi.CreateRDialog()
    sample_dialog.SetWindowTitle("Sample Dialog")

    #-- Create Pyside layout for RDialog --#
    pyside_dialog = wrapInstance(int(sample_dialog.GetWindow()), QtWidgets.QDialog)
    pyside_dialog.setFixedWidth(200)
    sample_layout = pyside_dialog.layout()

    #-- Add PushButton --#
    pushbutton = QtWidgets.QPushButton("PushButton")
    sample_layout.addWidget(pushbutton)

    #-- Add ComboBox --#
    combobox = QtWidgets.QComboBox()
    combobox.addItem("test_01")
    combobox.addItem("test_02")
    sample_layout.addWidget(combobox)

    sample_dialog.Show()
Loading and Editing a Qt Designer UI Widget
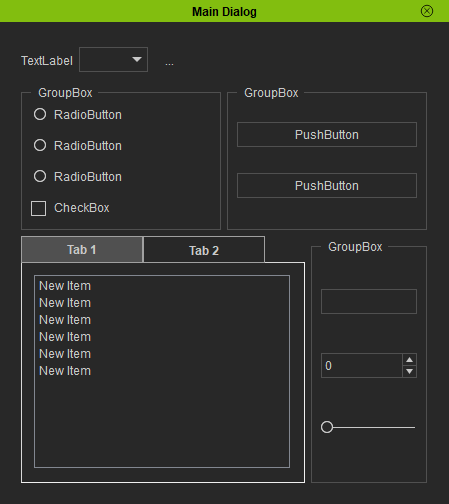
This sample demonstrates how to load a Qt Designer UI file and edit the loaded widgets. You must first use Qt Designer to create a *.ui file that represents the widget tree.
import PySide2, RLPy, os
from PySide2 import *
from PySide2.shiboken2 import wrapInstance

#-- Make a global variable contain Dialog --#
sample_dialog = None
qtui_widget = None

def run_script():
    global sample_dialog

    #-- Make the RL Dialog --#
    sample_dialog = RLPy.RUi.CreateRDialog()
    sample_dialog.SetWindowTitle("Main Dialog")

    #-- Wrap to PySide Dialog --#
    pyside_dialog = wrapInstance(int(sample_dialog.GetWindow()), QtWidgets.QDialog)
    sample_layout = pyside_dialog.layout()

    #-- Load Ui file --#
    ui_file = QtCore.QFile(os.path.dirname(__file__) + "/sample.ui")
    ui_file.open(QtCore.QFile.ReadOnly)
    qtui_widget = QtUiTools.QUiLoader().load(ui_file)
    ui_file.close()

    #-- Assign the Ui file to PySide dialog --#
    sample_layout.addWidget(qtui_widget)
    sample_dialog.Show()


