Difference between revisions of "Content Dev:CC Avatar Head Preset"
Chuck (RL) (Talk | contribs) m |
Chuck (RL) (Talk | contribs) m (→Saving and Deploying Avatar Presets) |
||
| Line 8: | Line 8: | ||
== Saving and Deploying Avatar Presets == | == Saving and Deploying Avatar Presets == | ||
| + | You can save an avatar head preset in Character Creator by navigating to: | ||
| + | '''Content > Base > Skin & Morph > Head (Folder)''' | ||
| + | and pressing the '''+''' button below. | ||
| + | {{Single_Illustration|Avatar Head Preset Saving.png}} | ||
| + | |||
| + | In the subsequent pop-up window makes sure to save the content type as '''Head''': | ||
| + | |||
| + | {{Single_Illustration|Select_Actor_Preset_Type.png}} | ||
| + | |||
| + | After it has been saved, you switch to an entirely different character and apply the head preset by double clicking on it in the '''Content''' panel. | ||
| + | |||
| + | {{Single_Illustration|Avatar_Head_Preset_Application.png}} | ||
| + | |||
| + | Make sure that '''Apply Texture > Apply Head Color to Body''' is activated to take advantage of the auto-blend feature in Character Creator. | ||
== Head and Body Color Blend == | == Head and Body Color Blend == | ||
Revision as of 20:28, 23 January 2019
- Main article: CC Avatar.
CC Avatar Presets (Skin & Morph) contains character morph and texture data. It can be applied to the entire body or just to the head with the option to leave out either the morphs or the textures. Users will have the option to blend the diffuse map of the body to match that of the 3D Head AvatarPreset when applied. However, one would still need to manually adjust the other materials channels if the head and body materials do not match. In order for CC Avatar Preset to function properly, matching head and body morph sliders should be present in \Template\AvatarControl.
Avatar Presets do not come with matching eyes and teeth; please load these separately for the right fit. If the character's eyes do not come to a complete close when shut, one must check for a custom facial animation profile that should have been provided with the original content. Under most cases, dragging this 3dxFaceProfile onto the avatar will rectify problems with the upper/lower eyelid morph targets.
Saving and Deploying Avatar Presets
You can save an avatar head preset in Character Creator by navigating to:
Content > Base > Skin & Morph > Head (Folder)
and pressing the + button below.
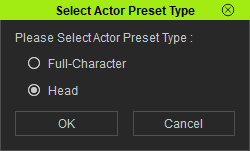
In the subsequent pop-up window makes sure to save the content type as Head:
After it has been saved, you switch to an entirely different character and apply the head preset by double clicking on it in the Content panel.
Make sure that Apply Texture > Apply Head Color to Body is activated to take advantage of the auto-blend feature in Character Creator.


