Content Dev:IC Maya Motion to iClone (Advanced Skeleton 5)
- Main article: iClone.
Animators who want a more robust rigging system for creating iClone compatible character animations in Maya, might find the HumanIK system to be too sparse and lacking in critical feature sets. A more sophisticated rigging and animation system can be found with Advanced Skeleton 5: https://www.animationstudios.com.au/advanced-skeleton.
Process Introduction
Important Considerations
- Character skeletons should not be haphazardly deformed: scaled or stretched.
- Skeleton bones should not be haphazardly renamed.
- Bones should not be added or removed from the character skeletons.
Simple Process Overview
- Launch Maya and install Advanced Skeleton 5. You'll need to perform a full install in order to access the controls window.
- Open the provided MB file.
- Adjust the motion of the character using the pre-deployed Advanced Skeleton.
- Bake the final animation onto the Human IK character.
- Select the Human IK skeleton and export it in FBX format.
- Open the character in iClone 8 and apply the FBX file.
- Check if the performance matches the one in Maya.
Provisional Files
- ReadyToAnimate.mb: Maya binary file for motion adjustment (Maya 2020).
- Advanced Skeleton 5: Folder containing plugin installation files.
- DummyActor.iAvatar: Avatar that can be opened with iClone 8.
- Tpose.fbx: This file needs to be applied before importing FBX motion files into iClone 8.
- HIK Character.mb: Used to inspect RL internal motions and export custom character motions.
You can download all of the provisional files in a zip file here.
Usage Instructions
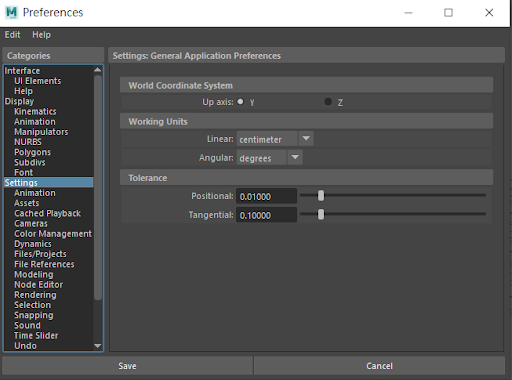
Launch Maya and open ReadyToAnimate.mb. Make sure to not use Import command or drag it into the scene as that will prepend a namespace to the bone names. If you find that the character is laying down when loaded, you must go to Windows > Settings/Preferences > Preferences, and in the subsequent window, enabled the Y option under Setting > World Coordinate System > Up Axis.
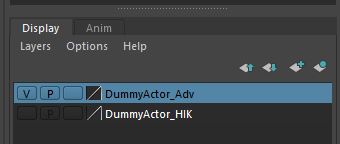
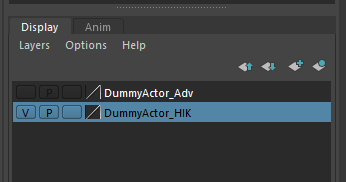
ReadyToAnimate.mb contains two layers: DummyActor_Adv for adjusting motions, and DummyActor_HIK for exporting motions.
Using Advanced Skeleton 5
Installing Advanced Skeleton 5
Take all of the contents within the Advanced Skeleton 5 folder and put them under C:/Users/YOUR NAME/Documents/maya/scripts. Drag the install.mel file into Maya's viewport to install the plugin commands into the shelf.
IK/FK Switching
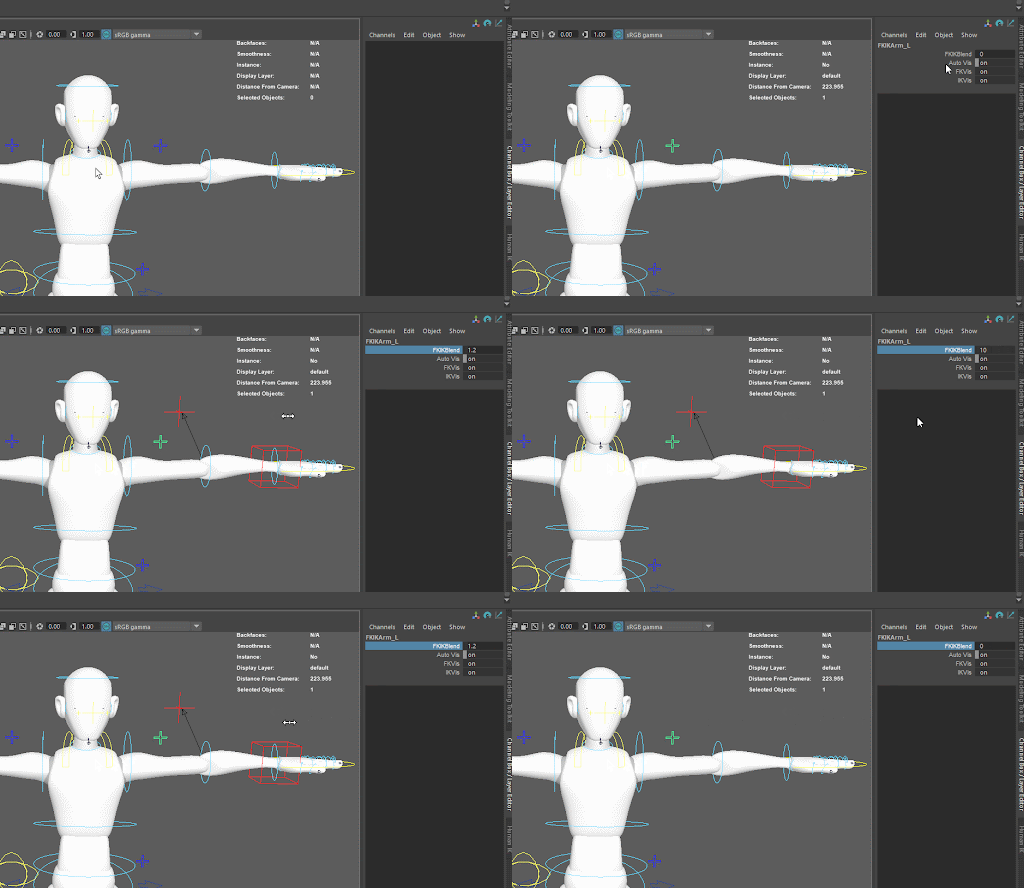
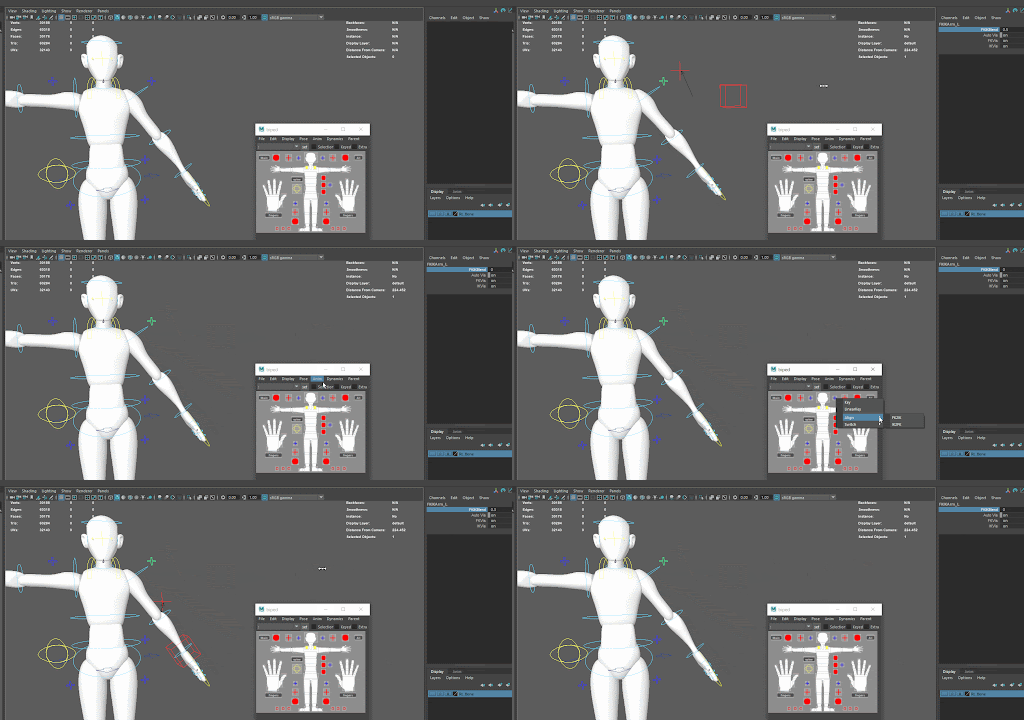
Click on the cross gizmo to the side of the character. In the Channel Box adjust the FIKIKBlend value. "0" is forward kinematic and "10" is inverse kinematic.
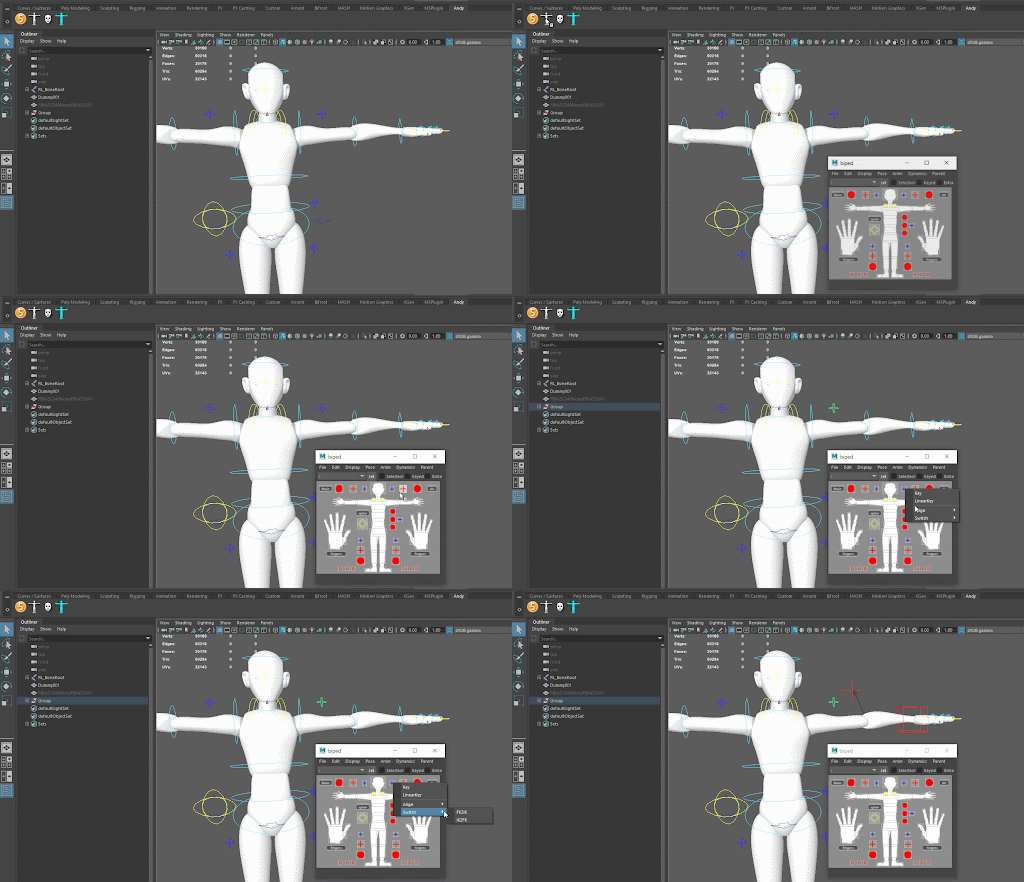
You can also launch the control panel from the shelf and click on a cross icon in the control panel diagram. Besides that, you can also right-click on a cross icon and perform Switch > FK2IK to mode switch. Keep in mind that a "switch" key will be set by doing this.
IK/FK Alignment
Switching between IK and FK mode is a frequent operation in the course of an animation. If the two systems are misaligned, then it'll become difficult to control. You can align FK to IK by opening the control panel and right-clicking on a cross icon to perform Align > FK2IK.
Finger Controls
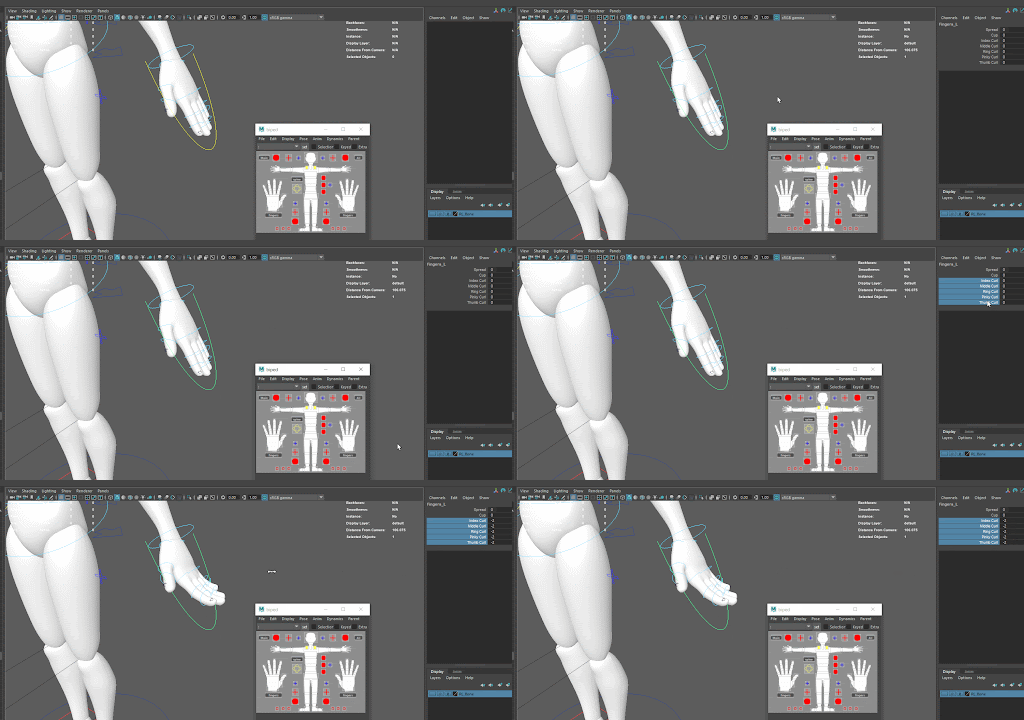
Select the yellow control curves surrounding the hand palms or select the finger icons in the control panel to see the finger attributions in the Channel Box. These values can be multi-selected to open and close multiple fingers at once.
Foot Controls
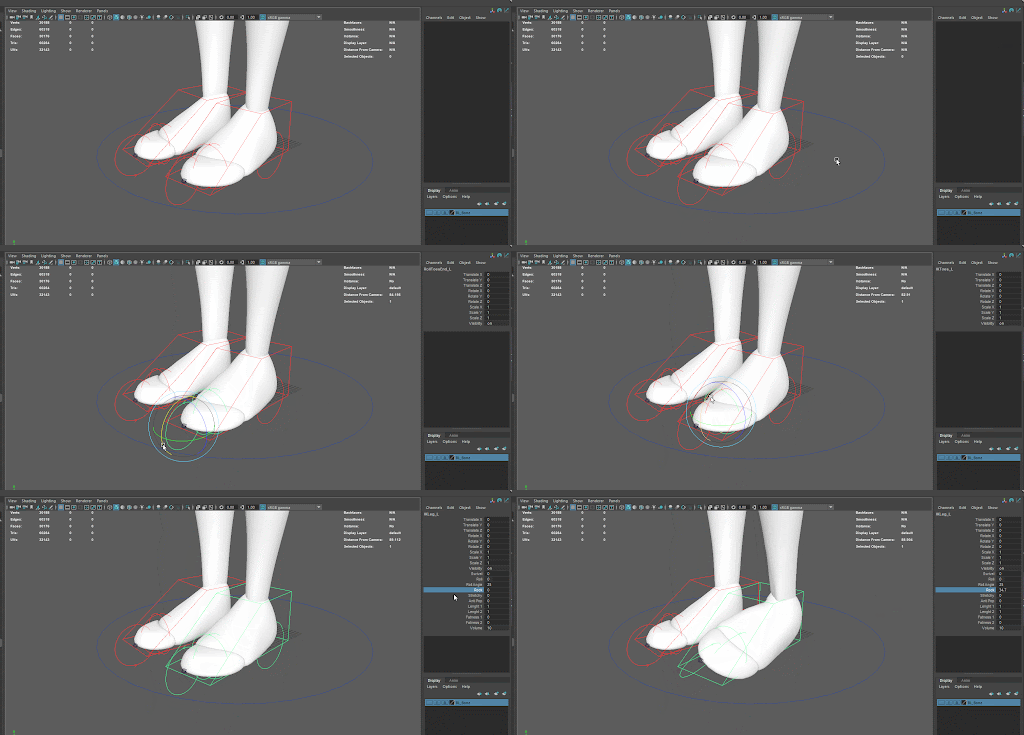
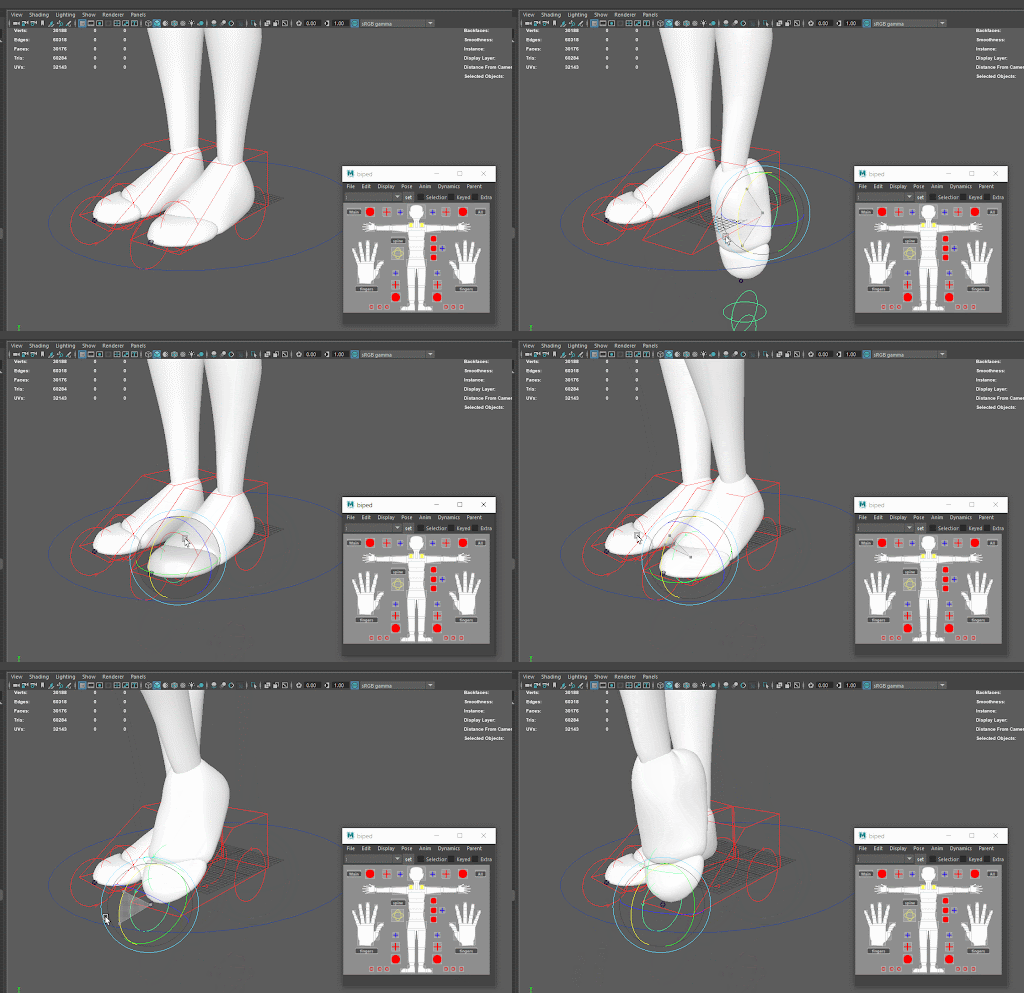
Select any of the three red circles on the feet to bend from the heels, balls, or toes. In order to roll the feet, select the IK control curve and adjust the Channel Box > Rock: negative values roll the foot inward while positive values roll the foot outward.
The three aforementioned red circle controllers can also be selected near the bottom of the control panel.
Body Controls
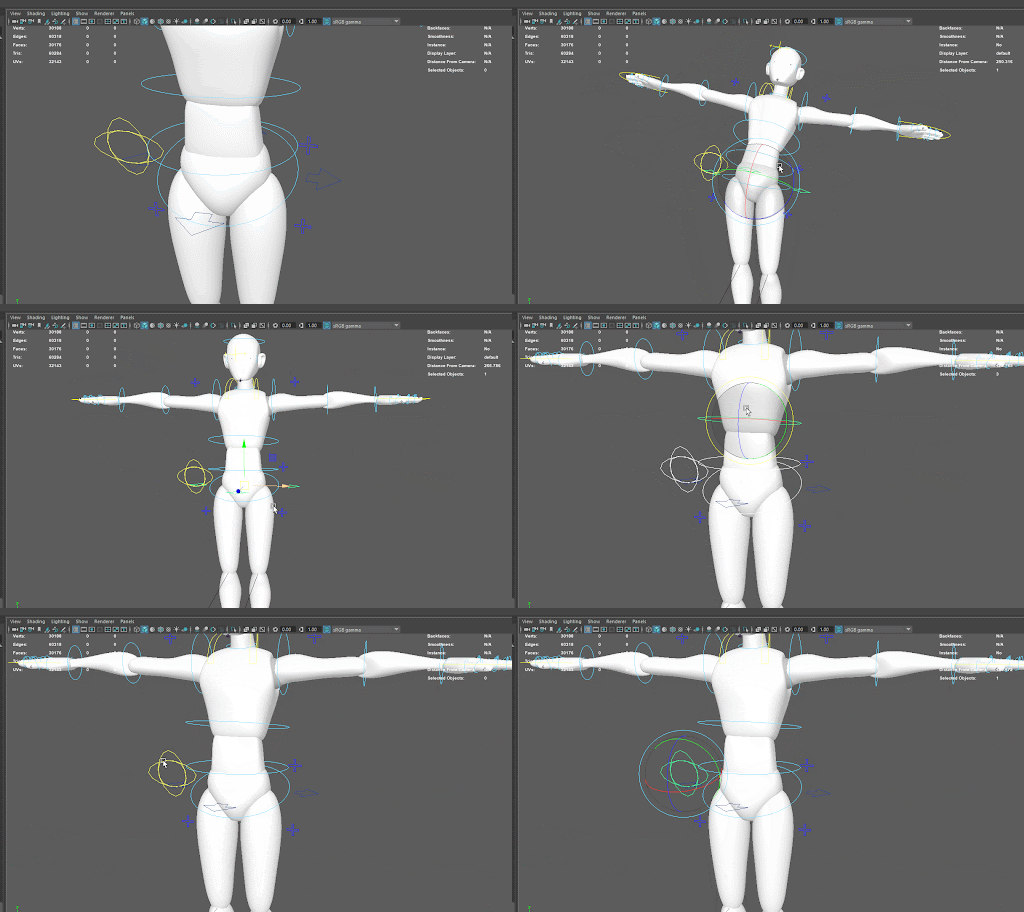
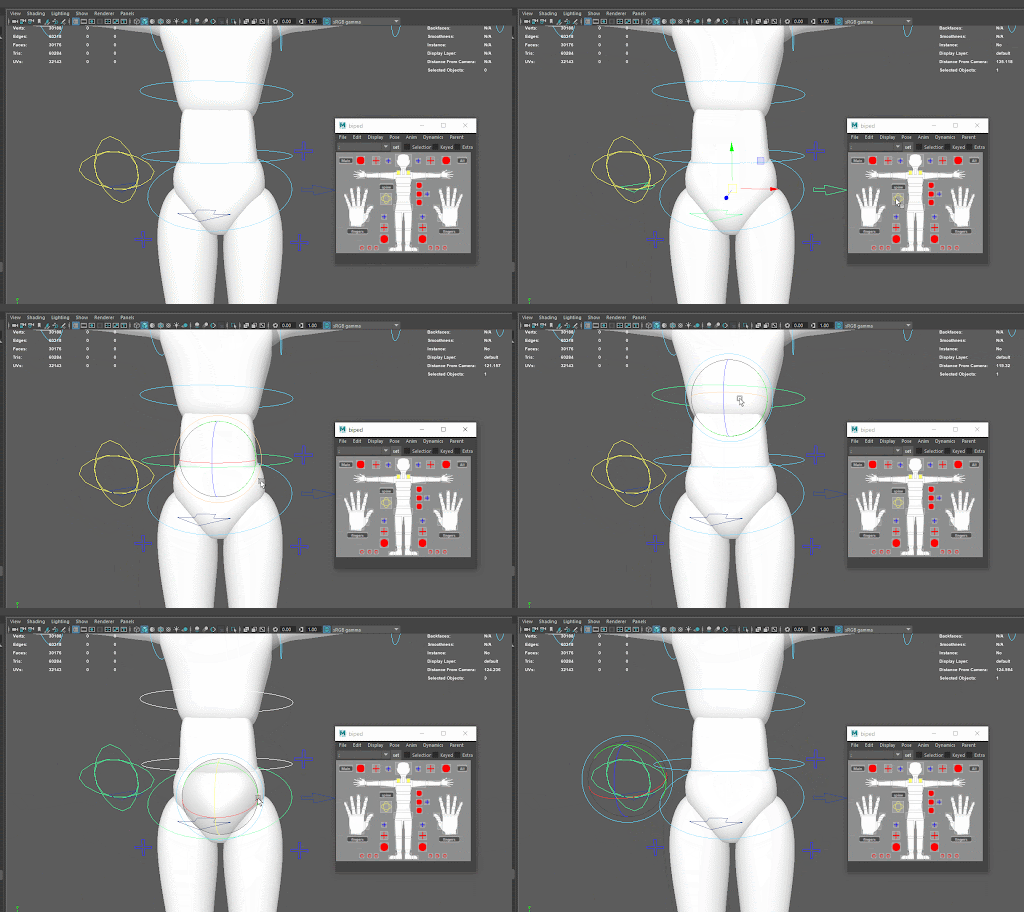
The deep blue arrow curve controller moves and rotates the hips which can also drag the rest of the body with it. The three light-blue rings on the body control the spine, and can only be rotated, not moved. The yellow double curve controller only gyrates the hips and does not have an influence over the rest of the body.
The aforementioned controllers can also be selected in the control panel. By clicking on the spine button, one can select all of the light blue controls and adjust the entire spine at once.
Head and Shoulder Controls
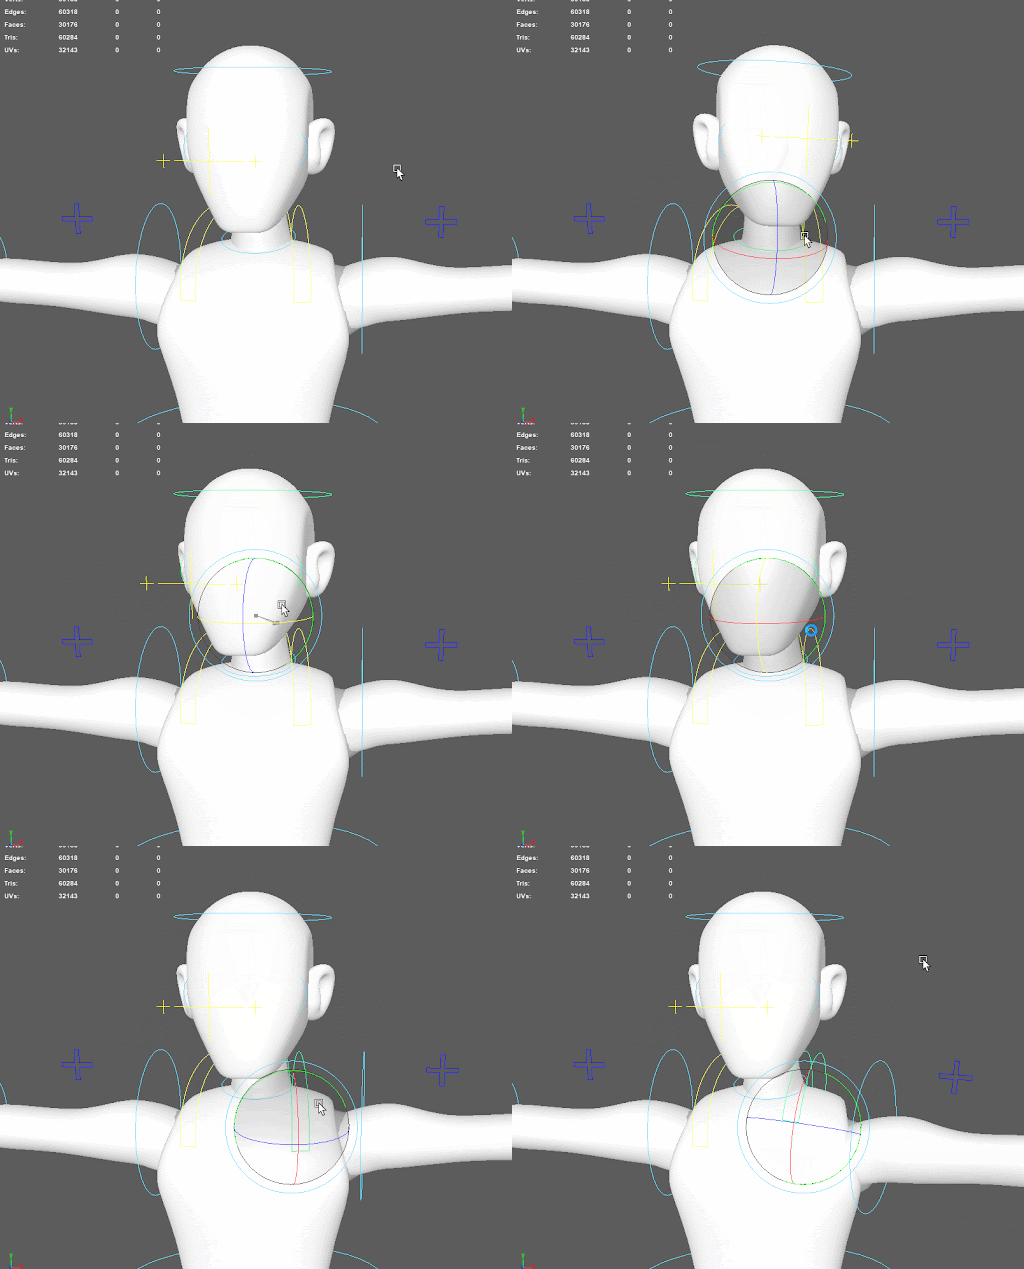
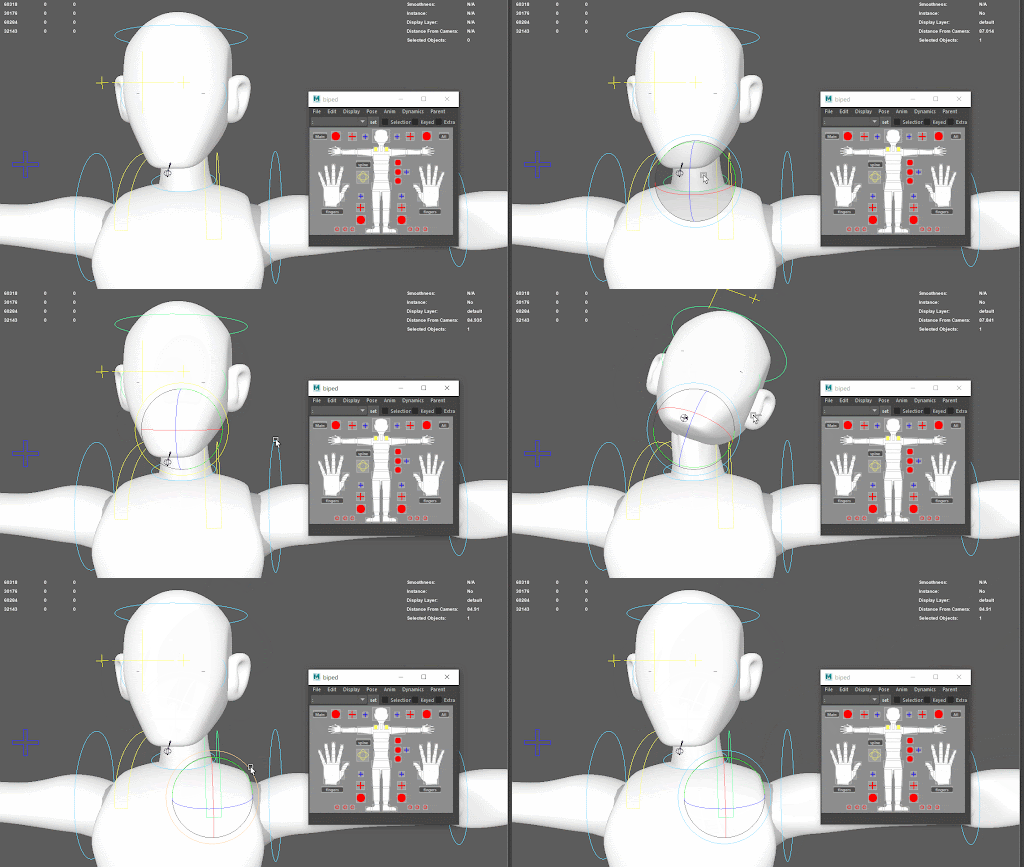
Two light blue control curves are responsible for turning the head. One control is used to rotate the neck and the other for the head. Two lateral yellow control curves can be used to move and rotate the shoulders. Due to the limitations of the character, one should be extra careful when adjusting the shoulders.
Head and shoulder controllers can also be selected in the control panel.
Motion Production Precautions
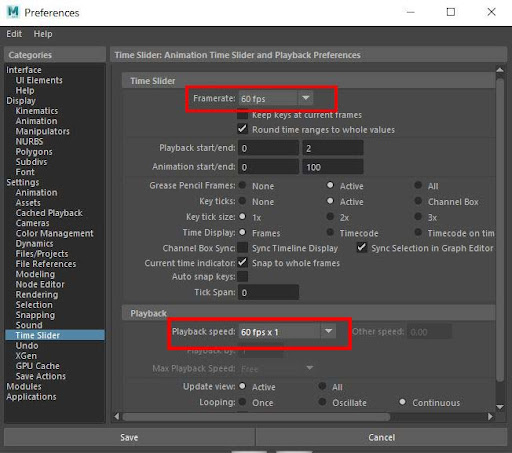
- Framerate should be set to "60 fps" beforehand.
- Playback speed should be set to "60 fps x1" to make sure that the workspace frame rate matches that of the export frame rate.
- Make sure all keys are set on the controllers and not directly on the skeletal bones themselves.
- iClone does not support squash and stretch animation with bone joints. Not only are these effects ignored, but they can also cause some unexpected issues when exported to iClone.
- You are encouraged to use Maya's Graph Editor to slow in slow out and massage the character animations.
File Export and Inspection
Using the Export Rig
Show only the dedicated export character by activating the DummyActor_HIK layer and disabling the DymmActor_Adv layer in the Diplay panel.
Baking the Final Motion
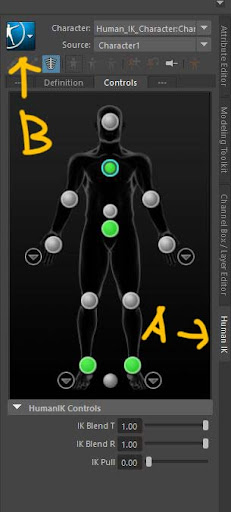
Bake the motion to the skeleton by switching to the Human Ik tab (A) and clicking on the blue button in the upper-left corner (B). Execute Bake > Bake To Skeleton with the default settings.
Exporting the FBX File
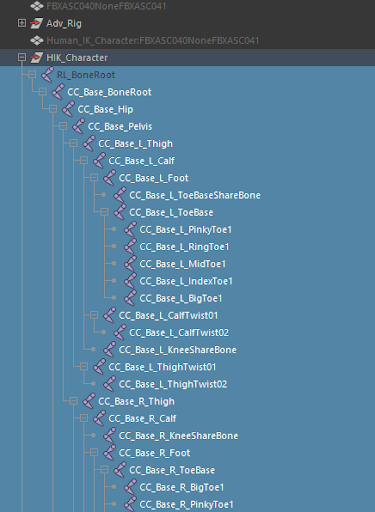
Export an FBX file by selecting all of the bones below the RL_BoneRoot on the HIK_Character in the Outliner. Avoid selecting rig-related components (like control curves) and auxiliary bones.
Perform File > Export Selection and open Options to the right. Click on the Edit presets... button and set FBX File Format > Version: to "FBX 2018" (2012 to 2018 are all compatible). Once set, perform Export Selection.
Importing the FBX File into iClone
Launch iClone 8 and drag the provided DummyActor.iAvatar file onto the viewport. Drag the FBX file exported in the previous step onto the dummy character. In the subsequent window, set Motion Profile to "Current Character" and load the provided Tpose.fbx file into Motion T-Pose, then click on the Convert All button.
How to Import Multiple Animation Segments
Select multiple FBX animation files and drag them onto the character in iClone 8. Adjust the settings using the same configuration as mentioned above. All of the animations will then be saved under the Content Manager > Animation > Motion > Custom category. Now you can apply each motion directly to the character from the Content Manager.
Check if the Animations are Consistent
Check if the animation in iClone 8 looks like the animation in Maya. If the results are different, then contact technical support or use the contact window or PM for your Reallusion-related project for a quick response; You will need to provide the FBX and Maya file to help diagnose the issue.
File Submission
- Please provide the FBX and Maya file for inspection.
- Submit the files to your PIC at Reallusion and wait for feedback.
Importing Custom Character Motion to iClone 8
If you have a unique character skeletal structure, then you'll need to retarget the animation to Human IK first.
Deploying HumanIK
Open the character animation project and set the framerate to 60 fps. Import HumanIK skeleton by switching to the Rigging mode and select Skeleton > HumanIK.
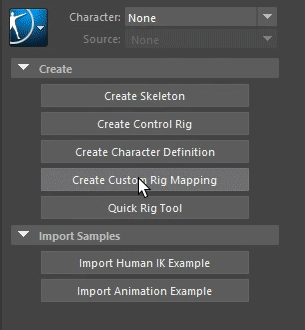
Set up the rig by clicking on Human IK > Create Custom Rig Mapping and click on Define in the pop-up window.
Skeletal Mapping
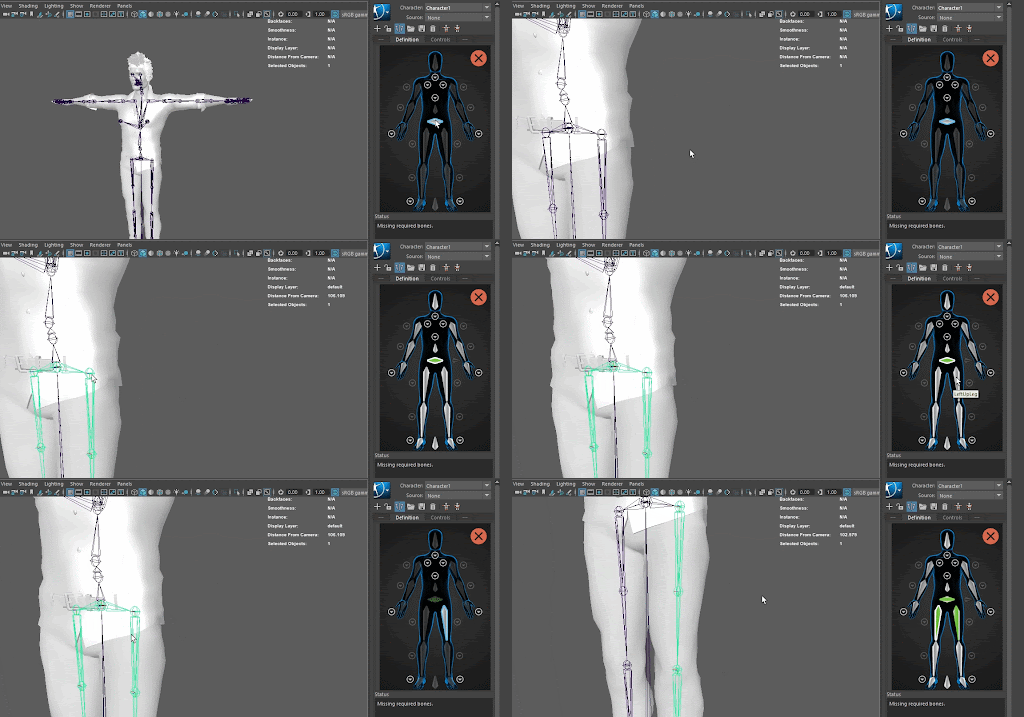
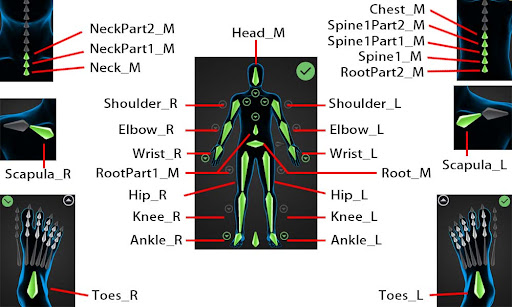
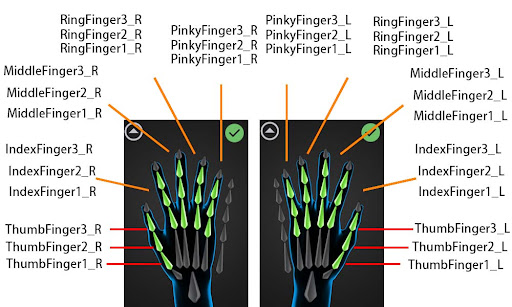
Map the bones of the custom character to the HumanIK skeleton (T-pose recommended). Do this by clicking on the Definition tab, and double-click on a bone in the Mapping panel, then selecting the corresponding bone on the character in the viewport. Using X-ray Joints is recommended. Finish by mapping the entire body including the feet, fingers, spine, shoulders, and neck. The following images are based on the Advanced Skeleton 5 skeleton structure.
Even though HumanIK's automatic mirror mapping is convenient, one should be careful when it comes to the fingers, as it can be quite error-prone.
Mapping Lock
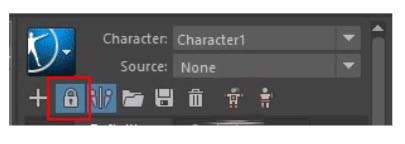
Once the mapping is complete, click on the lock icon to finish the Skeleton Definition rigging process.
Importing and Applying Motion to Human IK
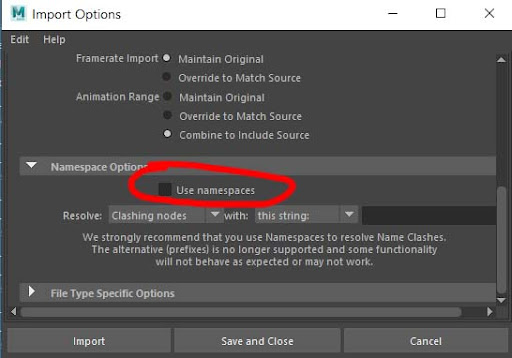
Import the provided HIK Character.mb file into Maya's viewport. Make sure that Use Namespaces is disabled in the import settings to prevent Maya from prepending the file name to the bones.
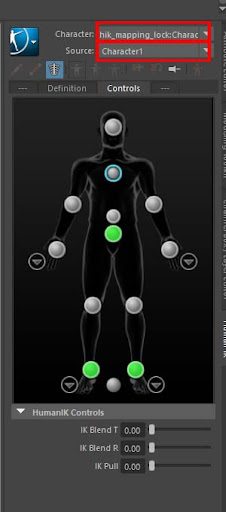
Change Human IK > Character to the character that was just imported, and change the Source to the Skeleton Definition that was mapped from the previous steps. This way motions can be applied to this new Human IK character.
Adjusting Motions
Due to the length and number differences in the bones, the two skeletal systems will invariably animate in distinct ways, especially when it comes to bending forward, whereas the HIK skeleton tends to bend more down.
You can select portions of the body for readjustment, such as aligning the Human IK bone positioning to the Advanced Skeleton, by using IK Blend T and IK Blend R.
Baking Motion to the Skeleton
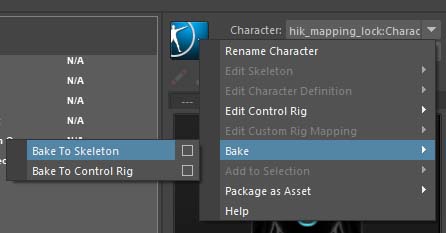
Once the adjustments have been made to the motion, click on the blue button in Human IK panel and select Back > Bake Skeleton. Once the animation is baked, follow the steps mentioned in #File_Export_and_Inspection for the final FBX export.
Checking for Consistency in iClone 8
Internal and advanced developers can check if the performance in iClone 8 matches that of the original motion in Maya. Drag and drop the FBX file exported from Maya directly into the viewport and press Shift+Alt+B to view the character's skeleton (developer version required). Only the skeleton will be shown (figure to the left of the following illustration). When the avatar and the FBX skeleton are zeroed out in world space, then one can inspect for motion inconsistency between the two figures that are stacked on top of each other.

