Difference between revisions of "Content Dev:CC Morph Creation 30"
From Reallusion Wiki!
Chuck (RL) (Talk | contribs) m (→Step 4) |
Chuck (RL) (Talk | contribs) m (→Step 5) |
||
| Line 33: | Line 33: | ||
{{Single_Illustration|Cc_morph_creation_3.0_03.jpg}} | {{Single_Illustration|Cc_morph_creation_3.0_03.jpg}} | ||
| − | |||
| − | |||
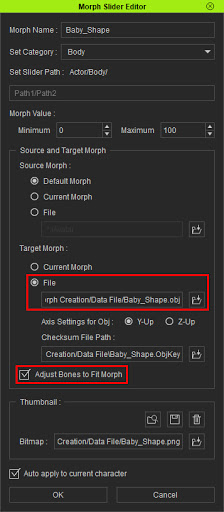
{{Text_Block|The menu settings are (from top to bottom): | {{Text_Block|The menu settings are (from top to bottom): | ||
| Line 41: | Line 39: | ||
#'''Source Morph:''' In most cases, the Default option will suffice. However, the '''Current Morph''' option is recommended for instances where the body proportions have deviated from the original. | #'''Source Morph:''' In most cases, the Default option will suffice. However, the '''Current Morph''' option is recommended for instances where the body proportions have deviated from the original. | ||
#'''Target Morph:''' Switch to '''File''' and load the previously exported OBJ file. | #'''Target Morph:''' Switch to '''File''' and load the previously exported OBJ file. | ||
| + | #'''Adjust Bones to Fit Morph:''' check option to have the bones readjust their positions to suit the new shape of the body. | ||
| + | #'''Auto apply to current character:''' enable this option and press the '''OK''' button to finish. | ||
| + | |||
| + | >> If a custom thumbnail is needed then make edits to or overwrite '''Thumbnail_Template_Blank.png''' under the install directory: '''\Reallusion\Character Creator3\Image\'''. | ||
| + | |400px}} | ||
| + | |||
| + | {{Single_Illustration|Cc_morph_creation_3.0_04.jpg}} | ||
| + | |||
| + | === Step 6 === | ||
Latest revision as of 23:52, 3 March 2019
- Main article: CC Avatar.
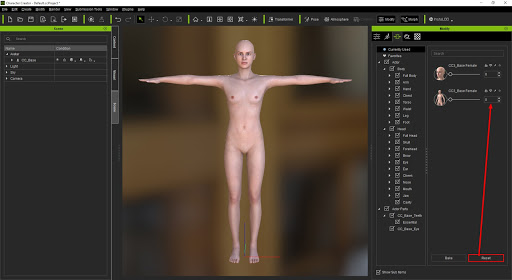
Step 1 (Reset the Morphs)
Prepare a clean avatar (without activated morphs) by pressing the Reset' button under Modify > Currently Used. This will in effect, reset all of the morph sliders to zero.
Step 2
Export the character in FBX format for sculpting/modification in a 3D application of your choice.
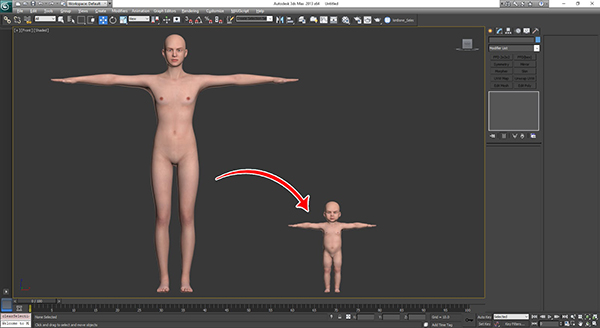
Step 3 (Adjust in 3rd Party Application)
During the course of your editing in another 3D application, make sure the models' poly count and poly IDs do not deviate from the original model.
Step 4
Export the modified model in OBJ format.
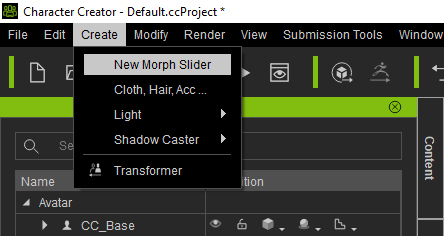
Step 5
Start the morph creation process: Create > New Morph Slider.
The menu settings are (from top to bottom):
- Morph Name: give an easily recognizable name for the morph target.
- Set Category: classify this specific type of morph into a logical category.
- Source Morph: In most cases, the Default option will suffice. However, the Current Morph option is recommended for instances where the body proportions have deviated from the original.
- Target Morph: Switch to File and load the previously exported OBJ file.
- Adjust Bones to Fit Morph: check option to have the bones readjust their positions to suit the new shape of the body.
- Auto apply to current character: enable this option and press the OK button to finish.
>> If a custom thumbnail is needed then make edits to or overwrite Thumbnail_Template_Blank.png under the install directory: \Reallusion\Character Creator3\Image\.