Content Dev:CTA Hair
Introduction
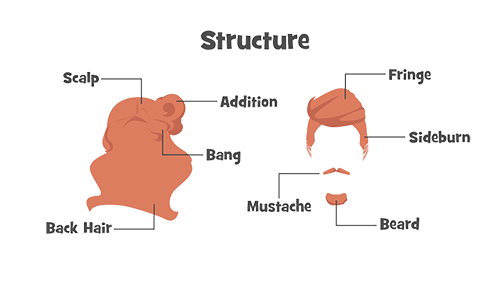 Basic structure for the hair accessory.
In the past, the hair existed alongside with the body in the form of front and back side pieces. Thus, there was a limitation in the way that the back hair piece would intercept into the character's body, particularly, if it was lengthy. In response, the CTA3 Power Tools 4 and 5 Hair and Beard systems introduce the new extrapolated composite accessories with the following features:
- No structural limitation.
- Dynamic motion support.
- Supports anchor points.
- User can recombine the pieces.
Basic Workflow
Steps:
- Structure the design and overall project.
- Prepare the artwork for the hair pieces.
- Import the pieces into CTA.
- Create the animations for the individual pieces.
- Save the motions in the Action menu.
- Set individual Color IDs.
- Save the parts as (*.ctProp) - the hair components are now complete.
- Assemble the hair.
- Set the anchor points.
- Save the hair as (*.ctAcc) - the hair is now complete.
Introduction to the Tools
| Software | Version | Range of Use |
|---|---|---|
| Adobe Illustrator | CC and up | Primary drawing application. |
| Animate CC | - | Conversion of images to (*.swf) format. |
| CTA 3 | 3.2 and up | Creation of dynamic composite props. Setting Accessory location points. |
Sample Files
Source Material Creation
Precautions for Source Image Creation
- Plan out the assembly of the overall image structure. Pay attention to its feasibility and re-usability and test regularly during the creation process
- Consider the feasibility of combining individual moving pieces. Reserve image portions for motion and fixed areas. Test often as you go.
- Determine the overall style and color scheme.
- If one wishes to set the Render Style for the final stage, try to combine the pieces of the same color by using the Pathfinder or Shape Builder Tool to avoid potential problems.
Animations for Composite Hair
The Action Menu for composite props takes all of the motions with same names and combines them together to trigger simultaneously. Therefore, one must pay special attention with the Motion Clip on a per part basis:
- Make sure that the motions that belong together have the same name.
- Make sure the combined motions match in size and scale.
- Make sure the combined motions match in length, otherwise parts of the same motion will have pauses during playback.
- Individual motions will be listed on the bottom column and can freely play on its own.
The following table is the motion specification for Reallustion Power Tools 4 & 5. You can follow the naming convention and animation lengths below.
| Reallusion Power Tools 4 & 5 Motion Specification | |||
|---|---|---|---|
| Motion Name | Frames | Motion Name | Frames |
| Walking | 19 | Breeze | 20 |
| Running | 20 | Frustration_Start | 16 |
| StrongWind_Start | 10 | Frustration_End | 16 |
| StrongWind_Loop | 10 | Exclamation_Start | 14 |
| StrongWind_End | 10 | Exclamation_End | 12 |
Hair Attachment Points
Different types of component parts need to attach to their respective places:
| Accessory Type | Fixed Position | Note |
|---|---|---|
| Hair | Face | Need to be attached to the image and not to the bone so that will move with the face while puppeteering. |
| Mustache | Nose | First attach to the nose then attach to the parent for proper puppeteering. |
| Beard | Mouth | First attach to the mouth then attach to the parent for proper puppeteering. |
Asset Creation Workflow
Component Creation
Composite Accessories can have many components and the drawing of the components happen on a piece by piece level. Therefore, it is wise to test out the composition of the pieces during the drawing process to prevent unforeseen issues.
Structural Design
Below is the Reallusion Power Tools 4 & 5 hair structure:
- The user can change the structure or add extraneous items such as jewelry if desired.
- Pay attention to the feasibility and re-usability of the structure.
- It is recommended to perform assembling testing in the drawing stage to avoid unexpected issues.
Component Creation
 ✘ Wrong: Too much detail can complicate the final composition.
 ✘ Wrong: Too little detail can merge the pieces indistinguishably.
 ✔ Right: Strive to achieve the right amount of detail.