Content Dev:CTA5 G3 Character Creation
Contents
- 1 Introduction to the character production process
- 2 Guide to the drawing process
- 3 Color Group settings (SVG only)
- 4 360° Head settings
- 5 180° Head settings
- 6 Spring settings
- 7 Checklist
- Main article: Content Dev: CTA Actor.
Introduction to the character production process
During the process of developing Cartoon Animator 3 (CTA3) and designing content packs, it came to light that many supplementary materials were not integrated into the character production process; CTA5's new character production gave the perfect chance to compensate for this deficiency; And finally, the content production process and relevant reference materials can be united to bring this article into fruition. After the overall shape of your 2D character is confirmed, you can proceed with the following steps to convert it into embedded content:
- Use image editor (e.g., Illustrator or Photoshop) to draw the body and shape variations according to the character's proportions.
- Create mouth and hand shapes that are able to fulfill your animation objectives.
- Assemble the character from its constituent parts.
- Export and import an character from Illustrator to CTA, and ensure everything is in working order.
- Adjust the boundaries for each facial feature.
- Create head turns and back up your project.
- Desploy spring physics to your character.
- Adjust the character's graphics and back up your project.
- Formalize the character's shape variations and color settings.
- Make basic adjustments to the character's expressions for facial puppeteering.
While drawing your character, it is prudent to consider the dynamism of its performance, such as the bend to the limbs as well as the method of altering the facial features and their appearance at different angles. When all of these elements are carefully considered, the chances of encountering inadequate dynamism in performance after the character has been assembled can be reduced; and thereby numerous trips of error corrections between Illustrator and CTA can be avoided. Since the character graphics and structures are related to each other, settings for color groups, head turns, and puppeteering starts at the structural level which is also in lockstep with the production procedure.
The character structure
-
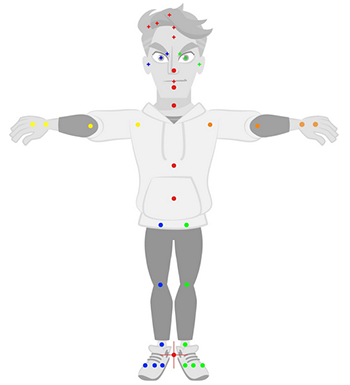 Composition of the body and facial bones accompanied by structural graphics.
 -
 The character SVG is composed of separate bone and image layers.


Download the CTA5 character template in AI format here: https://file.reallusion.com/cta/Cartoon_Animator_5_Vector_Pipeline_Resource.zip
Use the TPose for the entire character assembly. You can refer to the character template for the overall size ratio and it's also recommended to directly change out the graphics to adapt them to your character. The layout of the template AI files is the same as those in PSD format, whereas the main sections are divided into:
- RLBoneHuman:: houses the body skeleton.
- RLBoneHead:: houses the facial bones.
- RLImage:: contains all of the graphic elements.
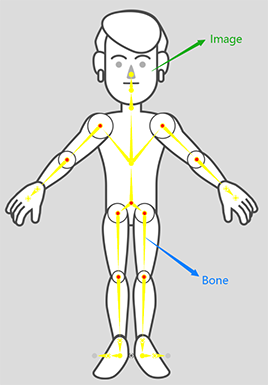
Layer names and images of the joints under RLBoneHuman::
The "::" symbol signifies subordination in a child-parent relationship (as shown in the diagram). For example, "BackHair::BackHairBase:" means that the bone called "BackHairBase:" is a child of "BackHair". The names of the parent and child elements must correspond exactly so that the graphics can move and deform with the bone, and the hierarchy can be set up properly. After the graphics are drawn and the names correspond for the three layers, they are then outputted as SVG, and then imported into CTA to set up the character.


Images for FreeBone characters can be freely named, but the structural folders must follow bone-related nomenclatures.


Applying similar structures to PSD files (After version 5.1)

If you are working with raster graphics, you have the choice to stick to the original folder structure or you can choose to reorganize the structure to resemble those for SVG characters. In principle, this entails the following process:
- Unparent the "Head Bone" and "Head Image" folders from the "TalkingHead" folder to the base/main layer.
- Delete the empty "TalkingHead" folder.
- Move the "Head Image" folder into the "Image" folder.

- Talking Head is the head structure for Freebone characters.
- Image Head is the head structure for standard characters.
- Talking Head and Image Head are similar, except that the "Head Bone" and "Head Image" are placed in different layer structures.
BoneHuman

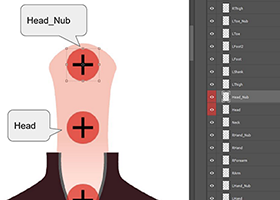
The character's body part bones can be repositioned to fit the style and proportions of your character. You can create a template from scratch and any ommissions on your part can be supplemented by referring to the part types and names in the following illustration. The leg bones and knees need to be slightly bent outward. Do not align the thigh and foot in a straight line, instead, offset the knee slightly to coax the leg to bend toward the right direction (especially when it squats).

The assembly of the face will coincide with the head creation. The neck should extend to the "HeadNub" which should be located around the center of the nose. This is so the neck has enough length to bend elastically as the head tilts.

Template Introduction
CTA5 provides the vector character for import into CTA for the creation process. This section will describe the process of taking the provided template into Illustrator for the SVG character creation step.

The character is composed of several images. The way the images are separated do not follow a consistent pattern. You'll need to inspect the character's template file to verify it's structure.

For every part there's a bone that controls several images.
- Eyes: 6 images
- Mouth: 15 images
- Hand: 30 images
- Multi-angled nose: 3 images
For parts with a range of images, it's important to verify with the template file.

Since faces are not limited to one image or angle, the head images for the G3 360 series character can vary. You'll need to verify with the template file.
Hair
Besides the aforementioned fixed structures, there are some variable structures that can occur with hair. The template does not contain correlated skeleton for this type; so you need to make one that fits your needs.
- Images that make up the hair vary depending on the target hairstyle.
- You'll need to check the template file to verify the structure.

Eyes
The eyes are composed of the special "Iris", "EyeWhite", and "Mask" layers. You'll need to place these elements according to the template.

The eyes constitute 3 separate layers in order to rotate and look around optimally. The layes include:
- Iris: eyeball layer.
- EyeWhite: whites of the eyes.
- Mask: controls the eye's travel distance and range.

Nose
Noses for 360 head will have multiple images for different angles.Clear

Mouth

- Sprite: The REar: group corresponds to the CTA sprite and RLBone of the same name.
- Element: The Mouth: > Normal: group supports image swapping and renaming to differentiate the parts like SmileOpen, PuckerLip, OpenLips layers (in the illustration to the left).
- Shape: The REarReplace group in Illustrator contains miniscule interchangable shapes.
Hands
The following illustration is the Spritehand. Spritehand is parented to RLImage palm element. There are a total of 20 types of hand elements under both hands.

The following illustration is the BoneHand. Bonehand is parented to RLImage palm element. Every single joint in the fingers can be controlled. Naming of joints for both hands can be the same and does not have an adverse effect when imported into CTA.

BoneHead

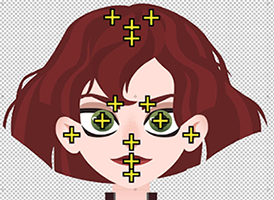
The basic bone positions of the head are the following:
- Eyes for the center of the pupils.
- Eyebrows for the eyebrows to the sides of the nose.
- Nose is usually positioned on the tip or center of the nose.
- Mouth should be placed at the center of the neutral lip shape.
- Ears are placed at the sides of his head near the midline of the face.
- Face position is roughly the same as the head around the position of the character's chin.
- BackHair/FrontHair is treated the same as the CTA4 Head Tool.
- If the two bones of the character are shifted arbitrarily, it will cause the hairstyle to be offset from one another.
- It is recommended to directly copy the position of the TemplateBone or change out the graphics in the template.
- Do not move or change the order of the layers.
Put the basic scalp hair under FrontHair and all hairs behind it under Backhair. Once these two items are fixed, draw out the hair cards. Adjust the skin colors according to the color tones of the scalp or head type. The current unified rules are the following:
- FrontHair on the top and BackHair on the bottom.
- The FrontHair is positioned close to the hairline.
- FrontHair and Backhair usually lies closesly apart.
- Bone points for hair cards need to be placed at the roots for them to move naturally with Spring dynamics.
Guide to the drawing process

The drawing process for the character is described below. After the graphics are made, verify that the visual style meets the conditions below, and consider if further adjustments are needed.
- Keep the line thickness and specifications consistent (with or without stroke methods).
- Make sure the line styles are consistent (pen strokes or no strokes).
- Add coloring while paying attention to tone, shading, and style consistency.
To avoid display issues with the finished graphics, Clip Groups need to be broken apart and reconstituted as merged objects. Backtrack to repair display problems like thinning lines, disappearing Clip Group shapes, or loss of clipping after bringing the character into the application.
- You can break up Clip Groups by executing Object > Expand Appearance in the menu bar.
- If there are line strokes in the Clip Group, you will first need to separate the object into shapes:
After confirming that objects in the Clip Group are all shapes, crop the image (Pathfinder > Crop):

Merging compound shapes

Usually, symmetrical objects need to be processed in this way. After selecting the things you want to merge, click Pathfinder > Unite.

Joint positioning

At this stage, the limbs feature stiff joints composed of two-part shapes with no weight map blending. Draw a circle as a reference for the rotational pivot. After making a cross reference line during alignment, drag the center of the circle to the intersection point and it will automatically align to perfectly connect the joints. Depending on your familiarity with rigging, the rotational axis can be changed based on this basic setup. When exporting SVG, please turn off all alignment shapes, reference lines, and graphics, which will make it easier to set Color Groups.
Drawing the eyes

The appearance in CTA (left) and the layer order (right):

- The bone pivot is usually set at the center of the pupil.
- The basic pupil position will also be set in the middle of the eye shape.
- There are six variations of eye shapes that correspond to facial expressions: "normal", "normal smile", "closed eyes", "shocked tight", "half open", and "wide open".
- In the eye shape variations, only "normal", "half-open", and "open" will contain the complete three-layer structure of the iris, eye white, and mask.
- The "closed eyes" shape will only require one image to be put on the eye white.
- The current specifications specify that "normal", "half open", and "wide open" eye shapes need to have masks that are slightly larger by 0.5px.
- This is to ensure that moving pupils don't create white outlines when they touch the borders of the eyes.
- Use Object > Path > Offset Path to adjust the enlarge the shapes.
- Whereas in prior versions of CTA, only a speck of light reflection is added to the eyes-open shape of IrisChange, CTA5 lets you experiment with other design choices.
If you want to make CTA3 style eyes without the eye whites, you should keep the following points in mind:
- Every change to the eye shape needs to include an EyeWhite and Mask.
- Mask cannot be larger than EyeWhite in version 5.0.
Using Sprite Sequences
CTA supports two eye structure options:
- Triple layers for puppeting, consisting of "Iris," "EyeWhite," and "Mask."
- Single or sequence images that completely replace the triple-layer system.
Since sequencing supports both SVG and raster frames, set up the folder structure in Photoshop accordingly:
Raster Frame Setup
- Add a "_Cycle" suffix to the parent folder of the sequence images. For example, rename a folder called "Iris" to "Iris_Cycle".
- Place the frame images individually into the folder, starting with the first frame and ending with the final frame.
![]()
Once complete, this setup will allow the animation to playback from the bottom frame to the top frame.
Vector Frame Setup
- Add a "Cycle:" suffix to the sequence group layer. For example, rename the layer from "Iris:" to "Iris:Cycle:".
![]()
The order of the playback will depend on the order of the layer import, starting from the bottom to the top.
Sprite Replacement with Sequence Images
In order to replace a sprite, follow the import steps below:
- Activate Composer > Sprite Edit.
- Select a sprite from the browsing menu.
- Click on the Replace Current Element button.
- Select all the sprite images from the subsequent dialog window.
- Once imported, click on the eye button to preview the animation.
![]()
To change the playback speed and loop settings, right click on the sprite to access the context menu.
![]()
Replacing a sprite with sequence images will also disintegrate its original setup structure. To support special structuring, use PSD or SVG format for import.
| The original eye has a distinct "Iris", "EyeWhite", and "Mask" structure. |
After import, the entire structure is replaced with a basic image sequence. |
Positioning mouth shapes

Principles for positioning the mouth shapes during assembly:
- For images where the teeth are shown, align the mouth graphics vertically on the bottom edge of the upper row of teeth.
- For images where the teeth are covered, align the upper lip to the bottom edge of the upper row of teeth.
- Do not displace the upper row of teeth to any obvious degree.

Please refer to the diagram to the right for drawing the mouth shapes. Pay special attention to the mouth shapes that show teeth or tongue. Lip biting and other expressions should be consistent with the example.
The mouth shapes and the layers:

- BMP needs to be named Normal:.
- Draw the side view of the mouth shape to match its frontal image.
- When assembling, pay attention to the alignment of mouth shapes at different angles to avoid sudden deviation when switching angles.
- You can refer to the alignment method in the figure below.
- Set the center of the images slightly to the direction of the mouth corner.
- The left and right side images will be offset to the left and right respectively.

Smooth head creation
The following video is a tutorial on creating the "Smooth Head" facial structure.
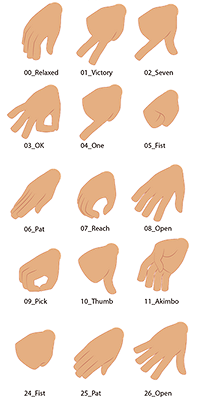
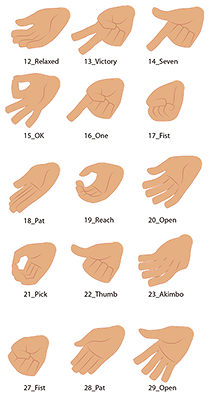
Drawing hand gestures

The current hand gesture poses refer to 3D gestures. If the appearance of the gestures is unclear to you, then you can reference the 2D graphic / 3D model chart to the right.
- Match the appropriate hand style according to the character style, and work according to the reference material.
- Analyze the key points of its style, and then derive all hand shapes after it's all mapped out.
- The pivot point must be located at the base of the palms and in a way that won't reveal the sharp edges of the hand when it's turning.
- The wrist shaft needs to be covered within the palm of the hand, and there should be no obvious corners.
- Basically, just draw one side of the palm and mirror a copy for the other side.
- For palm alignment, make good use of the cross-reference guides for automatic joint alignment.
Sharp contours of the hand can result in visual artifacts as the wrist bends, e.g., the notch at the top of the wrist when it supinates:

Drawing multi-angle feet
The feet need to swap between multiple images depending on the type of actions they will take.
- Draw the images of the foot according to what is required for animation and copy and flip the set to get the other side.
- CTA5 characters primarily face forward or 45° quarter angle.
CTA5 characters are mainly frontal and 45 degrees. Taking the right foot as an example, the foot shapes used for front-facing characters are:
- 45° outward.
- 0° frontward.
- 45° inward.


Taking the left foot as an example, the foot shapes used for right-facing characters are:
- 90° left.
- 45° quarter view.
- 0° frontward.


It is customary to draw the complete foot with the shoes as it's often unnecessary to draw the three angles of feet first and then the shoes to match it.
Extend Bone creation
The following video is a tutorial on creating Extend Bones.
Color Group settings (SVG only)

Color Groups use the following naming conventions (Group > Area > Objects > Sub-objects):
Character  > SkinTone > Arm / Leg / Torso / Head > Face / Ear / Nose
           > Hair > FrontHair / BackHair
           > Eye > Eyeline / EyeWhite / EyeColor
           > Eyebrow
           > Mouth > Lip / Teeth / Tongue / Oral
Clothing   > Outfit > Base / Sleeves
           > Top > Base / Sleeves
           > Bottom > Hip / Legs
           > FullBody
           > Shoes > Base / Sole / Strip / Pattern
           > Socks > Base / Pattern
Acc > HeadAcc / BodyAcc

The character is exported as SVG after it has been assembled. Before exporting, please make sure that only these three layers are enabled in the file:
- Body skeleton under RLBoneHuman:.
- Face bones under RLBoneHead:.
- All graphics under RLImage:.
Make sure to turn off all reference lines, images, and pivot points before importing the character into CTA. Click Color Group to make sure that a basic color combination can be applied. Group by Color and Group by Sprite have the ability to organize graphics into folders based on color combinations. Select a setting that will suit your needs.
It is recommended to use the Color Group provided by RL for classification, which is beneficial to:
- Easily find the part you want to color.
- From the two major types of character/clothing to subdivide each part, there is a fixed logic to ease the search for the desired part.
- Organizing images from large to small is also convenient for changing the overall tone first and leaving the detail adjustments for last.
- Make skin tones re-usable.
- When the naming and structure are the same, applying skin color to parts such as the nose or ears will automatically change to the current character's skin color and no additional color adjustment is required.
Therefore, it's best to organize the folders of Color Group according to the naming rules table mentioned above and move each part to the corresponding item. You can first generate a large project folder and then place the parts separately.

After inserting everything, you can select each object one by one in the SVG Color Adjustment to check if the parts that flash in the viewport are correct. Then save the configuration file for the SVG Group Editor to restore the settings quickly when you need to. Loading the settings back onto the character is also a good method to check if the color combinations are applied to the correct parts.

360° Head settings
Set up for universal application
Apply the same head rotation settings uniformly as the base foundation and then modify and adjust the details (currently, RL characters use "HeadTool"). The head turn will be recorded on the face shape and hairstyle, but the facial features will not. Hair assets can only be redeployed on head rotations of equal settings. The current process is to first save the head rotation settings and apply them to any character and save another character out of that in order to bring it into CTA5.

After reducing the size of the head in Composer, return to the stage to compare it with the character you want to apply to. Do not reduce the proportion of the character on the stage for comparison. Go in and out of Composer to adjust the ratio to match the head ratios. Ratios that are closer to the rotation range will give more accurate results. Back in production, read the settings file that was just modified while adjusting the head rotations. This way you can get a basic setup for the head rotations to work off of. Once you are done with the head turn setup, save the settings files so you can readily restore it when necessary.

Head turn set up
If there is no head rotation setting you can use or work off of then refer to the following methods:
Step 1
The Quick Head Turn Setup offer an initial setup for the head turns. Even though this step is not completely necessary, it will definitely help you hone in on the effective ranges for facial features. In principle, the more realistic the character is, the less distance the nose will travel with the head turn and the less likely it'll swap to another image when the head is turned to the side.

Step 2
The basic nine points represent nine angles, and if necessary, create new points for use as additional angles.

Step 3
Head rotations should be fine-tuned for correct alignment.

- In principle, you'll need to imagine that the face has a central axis.
- Use the left and right central axis angles to determine the length of the frontal face.
- The face is compressed due to the change of angle up and down, and the proportion of the hair (top of the head) is more exposed as the head angles down.
- Imagine the face as a board strapped to a rotating ball.

- When the facial features tilt upward: The space between the eyes and nose is compressed, the nose is separated from the mouth, the front of the nose is shortened, and the chin is flat.
- When the facial features tilt downward: The distance between the eyes and the mouth is compressed, the nose is close to the mouth, the front of the nose is elongated, and the chin is pointed.
- When turning the head: The nose is used as the reference as the space and width of the inner object become smaller, and the outer space becomes larger.
- The ear and the face layers swap levels depending on the angle of the head.
- The amount of displacement between the mouth and the tip of the jaw indicates the degree of rotation in the head.
Step 4
The hairstyle settings basically move according to the same logic.

- The basic relative position is that if the front-side hair goes up, the back-side hair will go down, and vice versa.
- The rotation of the left and right hair pieces follows the same principles as the rotations and compression of the facial features.
- Take the positional offset between the ears and the face into consideration when moving the sideburns.
- In practice, try putting the front and back hair onto the dummy character to adjust their overall sizes.
- The hairstyle itself is composed of pieces of hair, which makes it convenient to adjust their shapes and form to fit different characters.
Step 5
Since the aforementioned steps comprise of the basic concepts, you'll need to adjust the rotational methods according to the style of your character.
- The two ways to modify the left and right rotations are transformation and deformation.
- The mouth shape can be deformed to simulate a slightly sideways look.
- The eye shapes can be deformed to change the distance between the eyesockets and the irises.
- Transformations can change the shape of the entire eye while deformations will only change the shape and position of the eye whites.
- By taking advantage of this fact, you can modify the appearance of the eyes for the side view.
180° Head settings
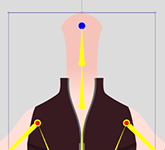
The center point of a long object will be placed close to one end for easy rotational adjustments, such as eyebrows and long hair pieces. The ears will be placed at the sides of the face near the center line with the pivot for the eyes aligned with the pupils. The face sides should be placed below the jaw line matching or near the Head Bone point. The Bone point is a one-time settings, so it is urgent to get the settings just right before turning the head. Otherwise, modifications to the Bone point will require modifications to the subsequent head-turn settings and expressions.
-
 Attempt to symmetrically align the left and right graphics and bones as much as possible.
 -
 The neck body part must be stretched to the center point of the face with the Head_Nub bone point set at its location.
 -
This setting will let the character turn his/her head while the neck bends according to expectation.

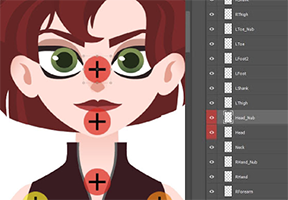
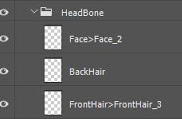
Bone point parent relation
Please make sure that the object is parented under their corresponding parent items to prevent isolated objects. For example, the bangs should be placed under the Front Hair and the facial parts should be placed under the Face. You should name the parts according to their eventual bone names. For example, Face > Face2 means that Face2 is the child bone of Face.
Facial angle image switch settings
Left and right facial part image switching (like the nose) is designated by the various turning angles in Photoshop. You can download the basic PSD structure template here. The silhouette for the sides of the face is not constructed from switching images, rather it is composited together from various elements which should be placed under the Center category. You should place the images in the lowest level directory of each category. For example, inside Center > Nose > Normal instead of just Center > Nose or Center. If placed, say in the Center > Nose folder, the element may appear inside the Composer but will become invisible in the Stage.
-
 Parent child relation is denoted with a ">".
 -
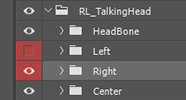 angle of the face are composed of Left, Right, and Center.
 -
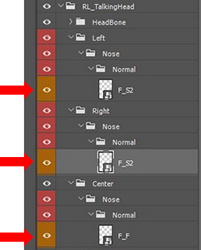 Graphic images should always be embedded in the deepest directory of the layer hierarchy.

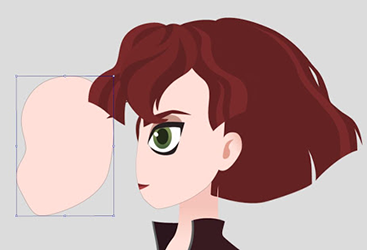
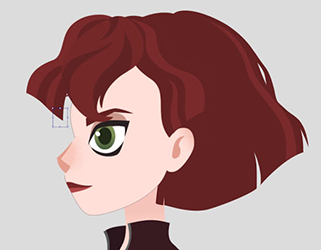
When creating the left and right side graphics, make sure they remain coherent with the center image. Therefore the parts feel as if they are the left and right side of an object. You can utilize differences in outlines and shadows to consolidate the look of the individual parts like in the figure to the left.
In order to make the head turn believable, you can place different images for different angles of the face. Then composite it with facial elements to simulate a complete head turn to the side.
Head turn settings
You can save some time by creating one side first (either the left or right) for the face turn and mirroring that over to create the opposite side. Some parts such as the eyes, eyebrows and ears have left and right configurations. You can also designate complementary parts using the Pairing Settings under Mirror Options.
-
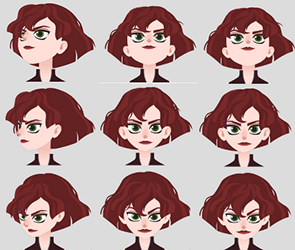
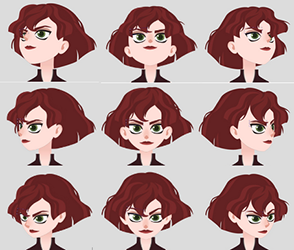
 The head turn supports 9 different angles: left up and down, center up and down, and right up and down.
 -
 Example of the head illustrated head angles.
File import/export settings
Keep in mind that child and parent names should match. For example, FrontHair3 should be placed underneath FrontHair and not Backhair. Non-matching names will cause the items to not adopt the movement settings. Size of the PSD graphical elements should also be relatively the same as those in the Cartoon Animator. When the size differences are too great, the movement range will differ significantly when the head turns. If you are unsure of the look for the 45 degree head turn, then it is best to first create the 0 and 90 degree head turn composition. This makes easier to infer the look for the 45 degree head turn and inform you on the facial feature positions and sizes. You can then save the file to preview the head turn and make adjustments to the facial features as needed.
-
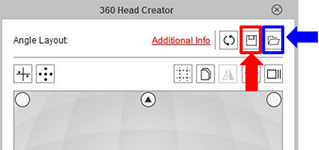 Once you have set the 9 angle points, you can press the save button (highlighted in red) to save the current settings or the current progress. You can also load configured settings using by clicking on the load button (highlighted in blue).
 -
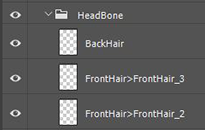 The parent-child relationship is set by the HeadBone. Please refer to the description of the head related bone point.
Advanced process example
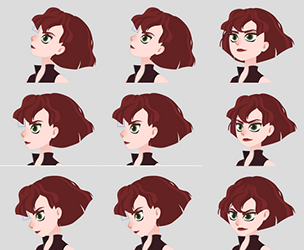
If you are creating a character in the style of an embedded character, then it is recommended that you first create the quarter view (45 degrees). After you save the foundational settings for the head turn you can process the front view (0 degrees) and the side view (90 degrees). Front and quarter view upward and downward tilt will require the adjustment of facial features and changes to the shape of the face. For the side view, simple head rotation for upward and downward tilt should be sufficient.
360° head creator quick setup
-
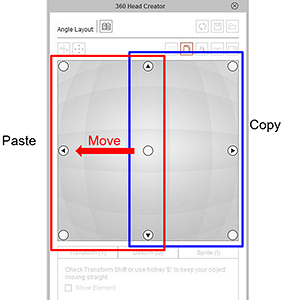 Once the 45 degree angle is imported, copy them from the blue area to the red area.
 -
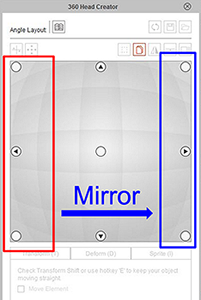 Take the left side region and mirror the images over to create the right side opposite angle.
 -
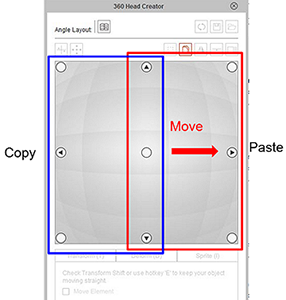 Once the 45 degree angle settings are imported copy them over from the blue area to the red area.
Following the steps above, you'll get results that resemble the following in corresponding order.
After the head is turned, the items that must be placed behind the neck, such as the back, are to be moved to the back of the body. Then move the entire head layer over the body.

Expression settings

Please follow the example animation on the left side of the UI to set the amount of displacement for each part of the different parts. The degree of exaggeration is different depending on the character style. Please set it according to your preference. There are several items such as the inclination of the eyebrows, the shape of the eyes, the range of movement of the pupils up and down, the amount of twisting of the nose, and the deformation of the mouth.
Smooth mode
Part of the eyes and mouth can choose to use Smooth Mode depending on the role. Different from the preset use of eye-changing/mouth type, Smooth Mode is a combination of multi-object combination, such as the combination of the upper lip of the mouth, the lower lip and the oral cavity into a nutcracker. Note that after clicking the Smooth Mode, you cannot restore the mode to the original map. Please make sure you need to click again.
PSD creation process
After the character PSD is imported, you can see if there is any object on the face that disappears/display error, and then re-import after changing from PS. If the character you are making has a three-angle body, use the same front head to copy the body to other angles to make the head turn settings.
Then check the parts of the body that have not been cut, and then use the Bone Editor to adjust the Expand to the maximum.
Body bone
For the joint alignment, you can draw a vector full circle with the same curvature in the PSD, using the wrist as an example. The joints on both sides are aligned with this circle. PSD into the AP will automatically ignore the vector file, can be retained. Change the gesture to pay attention to whether each gesture has a vector circle for reference.
Foot angle
It is recommended that if you want to place a new angle graphic, you can put the outer opening, front, inner eight, and positive side feet from top to bottom.
Skeleton
When making a new character skeleton, be aware that the three points of Thigh/Shin/Foot should be arranged in a non-linear manner to be able to manually operate the character. There is a slight difference in value (1pixel). If it is a straight line, the action character will go to either side. An angled situation will be fixed to the left and right.
Unless necessary, such as the shape of the foot of the shoe, the distance between the ankle and the sole (Foot/Foot2) should not be too far away. If it is too far, it will easily cause the deformation of the skeleton of the operating foot skeleton when the Lock toe is moved.
-
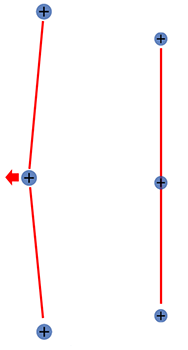 The knee should have a slight angle.
 -
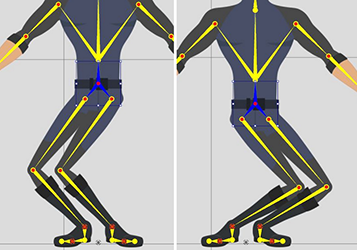 If the knee is completely straight, the inverse kinematics can flip to the wrong side.
 -
 A slight angle to the knee ensures that the inverse kinematics angle toward the right directions.
Hand gestures appendix
Take the right hand as an example, with 30 gestures on one side and mirror shots on the left hand. Note that gestures have back and under side differences.
-
 Back Side
 -
 Under Side
Spring settings

- Limit Angle: Limits the swing range, which can simulate objects that can swing but need to be controlled to a certain extent, such as shirt sleeves.
- Translate: Stretches and compresses the bone point distances to create an elastic, rubber-like effect


Set the structure of bone according to the needs of the character. Skirts or jewelry objects with corresponding overlapping and circular structures are more commonly used, and you can refer to them if you have similar dynamic requirements. In practice, it is more common to set one bone chain, two symmetrical bone chains, or even three-pronged bone chains along the edges.

If you position the spring dynamics along the edges of the graphic image, there will be more compression and expansion of the image. If a single bone is set in the center of the graphic image, the entire object will simply swing.
Generally speaking, spring dynamics has innate several characteristics:
- More links equate to bigger movements for the tail segments of the spring joints.
- Multiple joint chains on the same image can cause the image to pull.
- Preview the dynamic results to check if the rigging is properly set up.
- Check for unwanted deformations and over-stretching.
- Try deploying a spring preset and adjusting it to have the ideal settings.

Facial feature boundaries

Set the movement range of facial features. The main parts that will be adjusted are as follows:
- Eye: The pupil moves up and down and left and right. Eyes can be deformed and extruded according to your needs.
- Eyebrow: Make sure the eyebrow raises and movement ranges do not collide with the eyes. Having them move in a way that fits the character's style should be sufficient.
- Mouth: Make sure the mouth shapes do not intersect with the nose and eyes. Having them move in a way that fits the character's style is enough.
- Nose: In most circumstances, does not need adjustment. The degree of adjustment can be determined by the style requirements of the character.
Checklist
Now that the character is nearing completion, check to see if there is anything missing so far. Follow the steps below for the checkup process:
Layer order
- Front
- The head needs to be in front of the body.
- Forearms and palms need to be on the topmost layer.
- The upper arms go behind the body.
- Side view
- Left hand and foot need to be on top of the body and head layers.
- Right hand and foot need to be at the bottommost layer.
- Left leg layer can be moved under the body according to the graphics requirement.
- Left-side elements will always be on top of right-side elements.
Sprites
See if there are any missing images or changes in shape for the following objects:
The six eye shapes / Gestures / Mouth types / Soles and shoes
Parts graphic name
Check the names of individual accessories and sprites with updated graphics.
Color Group
Click on individual items and see if the flashing parts on the character correspond in kind and check if they are in working order. The parts of a character include:
SkinTones / Arms, Legs, Head, and Face / Hair / Clothing, Top, Bottom, and Accessories
Spring effect
Check if the spring dynamics still work for the character is animated with accessories and hairstyle applied. In addition, you'll want to apply prop motions to check whether the object dynamics are too strong or too weak, etc.