Difference between revisions of "Content Dev:CC 3.4 Hair Creation Process"
Chuck (RL) (Talk | contribs) m (→Smart Hair Shader Textures) |
Chuck (RL) (Talk | contribs) m |
||
| (3 intermediate revisions by the same user not shown) | |||
| Line 17: | Line 17: | ||
|ID||_ID||Greyscale||*.tif||*.png||Best||Closest||Yes||Shader Settings > ID Map||ID material should be applied to the groom hairs and AOV should be set to '''albedo''' for proper rendering. | |ID||_ID||Greyscale||*.tif||*.png||Best||Closest||Yes||Shader Settings > ID Map||ID material should be applied to the groom hairs and AOV should be set to '''albedo''' for proper rendering. | ||
|- | |- | ||
| − | |Opacity||_opacity||Greyscale||*.tif||*.jpg||High||Gaussian||No||Texture Settings > Opacity||Save this texture in JPG format for CC as PNG has no effect in the Opacity channel. | + | |Opacity||_opacity||Greyscale||*.tif||*.jpg/*.png||High||Gaussian||No||Texture Settings > Opacity||Save this texture in JPG format for CC as PNG has no effect in the Opacity channel. |
|- | |- | ||
|Root||_root||Greyscale||*.tif||*.jpg||Lowest||Closest||Yes||Shader Settings > Root Map||Root material should be applied to the groom hairs and AOV should be set to '''albedo''' for proper rendering. | |Root||_root||Greyscale||*.tif||*.jpg||Lowest||Closest||Yes||Shader Settings > Root Map||Root material should be applied to the groom hairs and AOV should be set to '''albedo''' for proper rendering. | ||
| Line 106: | Line 106: | ||
=== Hair Groom Plugin Options (For Maya) === | === Hair Groom Plugin Options (For Maya) === | ||
| − | For | + | For hair creation in Maya, the mainstream options include Xgen (built-in), Ornatrix, and Yeti. Currently, the internal RL pipeline supports Xgen and Ornatrix, giving developers the flexibility to choose between these two. Below is a brief analysis of the pros and cons of both: |
| − | + | Xgen: | |
| − | + | ||
| − | + | *Advantages: | |
| − | + | **Built-in, no need for additional installation. | |
| − | + | **Strong integration with Maya's toolset. | |
| − | + | **Powerful for large-scale hair generation and animation. | |
| − | + | *Disadvantages: | |
| − | + | **Unstable, frequent crashes, especially during rendering. | |
| + | **Limited script resources and online tutorials. | ||
| + | **Complex UI and file management system, making it harder to use efficiently. | ||
| + | |||
| + | Ornatrix: | ||
| + | |||
| + | *Advantages: | ||
| + | **User-friendly interface with simpler, clearer file classification. | ||
| + | **Fast and convenient file storage. | ||
| + | **Direct and efficient functionality, with most of Xgen's key features available. | ||
| + | **More stable operation, with fewer crashes and bugs. | ||
| + | *Disadvantages: | ||
| + | **External plugin, requiring installation and setup. | ||
| + | **May not integrate as seamlessly with Maya's native tools compared to Xgen. | ||
=== Texture Layout Concept === | === Texture Layout Concept === | ||
Latest revision as of 01:21, 26 September 2024
Contents
- 1 Smart Hair Shader Textures
- 2 Texture Aspect Ratios
- 3 Nine Channel Settings
- 4 Shader Texture Settings
- 5 Using the Render Method to Produce Texture Maps
- 6 Matters Needing Attention During Texture Production
- 7 Render-less Hair Texture Production
- 8 Brief Introduction to Baking Scalp Textures
- 9 Hair Bake Methodology
- Main article: CC Asset Production.
Smart Hair Shader Textures
The smart hair shader utilizes 6 effect maps with an optional Base Color map:
| Texture | Suffix | Color Space | Arnold Render Format | CC Input Format | Image Quality | Arnold Pixel Filtering | Needs Edge Padding | CC3 Material Input Channel | Notes |
|---|---|---|---|---|---|---|---|---|---|
| Ambient Occlusion | _AO | Greyscale | *.tif | *.jpg | Medium | Closest | Yes | Texture Settings > AO | Some pixel sampling is tolerated for more realistic real-time rendering. |
| Z-depth | _depth | Greyscale | *.exr | *.jpg | High | Closest | Yes | Texture Settings > Blend | Opacity should be composited into this texture in order to apply edge padding. |
| Flow | _flow | RGB | *.tif | *.png | Best | Closest | Yes | Shader Settings > Flow Map | Opacity should be composited into this texture in order to apply edge padding. |
| ID | _ID | Greyscale | *.tif | *.png | Best | Closest | Yes | Shader Settings > ID Map | ID material should be applied to the groom hairs and AOV should be set to albedo for proper rendering. |
| Opacity | _opacity | Greyscale | *.tif | *.jpg/*.png | High | Gaussian | No | Texture Settings > Opacity | Save this texture in JPG format for CC as PNG has no effect in the Opacity channel. |
| Root | _root | Greyscale | *.tif | *.jpg | Lowest | Closest | Yes | Shader Settings > Root Map | Root material should be applied to the groom hairs and AOV should be set to albedo for proper rendering. |
| Base Color | _baseColor | RGB | *.png | *.jpg | Medium | Guassian | Yes | Texture Settings > Base Color | This map is optional, and can either be rendered or composited from other maps. |
In view of the complexity of the new shader mapping process and new requirements, a separate article is required to explain everything in detail. This time around, the use of next-generation, Unreal-inspired process will be used to create the texture maps. If you want to understand the principles behind each texture channel, you can refer to Unreal's hair project.
The usage of each texture channel will be touched upon in the following sections along with a brief explanation of their practical purposes.
ID Map
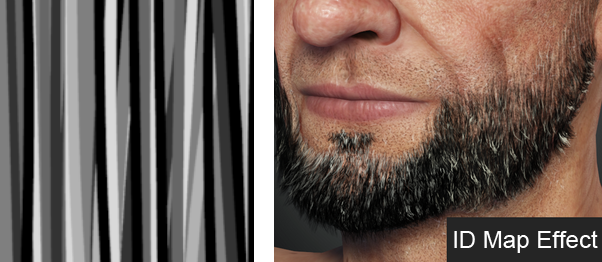
Mainly used for cross-strand color changes (e.g. black hair mixed with white hair or highlighting) and scattered reflections. The principle is to use different hues to randomly separate each hair strand. For example: by selecting hair strands within a grey-scale range of 20 to 50 (if white to black is 0 to 100), a randomized dye (or other special effects) can be applied.
Root Map
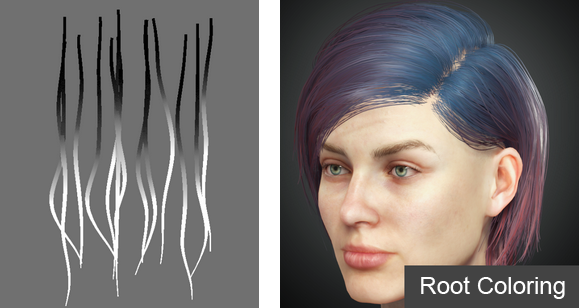
Mainly used for along-strand color changes (e.g. gradual coloring). The principle is to use a gray-scale gradient to change the color of the hair along the flow of the strands.
Flow Map
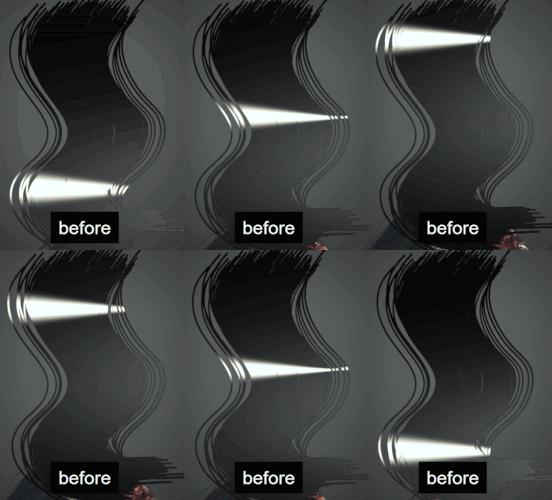
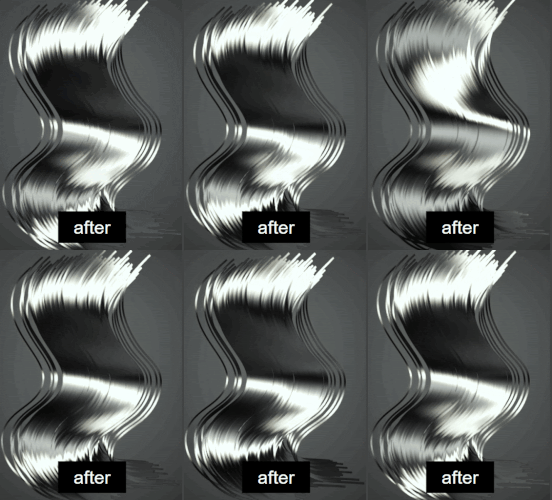
Similar to the normal map, it is mainly used to manipulate the optical flow direction (especially for low-poly curly hair). The principle is to control the direction of the highlight flow using an RGB texture map, so that the reflective effect can overcome the obtuse look of low-poly hair cards.
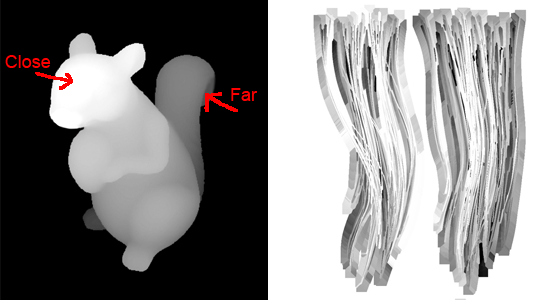
Depth Map (Non-applicable Map)
Generally used for depth-of-field compositing effects. The new Character Creator hair shader is only responsible for compositing the diffuse map, because CC does not support Unreal's Pixel Depth Offset effect.
Keep in mind that white represents near and black is far.
AO Map (Legacy Texture Channel)
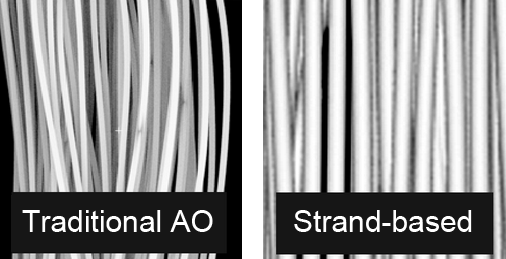
Given that the old process did not produce texture maps by rendering, the ambient occlusion process will need to be touched upon.
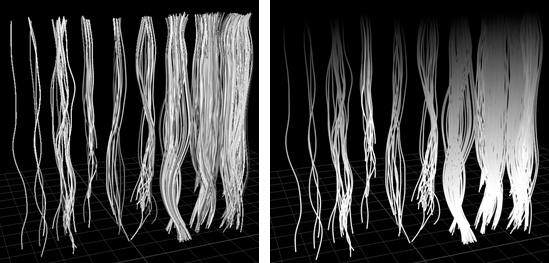
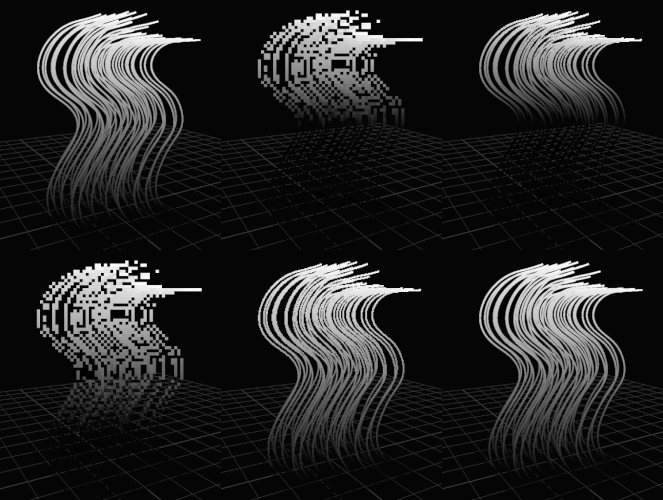
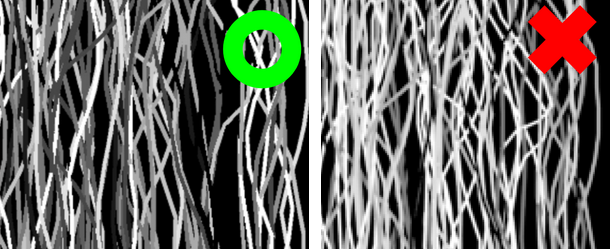
The image to the left is the traditional ambient occlusion map which takes into account the occlusion between neighboring hair strands. On the right is another method for calculating AO by emphasizing the three-dimensionality of each hair strand. Since the method to the right is less visible under medium distances, the example picture to the left is the preferred way.
Texture Aspect Ratios
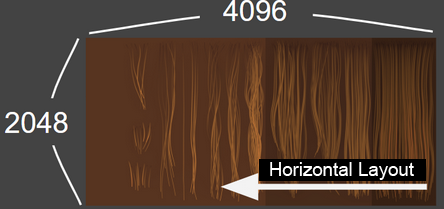
Traditionally, the hair textures come in square aspect ratios. However due to the demands of the current process, the use of rectangular (2048x4096px) aspect ratios may be required. Rectangular aspect ratios are particularly apt for long hair, making it more intuitive to layout lengthy hair cards. On the other hand, the square aspect ratio benefits from being frugal with texture memory and tend to have better definition at the same resolution. Simply put, rectangular aspect ratios may be better for long hairstyles while short hairs can be placed on square aspect ratio maps. Developers should decide for themselves which aspect ratio is best suited for each situation.
Nine Channel Settings
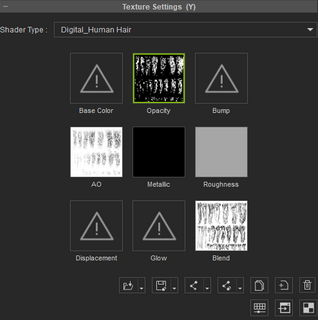
The new texture channel settings are shown on the left. The differences between the old and new way of handling texture channels are as follows:
- Base Color and Bump maps have been removed.
- The Base Color will be created and baked according to the shader parameters and applied under the hood.
- The Bump map is made redundant with the data provided by the Flow map, therefore it is not required.
- The Z-depth texture is placed in the Blend channel with its blend mode set to "Multiply".
Shader Texture Settings
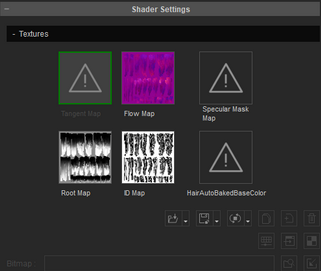
The new hair shader has kept the traditional Tangent and Specular channels, and in additional, have added three new channels: Flow, Root, and ID. Flow and Tangent channels are mutually exclusive (similar to Bump and Normal channels). The Root and ID maps should be placed into their respective channels to achieve the proper effect.
Using the Render Method to Produce Texture Maps
Hair Groom Plugin Options (For Maya)
For hair creation in Maya, the mainstream options include Xgen (built-in), Ornatrix, and Yeti. Currently, the internal RL pipeline supports Xgen and Ornatrix, giving developers the flexibility to choose between these two. Below is a brief analysis of the pros and cons of both:
Xgen:
- Advantages:
- Built-in, no need for additional installation.
- Strong integration with Maya's toolset.
- Powerful for large-scale hair generation and animation.
- Disadvantages:
- Unstable, frequent crashes, especially during rendering.
- Limited script resources and online tutorials.
- Complex UI and file management system, making it harder to use efficiently.
Ornatrix:
- Advantages:
- User-friendly interface with simpler, clearer file classification.
- Fast and convenient file storage.
- Direct and efficient functionality, with most of Xgen's key features available.
- More stable operation, with fewer crashes and bugs.
- Disadvantages:
- External plugin, requiring installation and setup.
- May not integrate as seamlessly with Maya's native tools compared to Xgen.
Texture Layout Concept
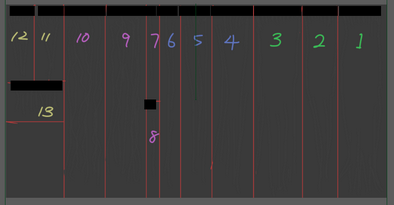
It is recommended to create a draft layout of the texture maps in an image editor (like Photoshop) before entering Maya to begin texture production. This is because, one the one hand, limited UV space can be planned for ahead of time, and on the other hand, the UV maximum space can be used to avoid the need to add and remove hair cards.
First, you should gather references to observe the qualities and overall structure of the target hair style.
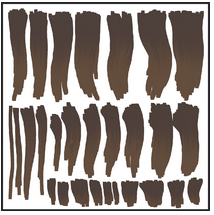
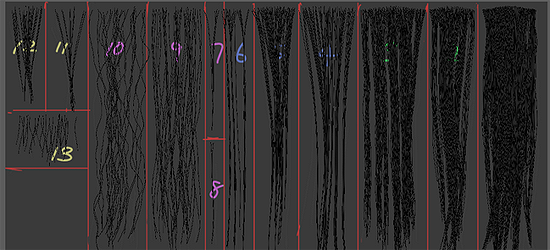
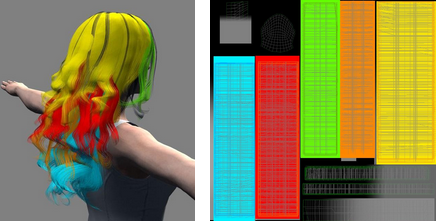
The figure to the left is the hair UV layout including the borders of each hair piece. This example is divided into four regions: dense, excessive, sparse, and stray hairs. The red lines are the UV boundaries within which individual hair piece UV islands reside. This is so that the UV islands do not come too close to one another when they are applied to the layout. You can then take this layout into Maya as a guide to create the Groom Hairs.
Additional Tips
Drafting the hair texture is all about variations, without being too exaggerated (as repetition can become obvious). Do consider the following elements for mock-up:
- Density: consider making the underlying layers more dense and outer layers more sparse so the layers underneath have more chances of showing through.
- Curvature: do make different types of curvatures like "S" and "C" shapes.
- Crisscrossing: allow for subtle crisscrossing with few strands of hair, do not clump the crisscrossed hairs as that can become too exaggerated (see the first point).
- Layout: do draw a mock-up of the UV layout on top of the hair draft texture. This lets you visualize the final cut-up for the hair cards.
- Length: variate the clumps of hair and organize it to simplify the creation process, e.g. from right to left and top to bottom.
- Distribution: do distribute the hair follicles evenly with variation coming from the way that the hair strands flow.
Production Method
Step 1
Set the project and use the project window to pick a project directory. This is utmost importance because if XGen is to be used, then the project settings must be resolutely established, otherwise one may encounter rendering issues.
Step 2
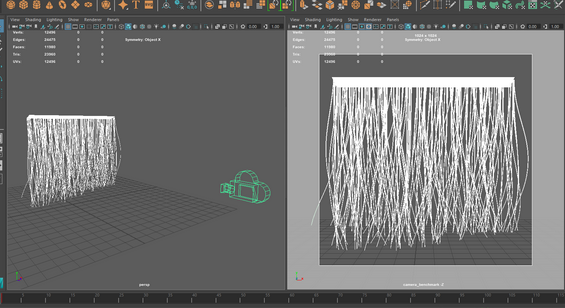
Place in the standardized camera setup by importing the provided FBX file. In order to enforce a consistent working environment and stable, predictable results, it is recommended to use the reference camera to render the Groom Hairs. The existing Groom Hair in the scene is a placeholder for positional reference. You should replace this Groom Hair with a setup of your own. Make sure the hair growth direction is from top to bottom, otherwise the Flow map will not be compatible with the advanced hair shader in Character Creator.
Use the camera settings > Reallusion gate to visualize the render boundary as shown below:
Step 3
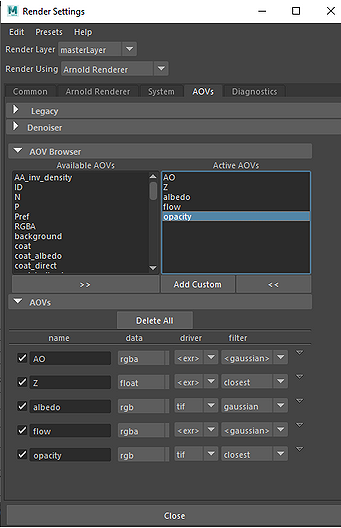
Once the Groom Hairs are completed, the next stage is the rendering process using Arnold, with render and AOV setting adjustments. The AOV portion can be accomplished within the same scene using the shaders included to render different channel effects. This is similar to pass rendering for final compositing that is standard practice in the animation industry. The embedded channels we are interested in are Z (depth), Albedo (matte colors), and Opacity (masking). In addition, we will be using custom AOVs to generate the remaining channel textures such as AO (ambient occlusion) and Direction (flow) maps.
AOVs (Arbitrary Output Variables) provide a way to render any arbitrary shading network component into different images. For example, an artist might find it convenient to separate direct and indirect lighting contributions and later recombine them during compositing. Arnold provides built-in AOVs for outputting depth, position, and motion vectors.
You can download the preset files for Maya Arnold render and material settings here.
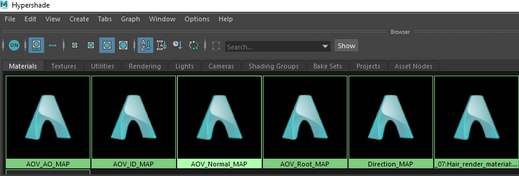
The shaders are already setup in a separate file which you'll need to drag into the rendering project (use Arnold import for 3dsMax). Each preset shader is made up of complex material graph of pre-connected node networks.
Step 4
Apply the ID or Root material to each hair object.
Step 5
Go to the render settings and set the aspect ratio to square with an output resolution of 4K.
Step 6
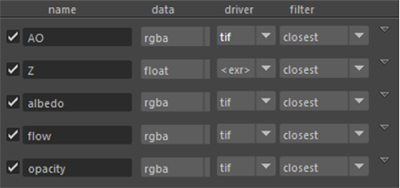
Return to the AOV settings, and add the Flow and AO rendering parameters with the embed settings (Z, Albedo, and Opacity). Adjust the settings to resemble the following example image:
The pixel filtering should be set to "closest" and not the default value of "Gaussian", otherwise there will be pixel bleeding on the edges of the hair strands.
Step 7
Assign the custom AOV shaders by plugin them into the "Shader" slot for the provided material.
Step 8
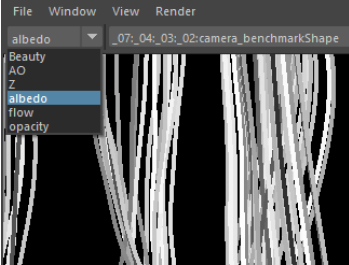
If the settings are correct, you should be able to see the set AOV channel in the Arnold rendering window, so that you can prepare for rendering (remember to switch to the reference camera mentioned at the beginning when selecting coloring). As for why it says to give the hair root or id first Material, because there is no way to separate these two AOV channels and both are albedo effects (aov does not support hair shader), so at present, you can only replace the hair itself with the shader and then use albedo to separate rendering. In the future, there will be a perfect rendering method that will be added to the process. Most of the channels in the rendering are directly using the preset values, it is no problem, but some channels can be customized visually. Here you can customize the Root map, Zdepth, ID map.
Root Map
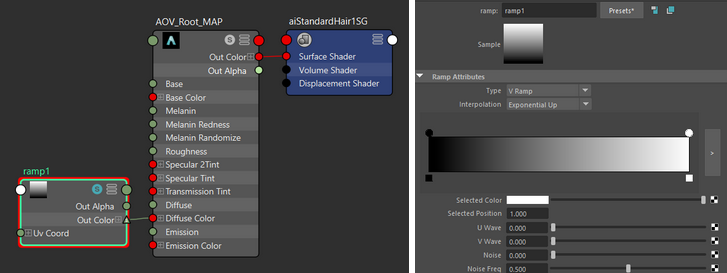
The ramp node in the root map node provided by Maya can be used to adjust the parameters of the grey-scale gradient, and the producer can set the texture by himself to match the vision in CC
After output, the texture must be converted to grey-scale from Photoshop, otherwise there may be some pixel noise.
ID Map
In general, the ID map node provided by Maya does not need to be adjusted, because this node is mainly to give each hair a random ID distribution of 0~1 (white to black), so if the color distribution is uneven visually, please contact technical support (for example, the proportion of dark colors is particularly small), it may be that the parameters are wrong.
The ramp node can adjust custom gray scale parameters:
Matters Needing Attention During Texture Production
The following are a few useful tips for creating production-ready textures.
Converting 32 Bit to 8 Bit Z-Depth Map
The z-depth map is a grey-scale texture used to express depth of the hair strands. Arnold uses EXR format to process this map, which is then brought into Photoshop for exposure readjustments. When first brought into Photoshop, the Depth texture will appear completely white, because color values in EXR are expressed in 32 bits. You'll need to convert the map to 8 bits, invert the image, and export from Photoshop; instruction video:
You can export the post-processed z-depth map in PNG format.
Using the Color Picker to Adjust Exposure
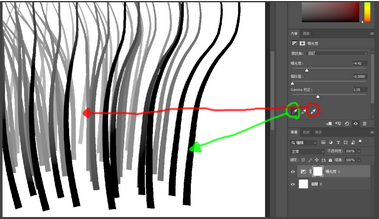
You can use the exposure eyedropper to pick the closest and farthest hair, and adjust the gradient with the slider. Remember to invert the entire image after adjusting the exposure values.
Additional Touch-ups in Photoshop
Exposure adjustments as a first step is usually not enough, and additional post-production should be carried out. This can be done manually in Photoshop and should follow the same principles as AO (ambient occlusion) production:
- This will become the AO map in Character Creator.
- Once applied to the blend channel, the effect should not heavily effect the diffuse color.
- Avoid overly dark texture maps (like the image below), otherwise the hair will appear "dirty".
- You should err on the side of the bright maps rather than dark.
- The gradual transitions from light to dark should be meticulously preserved.
- Bring the AO map into Character Creator and Unreal for quality control repeatably during the production process.
- Remember that the white values stand for near, and black for far -make sure to invert the map when necessary.
Processing the ID Map
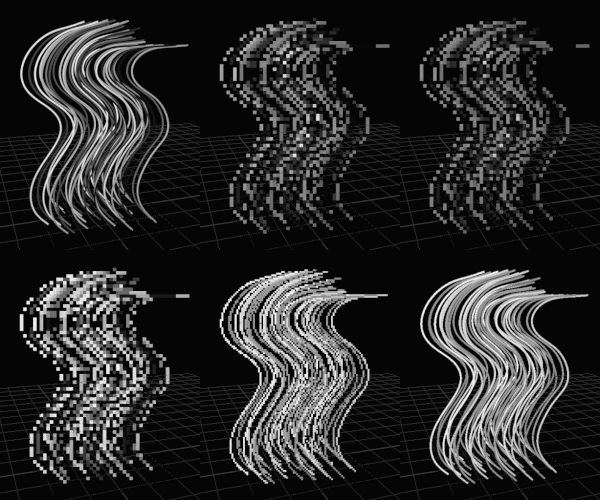
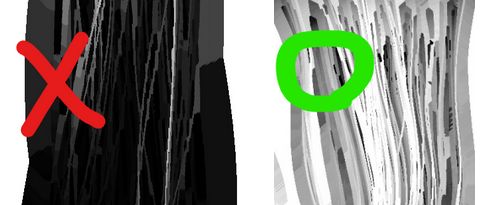
Correct: Black, gray, and white is evenly distributed, and the border pixels are not blurred (the hard-edged pixels will yield provide sufficient padding). Incorrect: The distribution of grey-scale colors are uneven (bias toward white), and the borders pixels are blurred, this will cause errors in edge detection and give insufficient padding.
Avoid Overly Thin Hair Strands
Hair strands in hair texture maps should not be too thin. Hair thickness is a consideration because if hair strands are too thin, then the texture maps will become too pixelated. It is recommended to keep the width of the hair strands 2 pixels or above. Notwithstanding certain shader effects, the hair thickness also has direct correlation with the size of the texture map. For example, a 4K texture map will tend to have thinner hair strands than a 1K texture maps, however due to a higher pixel count will be more taxing on the system resources. For proper hair thickness settings, check with your Art Lead.
Applying Proper Padding
Adding padding is the last step after all of the texture maps are rendered/produced. Because hair textures are high-precision maps, it is of utmost importance to preserve hard-edged pixels. This is also the reason why the sampling filters are preset to "closest". In the extra padding step, we will use the xNormal Photoshop plugin for it's ability to perform pixel edge extension based on the alpha mask.
Padding must be added to all other texture maps besides the Opacity map. So all aforementioned maps must be rendered in RGBA to preserve the alpha channel. The recommended pixel width for the padding should be tentatively set to 32 pixels at a minimum.
The image below shows the effect of mipmapping on a texture image as a camera pulls away from the target object.
Notice that a mipmapped image without padding will undergo pixel blending around the alpha edges.
Render-less Hair Texture Production
Skip this section, if this is not the method you will be pursuing.
Texture Bake Concepts
The aforementioned concepts are suitable for the creation of hair cards. But in some cases, like dealing with non-planar models such as scalp textures and more solid braids, and outsourcing only providing source files with hair pieces, etc., the use of rendering techniques may not be applicable. In these cases, you can utilize xNormal to bake the texture maps. The following are example steps of this process:
Step 1
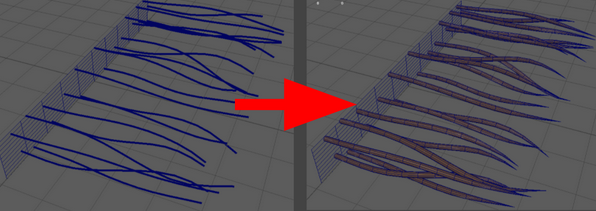
First, convert the groom hair to actual geometry for high-poly mesh.
Step 2
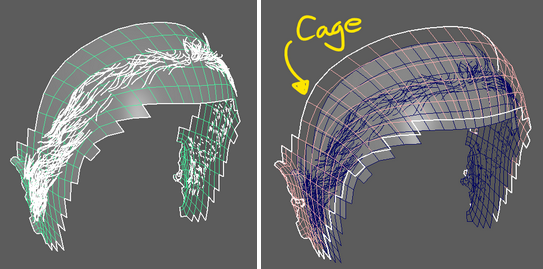
Create a low-poly cage.
Step 3
Textures rendered by Arnold can also be baked via high-poly source mesh and low-poly cage in xNormal (details are not included in this article). In particular, Root and ID maps are baked by transferring texture data from the high to low poly meshes. Therefore, it is paramount for the high-poly mesh to have proper UVs, and preferably in square format. A study of the Flow map creation process for xNormal has not been conducted, therefore, rendering in Maya is still required.
Detailed Online Tutorials
The following video covers the xNormal channel baking process in extensive detail. People interested in this process should view this video to quickly get up to speed with the latest techniques.
Tips on Texture Baking
ID Maps
Make good use of the KernSelect tool in Maya to randomly select individual hair strands to apply different shades for the ID map. You can randomly select a group of hairs from a batch by a set percentage. This will ultimately, let you evenly split the hair into ID groups.
With each ID grouping for the high-poly hair, you can assign a separate ID color/hue. After several tests, we found that a color separation of 10 degrees will yield better visual results. Therefore, we recommend assigning ID from a grey-scale hue that is divided into 10 colors.
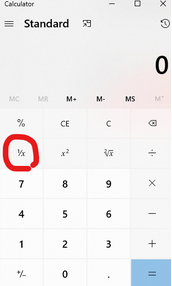
Make good use of a calculator; specifically the "1/X" function to compute the proper value for the target grouping. For example, if you choose to divide by 10 colors, then input 1/10, 1/9, 1/8, 1/7... and so on to 1/1, then apply the values to the KernSelect Tool to select the groupings in sequential order, from pure white to pure black. After the textures are applied, bake the high-poly source mesh color data to the low-poly cage model. This step must be meticulously executed with adequate patience.
Remember to never apply intense anti-aliasing to the images, as in doing so will render the image too blurry and adversely effect the hair shaders. Setting the anti-aliasing to "1x" is sufficient for baking ID maps.
Opacity Maps
As opposed to all other maps, the Opacity texture is the one exception that does not need extra padding. Applying padding to the Opacity map will cause the hair strands to appear really thick.
Depth Maps
The cage model must be added for proper texture bake.
Common Considerations
Overly Thin Hair
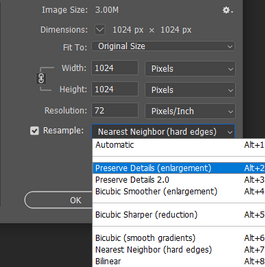
Hair strands that are very thin can end up being cut off. Although it is best practice to fix the hair model itself, the situation may not always allow for it. You can also try to increase the texture resolution of the baked map to 8K or beyond, and compress back to the original size, which will be effective most of the time. Pay special attention to the texture type before applying the compression settings. "Smooth gradient" must be used for opacity maps, while the others should preserve hard-edges lest they become too blurred.
Hair Cards vs Hair Tubes
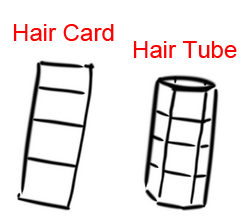
There are two mainstream schools of thought for high-poly hair creation: hair cards vs hair tubes. In principle, both practices are legitimate, however, if you wish to use hair cards then you must make sure that the normals are facing the low-poly models. Otherwise, the thickness of the hair strands may vary due to the changes in the facing angle. Hair tubes have the advantage of giving a three-dimensional bake for the normal maps that can be very useful in real-time engines such as Marmoset. On the other hand, hair cards can greatly reduce the baking time due to a smaller poly-count, therefore, it is recommended for in-house productions, where time is of the essence.
Hair Bundle Positions and UV Arrangements
Once the design of the hair bundles are determined, the UV arrangement naturally follows. Make sure to keep 10 to 20 pixel distance between the UV islands, consider the relationship between normal directions and layers for the hair cards. Hair levels will effect the Soft Cloth results and the UV distribution should be kept tidy. Take the following hair curls as an example:
Brief Introduction to Baking Scalp Textures
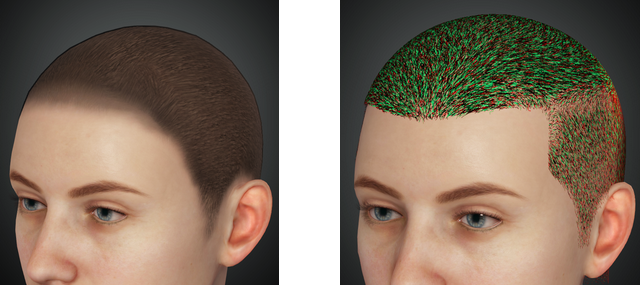
The scalp fulfills a special purpose for this new process, which can be divided into "external mesh" and "fill mesh", and the old process can still be used according to the situation. The main differences between the new and old process for hair creation are:
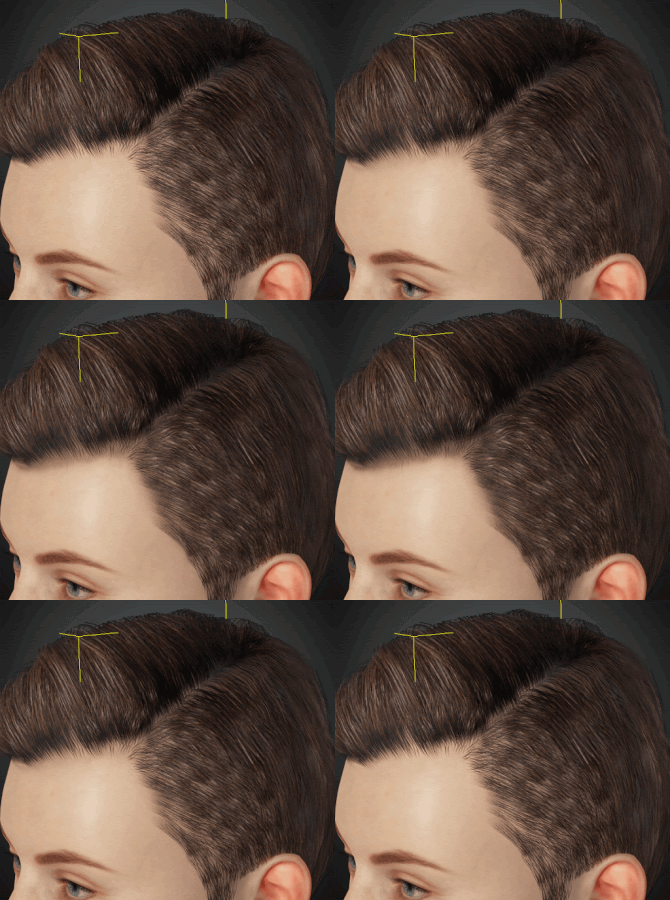
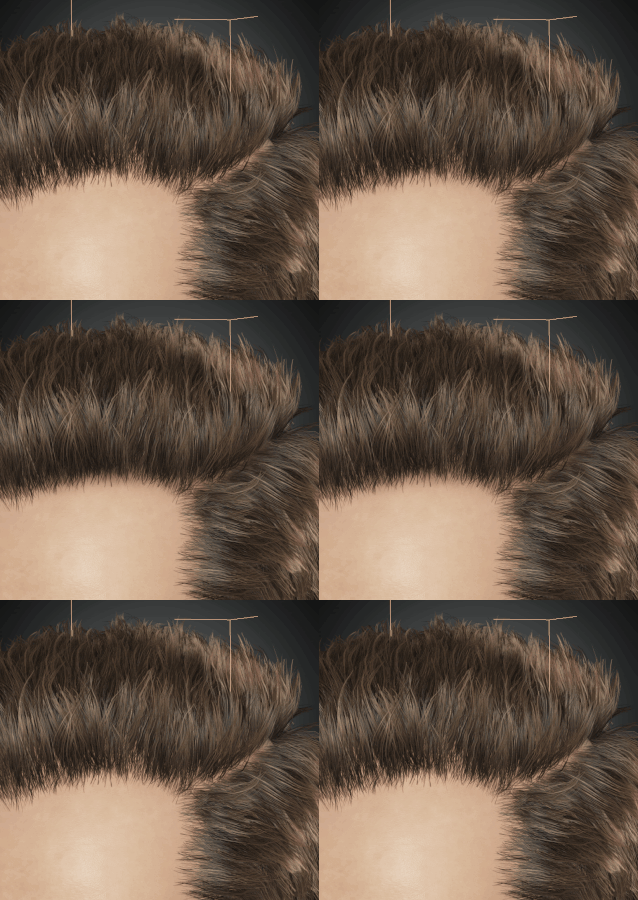
- Old process (picture to the left): The previous process solely relying on Photoshop does not produce the maps required for the texture channels of the new shader.
- New process (picture to the right): Baked in xNormal, the new process provides the necessary channel maps to drive the new shader effects.
The texture channel maps for the scalp are the same 6 texture channel maps for the hair.
Although most of the game industry uses the baking process to obtain scalp textures, it does not mean that the old process will not have good visual results. Please discuss with Art Lead to determine which style to use, regardless of whether it is new or old. Taking visual standards and production time costs into consideration, here is a comparison table of the new and old processes:
| Process | Production Time | Required Resolution | New Shader | Performance | Production Difficulty | File Volume | Visual Harmony |
|---|---|---|---|---|---|---|---|
| New | Long | High | Supported | Poor | High | Many | Less |
| Old | Short | Low | No Support | Best | Low | Tiny | More |
Scalp Types
Gap Fillers (Old Process)
The scalp can be used to fill in empty or sparse areas of the hair, and only the opacity and diffuse textures are required to fulfill this criteria. Proper scalp fills can reduce the amount of necessary hair geometry and the load on the system as a result. It can also help to create a natural look for the transition between the skin the hair. For this purpose, the older, and faster method for production is sufficient.
Avoiding Overfills
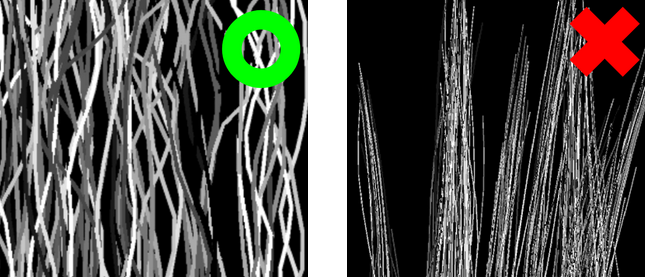
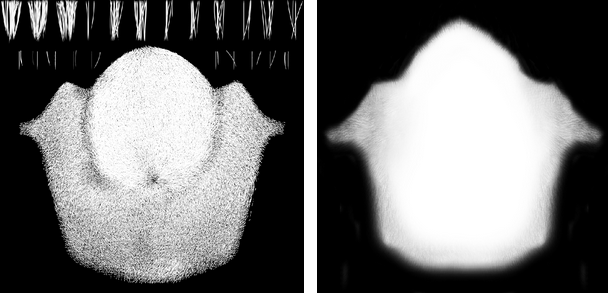
Avoid making the scalp textures too dark (shown on the left), as this will cause the hairline to segment too sharply. Instead, try to make it more "porous" as shown in the image to the right.
Exposed Scalp (Old Process)
The difference between gap fillers and exposed scalps, is that the exposed scalp can be viewed directly without being obstructed by the hair. Therefore, exposed scalp need to have clearly defined hair follicles -not just color fills. This is so that the visuals for the scalp can be adjusted for the new shader. Exposed scalp is suitable for buzz cuts and areas of hair that are too intricate or elaborate for hair card placement. Production method for this scalp type will be explained later.
Exposed Scalp Production Process
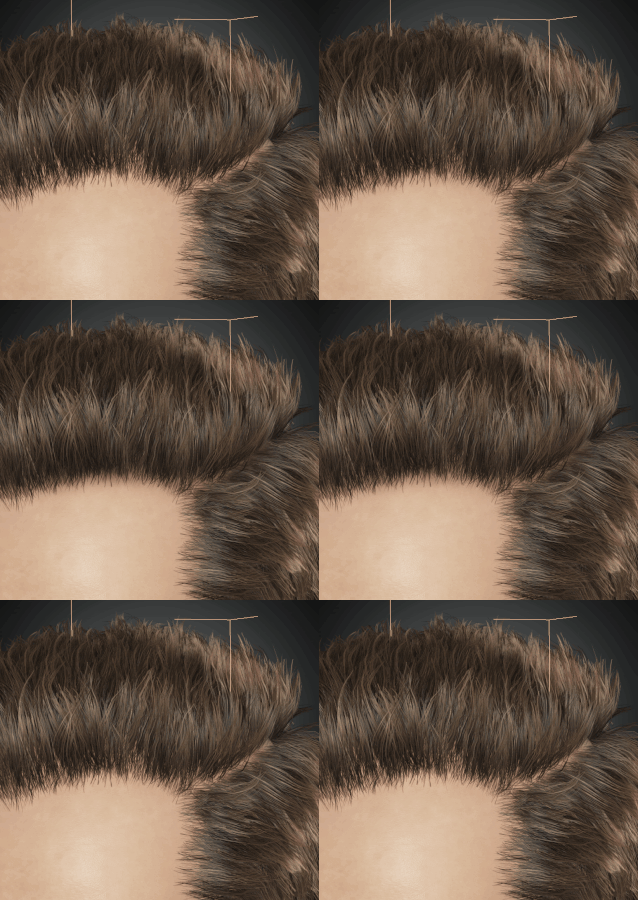
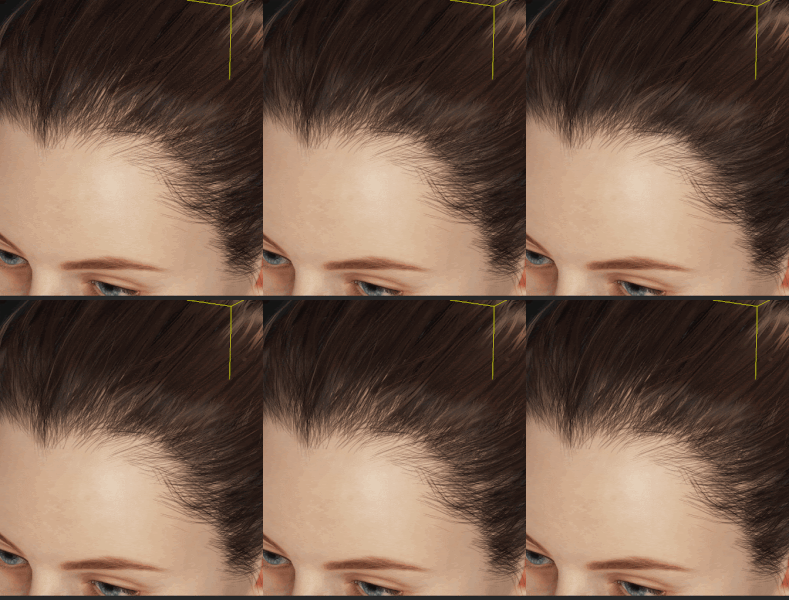
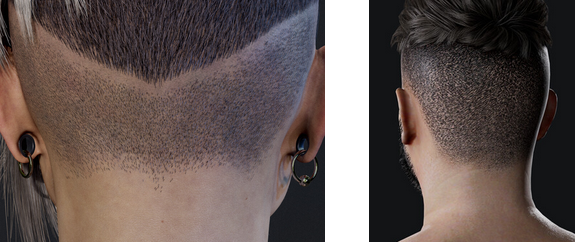
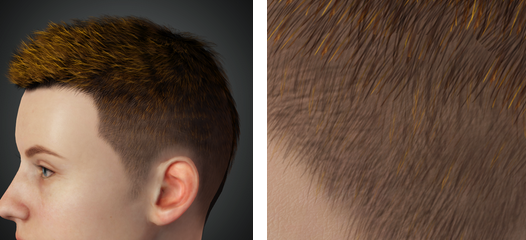
For visual bench-marking, see example one and example two.
The baking process with xNormal is basically the same as the one mentioned above. Additional complication comes from having to pay attention to more factors during the baking process. The following is a list of things to pay attention to:
- The principle of the xNormal baking procedure is the same, i.e. baking high-poly to low-poly mesh with a cage:
- Use hair cards instead of hair tubes because it's not possible to control normal direction for hair tubes.
- Use Xgen's Interactive Groom Editor because it's more suitable for shorter scalp hair.

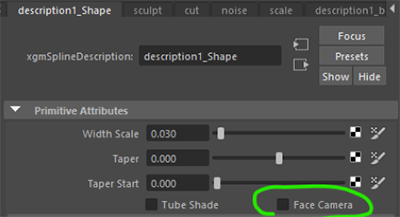
- Turn off Face Camera: Whether it's XGen or Ornatrix, both features have hair strands face the camera by default. This setting should be disabled.
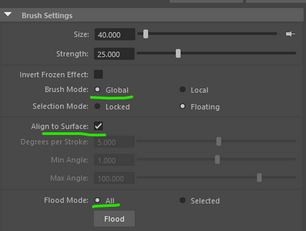
To elaborate, camera facing is turned off mainly to regain control of the normal direction of the hair cards. We can then align the hair cards to the scalp with the twist tool ![]() and align it in the direction of the hair growth to facilitate the baking process.
and align it in the direction of the hair growth to facilitate the baking process.
Hair Bake Methodology
The following is the opinion of the original author, and does not represent the views of Reallusion.
All in all, baking is a technology that is more difficult to master than rendering. Mismanaging some small details can visually compromise the final result. Moreover, the teamwork required for production can be intensive with a lot of handovers between co-workers, especially when dealing with outsourcing. This is because, unlike rendering, there is no universal project that can be re-used throughout production, however, the process is not without its merits. For example, the ID textures produced by baking can still supersede those produced from rendering when applied to the new shader. Furthermore, baking is the only viable solution when it comes to producing scalp textures; the production of Depth maps can also be said to be fast and of high-quality.
In the present CG world, the bake process is still the mainstream production process, and its biggest promoter looks to be Johan Lithvall. Current teaching material and resulting visuals for this technique are all very outstanding. Combined with the Unreal Hair shader, this method is the most commonly seen on Art Station, and xNormal is basically the universal baking software that is open source and readily available. In terms of industry promotion and user popularity, xNormal overwhelmingly wins over Arnold (promoted by Reallusion). Of course there's a reason behind this, that is, hair creation techniques depend on the shifting sands of technology and discovery. Whichever technique develops the fastest and offers the best quality will become the mainstream.
In conclusion, the process of texture production can be multi-faceted and complicated, but the fact of the matter is that it only accounts for 40% of the visual presentation. Furthermore, the arrangement of the hair cards is the most contributor to the final visual result. As such, the quality of hair production should be thought of as a balance between vision and resource management. New process will never the the best process forever, but we should continue to encourage the evolution of the industry going forward.
