Content Dev:CC Submission FAQ
- Main article: CC Asset Development.
Mesh Troubleshooting
Once a mesh is triangulated by CC, how do I get its faces back into quads?
There is no way to get back the original quad mesh, however you may use some tools to convert triangle faces to quad faces. You can try out some of the methods below:
- Inside 3dsMax, use Graphite Modeling Tools > Geometry > Quadrify Selection on the mesh.
- Inside Maya under the Modeling mode use Mesh > Quadrangulate on the mesh.
Be aware that the quadrangulate mesh can differ significantly from the original quad mesh.
Strange black lines appear on the mesh as the camera zooms out!
If the texture borders line up to the UV borders rather closely than the texture edges will appear as the camera pulls outward leading to a down sizing and down sampling of the texture maps. Take the texture maps and add some buffer coloring around the texture borders, or recreate the texture maps with larger buffer edges.
How do I check for Ngons?
- Inside 3dsMax, under the Poly > Selection mode, enter 4 in By Numeric then click on the white arrow next to it. This will select all of the faces that have edges higher than 4.
- Inside Maya, perform Select > Use Constraints... and change the selection mode on the object in question to Face. Under the Polygon Selection Constraints menu, select Next Selection and set Order to Nsided. Drag select over the entire object to select the Ngons.
How do I check for overlapping faces and vertices?
During mesh construction, if one is not careful with the slicer or similar tools, then duplicate vertices occupy the same spot. Oftentimes, this goes unnoticed. You can use the following methods to check for overlapping vertices:
- Inside 3dsMax via the 3d panel, use [+] > xView > Overlapping Vertices or Overlapping Facesso that the areas with overlapping vertices become highlighted in green. You can proceed to delete these verts.
- Inside Maya there is no way to view duplicate vertices but you can select all of the mesh verts and apply Edit Mesh > Merge and set the Threshold to a tiny number like 0.0001. Click on the Apply or Merge button to get rid of all the duplicated vertices.
How do I check for open pockets in the mesh?
- Inside 3dsMax via the 3d panel, use [x] > xView > Open Edges to show the unwelded points in green.
- Inside Maya, use Display > Polygons > Border Edges to thicken the edges of the unwelded points. You can increase the thickness via Display > Polygons > Edge Width.
How do I convert different units of measure to centimeter, for example, if the model was made in inches?
- Create a new scene in your target application and set the unit of measure to centimeter.
- Start the FBX import process for your target model.
- Disable Automatic conversion option, if available.
- Set the File units converted to to match the unit of measure in the file, for example, to inches.
Shading Troubleshooting
The normals behave strangely under certain light angles!
Most likely due to a problem with the normal map format not made for OpenGL. At first DirectX and OpenGl normals may look similar, however, looking at the knife cut normal map samples below the differences become obvious:
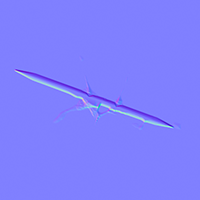 OpenGL format: notice the purple highlights the top of the cut while green outlines the bottom.
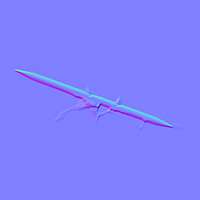 DirectX format: notice the green highlights the top of the cut while the purple outlines the bottom.
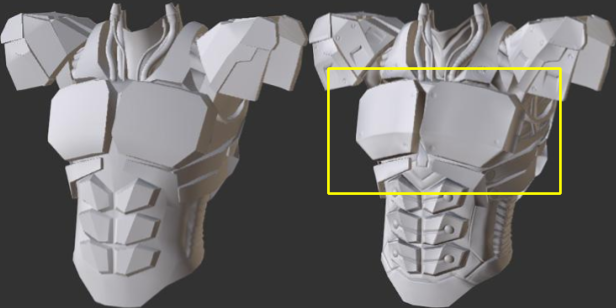
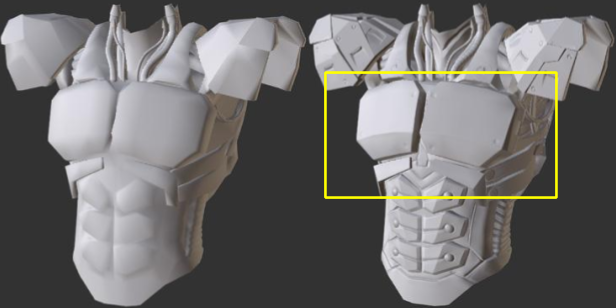
Why do flat areas of the shading appear concave or convex after applying the normal maps?
It is possible that the normals were baked from a lowpoly model that has differenct smoothing groups. A good rule of thumb is to bake from a lowpoly model that has a single smooth smoothing group to let the normal map express the full range of light angles.
My mesh has strangely shaded or black faces!
Check for the following possible causes:
- The existence of a floating vertex.
- The mesh has flipped or reversed UVs.
- The normals direction is incorrect.
- The normals direction is not set to OpenGL.
How do I convert my DirectX normal maps to OpenGL?
You can change DirectX normal maps to OpenGL normal maps by inverting its green color channel. For example, inside photoshop:
- Inside the CHANNELS panel, select the Green layer.
- Press Ctrl+I to invert the layer.
- Save the OpenGL compatible normal map.
Miscellaneous Troubleshooting
How do I check for inverted or flipped UVs?
- Inside 3dsMax with the object selected, open Edit UVWs panel and perform Select > Select Inverted Faces to highlight the inverted UV regions in red.
- Inside Maya with the object selected, open Windows > Modeling Editors > UV Editor and click on the Toggle shaded UV display button in the toolbar to highlight inverted UV regions in red.
When I drag the character into CC, the FBX file fails to import!
Make sure that a corresponding FbxKey exists. You can read in the FbxKey with the following two methods:
- Make sure the FbxKey and the FBX file reside in the same directory, and upon import of the FBX, CC will automatically load the FbxKey as well.
- You can pick the FbxKey via the Create Asset(s) panel during the character import process.