Content Dev:CC AHMP Guide
Auto Hide Model Polygons or AHMP is a technology used by Character Creator to dynamically hide mesh faces when Cloth is worn.
Special thanks to Vitaly Prudnikov (Vit3D).
Cloth that is worn on the character should perfectly cover the body under the ideal circumstances. However, sometimes mesh penetration may occur when the cloth is contracted to the body shape or when the figure is in motion. Auto Hide Model Polygons tool (AHMP) can be used to define the polygons that become automatically hidden when the cloth is worn on the body and the clothing underneath. AHMP settings are directly saved on the cloth asset itself. AHMP is achieved by two methods: the Skin Hiding Groups and the Cloth to Cloth Hiding Groups. The cloth groups do not affect the skin group and will be described in detail in the later sections.
In order to use AHMP correct, you must first set up the cloth collision layer ordering, see Collision Layer Assignments.
AHMP File Download

Corresponding CC Version AHMP File Download v4.30 Download (AHMP v4.30) v4.23 Download (AHMP v4.23) v3.3 Download (AHMP v3.3) v3.2 Download (AHMP v3.2) v3.11 (Sept, 2019) Download (AHMP v3.11) v3.1 (Aug, 2019) Download (AHMP v3.1) v3.04 (Feb, 2019) Download (AHMP v3.04) v2.3 (Dec, 2017) Download (AHMP v2.3) v2.2 (Nov, 2017) Download (AHMP v2.2) v2.11 (July, 2017) Download (AHMP v2.11) v2.1 (June, 2017) Download (AHMP v2.1) v2.01 (May, 2017) Download (AHMP v2.01)
Usage of AHMP
Activating AHMP in CC
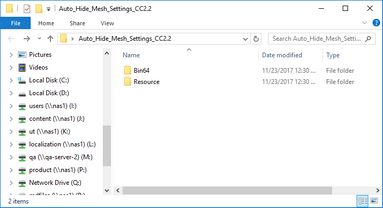
AHMP is a plug-in for CC. The settings for AHMP is shared with other codes, so everytime you update CC you must also download the AHMP file to match the updated version of CC. In order to do this:
- Unzip the AHMP file.
- Copy the file to your CC installation directory.
- Execute CC and AHMP will automatically load.
 AHMP file
 CC installation directory
User Interface
After installation, AHMP can be found on the bottom of the Modify control panel. To activate it, you should select the cloth model in the scene and press the Edit Mesh Mode button. To finish the hide group definition, press the Edit Mesh Mode button to exit.
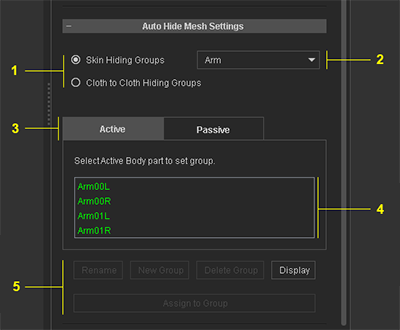
- Radio buttons for switching the mode between Skin Hiding Groups and Cloth to Cloth Hiding Groups.
- Dropdown list for selecting body parts under the Skin Hiding Groups mode.
- Tabs for switching the group types between Active and Passive.
- Groups names list. Assigned groups are listed in green while unassigned are listed in white. Passive groups names have a _Semi suffix.
- Various operation buttons.
How AHMP Works
Hide Skin Groups
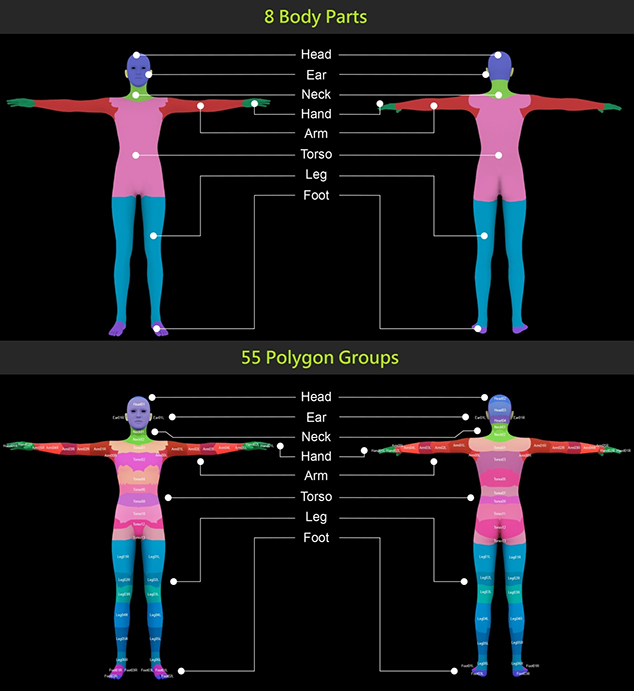
CC Character has predefined 55 polygon groups under 8 body part categories which includes head, ear, neck, hand, arm, torso, leg, and foot.
Active vs Passive Groups
Active Groups
Assignment of the Cloth Active groups directly affect the visibility of the polygons of the body. As soon as the cloth is applied, the corresponding polygons in the body mesh will become hidden. Active groups not only affect the skin but the also all the cloth layers underneath that have the same group name assignments.
Passive Groups
Assignment of the Cloth Passive groups have no direct effect on the visibility of the polygons of the body or the cloth model itself. This type of assignment just marks the faces as a potential candidate for hiding when a cloth of the same Active group is layered on top.
 One must compare the distribution of the faces between the Polygon Groups and the Cloth. If the Cloth can not cover all of the Polygon Groups, then assign this area as a Passive Group.
In summary, the assignment of the Active groups in the cloth model will hide the skin Polygon groups of the same names below. It will also hide the cloths beneath that have Active and Passive settings of the same names.
Skin Mesh Groups Definition
When you define the skin polygon groups for hiding, in fact, you are making some sort of link between the faces in the cloth and the corresponding polygon groups in the body.
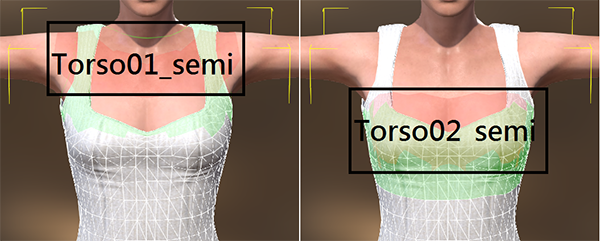
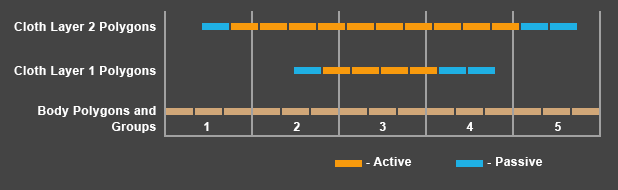 The body polygon groups are numbered from 1 to 5. Parts of two layers of cloth meshes above are set to passive depending on whether or not they cross into the body polygon group regions but are not, by default, counted as belonging to those regions.
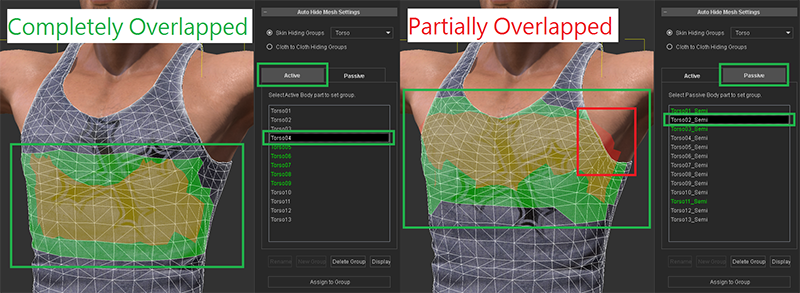
Some parts of the cloth geometry will overlap completely over some body polygon groups, and thus, should be set to the Active definition list. Other parts of the body polygon group are only partially overlapped, and thus, one should define the regions as Passive instead.
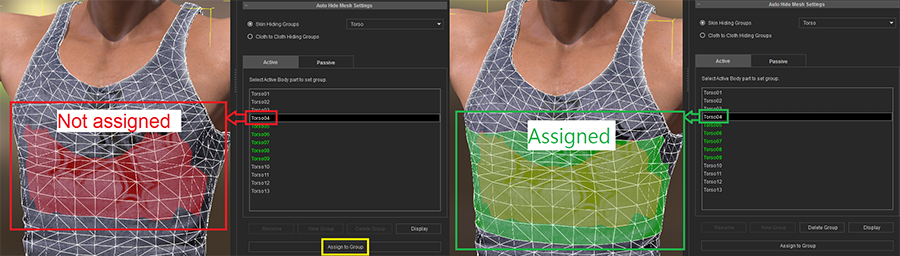
In order to define the skin polygon groups:
- Switch between the Active or Passive tabs to highlight the selected groups in different colors.
- Select the portions of the mesh that highlight in red and press the Assign to Group button.
Reallusion made CC content also utilize the same body polygon groups. If developers follow the rules set out in this guide, then the custom and Reallusion made clothes can be properly mixed and matched.
Cloth to Cloth Hiding Groups
The main difference between Skin Hiding Groups and Cloth to Cloth Hiding Groups is the fact that cloth groups have no effect on the body mesh. This can be useful if the character has several layers of clothing that belong to the same type of collection. Other than this, the cloth groups work the same way as the skin groups. There are also no limitations on the defined cloth groups in terms of polycount and cloth group names. However for it to work properly with other clothing of the same collection, you should keep the group names consistent for matching visibility settings.
If you like to create clothing that is fully compatible with other existing standard collections in the Content Store and the Marketplace such as CC Essential Clothing & Fabric and Professional Outfits, it's recommended that you examine the clothing models in these packs and find out what cloth group names are being used. If the cloth groups fit the configurations of the your clothing then you can apply those same names to your cloth models.
To create the cloth groups:
- Switch to Cloth to Cloth Hiding Groups mode.
- Select Active or Passive tab.
- Press New Group button and define a group name.
- Select the cloth model polygons that you would like to include in this group.
- Press Assign to Group button.
You can also create empty cloth groups by not selecting any polygons in its assignment. This can be useful for hiding the entire cloth model below that have the same group assignment. For example, you can have an underwear model with the cloth group of "Briefs" with all of its polygons included, then you have a pants model which should completely cover and hide the underwear mesh when it is worn. In this case, you can create a "Briefs" active cloth group on the pants with no polygons assigned to the group and everything should work as expected.
In most cases, cloth groups should be defined as Active while the Passive definition can be useful for interactivity with other cloth layers.
Example AHMP Applications
In the examples below we study the AHMP settings for the cloth content that come with CC by default.
Skin Groups
Active Groups
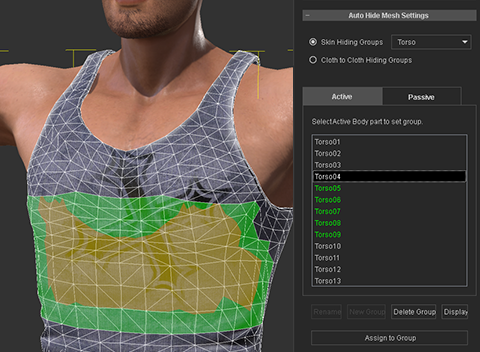 Assigned active skin groups directly affect the visibility of the body.
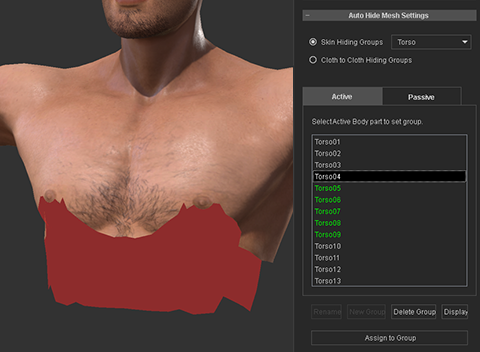 All polygons assigned to the Torso04 group are hidden (tank top hidden for visibility.)
Passive Groups
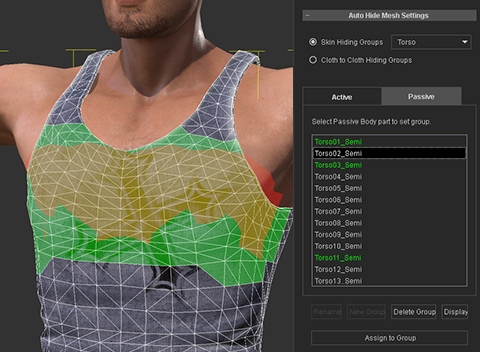 Assigned passive skin groups do not have direct effect on the visibility of the body.
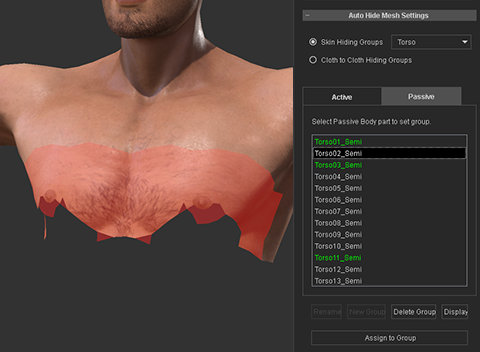 All polygons under the Torso02 group are still visible.
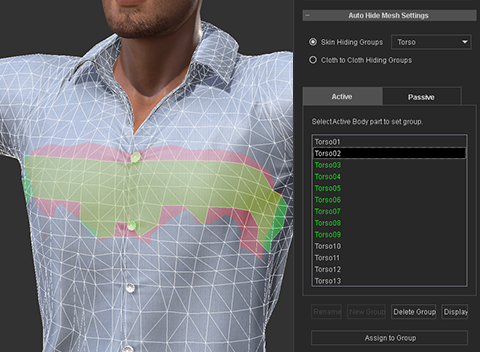 The shirt model applied as the second cloth layer with a Torso02 active group.
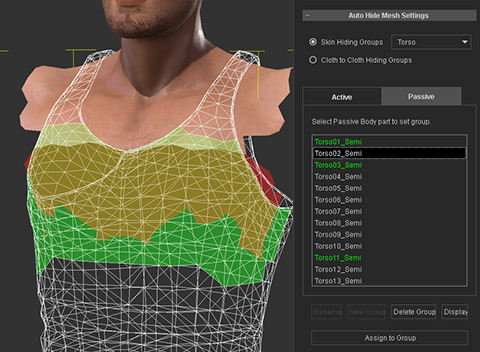 Torso02 becomes hidden in tank top and the body (shirt is hidden for visibility).
You may have noticed that in the examples above, the tank top has become invisible. This is because both tank top and the shirt models, besides having the same skin groups, also have Cloth to Cloth group definitions.
Cloth to Cloth Groups
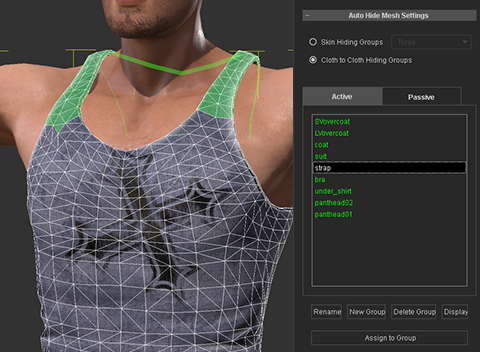 The tank top model has an Active Cloth Group called strap which has no effect at all until the tank top is used as a single layer cloth.
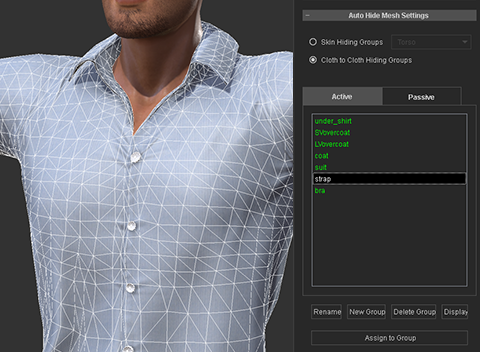 The shirt model has an empty strap cloth group with the goal of effecting only the clothing underneath it and not above it such as jackets, suits, etc.
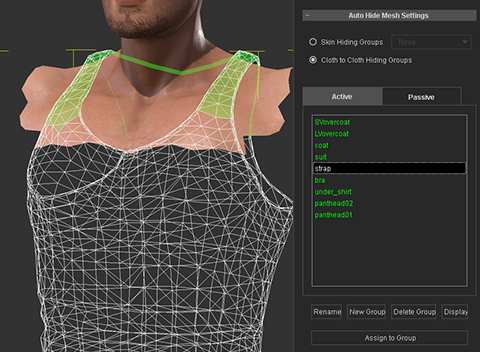 When the shirt and tank top are combined, the polygons assigned to strap group become hidden but has no effect on the skin beneath.
You can find much more AHMP usage examples by examining Reallusion made CC cloth content.