Difference between revisions of "Content Dev:CC 3.4 Hair Creation Introduction"
Chuck (RL) (Talk | contribs) m |
Chuck (RL) (Talk | contribs) m (→Required Production Tools) |
||
| Line 61: | Line 61: | ||
{|class="wikitable" | {|class="wikitable" | ||
| − | |||
!Software!!Version!!Usage!!Remarks | !Software!!Version!!Usage!!Remarks | ||
|- | |- | ||
| Line 69: | Line 68: | ||
|- | |- | ||
|Maya||2020 and above||Model making, Arnold texture rendering, skin weight modification, and XGen for hair creation.||There can be difficulty in loading the provisioned files for versions prior to Maya 2020. | |Maya||2020 and above||Model making, Arnold texture rendering, skin weight modification, and XGen for hair creation.||There can be difficulty in loading the provisioned files for versions prior to Maya 2020. | ||
| − | |||
| − | |||
|- | |- | ||
|Xnormal||Latest official release||Bake hair (scalp) textures maps.|| | |Xnormal||Latest official release||Bake hair (scalp) textures maps.|| | ||
|- | |- | ||
| − | |Xnormal (Photoshop)||Latest official release.||Adding padding to texture maps.||This is a Xnormal plugin for Photoshop. | + | |Xnormal Filters(Photoshop)||Latest official release.||Adding padding to texture maps.||This is a Xnormal plugin for Photoshop. |
|- | |- | ||
|GS curve tool||Latest official release.||A tool that assists in arranging hair cards in Maya. It is not necessary but highly recommended.||[[https://www.artstation.com/marketplace/p/zzR2/gs-curvetools-v1-1-maya-plug-in-curve-controlled-hair-cards-pipes-and-more|Link to Webstore]]<br>[[https://gs-curvetools.readthedocs.io/en/latest/ |Link to Tutorials]] | |GS curve tool||Latest official release.||A tool that assists in arranging hair cards in Maya. It is not necessary but highly recommended.||[[https://www.artstation.com/marketplace/p/zzR2/gs-curvetools-v1-1-maya-plug-in-curve-controlled-hair-cards-pipes-and-more|Link to Webstore]]<br>[[https://gs-curvetools.readthedocs.io/en/latest/ |Link to Tutorials]] | ||
|- | |- | ||
|KernSelect tool||N/A||A tool to assist random object selection in Maya (mainly used to make ID maps).||Enter the code directly in the script editor to use. [[https://forums.cgsociety.org/t/selecting-random-objects-in-selection-mel-script/1572731/2 |Script URL]]. | |KernSelect tool||N/A||A tool to assist random object selection in Maya (mainly used to make ID maps).||Enter the code directly in the script editor to use. [[https://forums.cgsociety.org/t/selecting-random-objects-in-selection-mel-script/1572731/2 |Script URL]]. | ||
| + | |} | ||
| + | |||
| + | === Groom Hair Tools === | ||
| + | |||
| + | Even through internally we prefer to use Ornatrix, there are several mainstream options for creating groom hair. | ||
| + | |||
| + | {|class="wikitable" | ||
| + | !Software!!Remarks | ||
| + | |- | ||
| + | |Ornatrix||This plugin is available for Maya, 3Ds Max, and Cinema 4D users. | ||
| + | |- | ||
| + | |XGen||This tool comes with Maya by default and only available in Maya. | ||
| + | |- | ||
| + | |Yeti||Yet another option strictly for Maya. | ||
| + | |- | ||
| + | |Houdini Hair||As the name implies, only available for Houdini. | ||
| + | |- | ||
| + | |Blender Hair||Free to use just like the Blender software; uses the internal particle system. | ||
|} | |} | ||
Revision as of 02:29, 1 June 2021
- Main article: CC Asset Production.
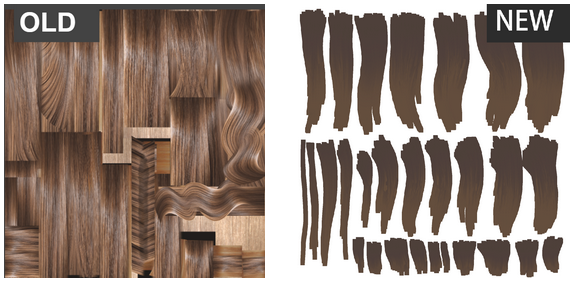
The new hair production workflow, mentioned in this article, is meant to supersede the old methods. See CC Hair Creation Guide for details on the outdated procedures.
What is CC Smart Hair System?
The embedded Smart Hair system is designed to provide the most realistic yet performance-friendly Hair, Brows, and Beard for digital humans in games and films.
For more information visit: https://www.reallusion.com/character-creator/hair.html
Reasons Behind Relegating the Legacy Workflow
- It is difficult to create synergies with different channel maps in Photoshop and other drawing applications. For example, there is very little correlation between the opacity and diffuse map.
- There tends to be a high skills threshold when it comes to hand-painting texture maps.
- It's impossible to hand-paint the Flow map which is a special texture map in RGB color-space.
- Processing ID maps is also quite laborious and not easy to execute.
- It is not easy to modify hand-painted texture maps in unison, and the chance for complete redraw is high.
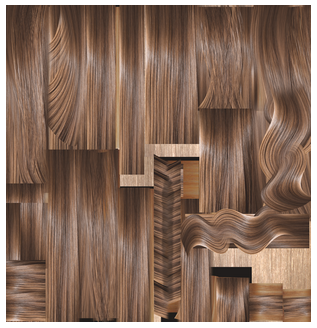
- The old process often used photos of real hair (even including highlights) as the diffuse texture (pictured right). This method is suitable for low-poly hair, but it is not visually pleasing for high-poly hair.
Although it is not recommended to use hand-painting in Photoshop to complete hair textures, as suggested in this procedure, it can still be used for scalp textures that only serve to demarcate the hairline.
Old and New Process Comparisons
The new workflow relies on the texture maps to control hair coloring, highlights, and ambient occlusion. The old way of combining the diffuse, specular highlights, and ambient occlusion into one texture map is abandoned. Therefore, the new diffuse map should look flat without highlighting - as this is quite normal for the new process.
Visual Benchmarking
Visual standards can be found on the Art Station to search for the hair of The Last of Us 2. They are all made with hair cards and the quality is quite high.
Reference links: Abby, Dina, Young Ellie, Manny, girl
Simplified Workflow Overview
Step 1. Analyze the hairstyle you want to make and create the relevant texture maps. Step 2. Export the target CC avatar into your 3rd party 3D application (like Maya), position it, and place the hair cards.
Step 3. Bring the hair cards into Character Creator as an accessory. Step 4. Change the material of the hair cards to a hair shader and observe its appearance. Step 5. Skin the hair cards to the body and export the character as FBX to Character Creator. Step 6. Click on the desired hair pieces and save them as individual groups or hair elements.
Required Production Tools
There are many tools that can be used in the new process. Only the commonly used versions and specifications for production are listed here to assist in the environment setting before production. If you want to use additional tools for production, please confirm the proper software version with your Project Manager or Art Lead beforehand.
| Software | Version | Usage | Remarks |
|---|---|---|---|
| Character creator | 3.4 and above | Base character output, import, material adjustment, and project creation/storing. | Remember to enable mipmapping for power users (in preferences). |
| iClone | 7 or more | To check physics settings. | |
| Maya | 2020 and above | Model making, Arnold texture rendering, skin weight modification, and XGen for hair creation. | There can be difficulty in loading the provisioned files for versions prior to Maya 2020. |
| Xnormal | Latest official release | Bake hair (scalp) textures maps. | |
| Xnormal Filters(Photoshop) | Latest official release. | Adding padding to texture maps. | This is a Xnormal plugin for Photoshop. |
| GS curve tool | Latest official release. | A tool that assists in arranging hair cards in Maya. It is not necessary but highly recommended. | [to Webstore] [|Link to Tutorials] |
| KernSelect tool | N/A | A tool to assist random object selection in Maya (mainly used to make ID maps). | Enter the code directly in the script editor to use. [|Script URL]. |
Groom Hair Tools
Even through internally we prefer to use Ornatrix, there are several mainstream options for creating groom hair.
| Software | Remarks |
|---|---|
| Ornatrix | This plugin is available for Maya, 3Ds Max, and Cinema 4D users. |
| XGen | This tool comes with Maya by default and only available in Maya. |
| Yeti | Yet another option strictly for Maya. |
| Houdini Hair | As the name implies, only available for Houdini. |
| Blender Hair | Free to use just like the Blender software; uses the internal particle system. |
Asset Provisions
Texture Production Project Files (Uniform Rendering Settings)
The material settings for the new process is loaded with parameter adjustments and can be quite cumbersome to replicate manually for each and very project. Therefore, it is recommended to use the provided universal production file for rendering texture maps. Throughout production, you may work on different types of hair such as scalp hair, eyebrows, beards, etc. However, the settings for each hair type is universally the same; all you have to do is replace the groom hair in the scene with your own custom groom hair.
Always use groom hair and not actual geometry, otherwise the ID and Root shader render results will be faulty. And always open a project from the menu, instead of dragging the provisioned file into an existing scene, otherwise the preadjusted AOV and render settings will be lost.
The default setup files are provided here for new setups and in the case of accidental deletion: Maya Reference Files
| Items set | Description & usage |
|---|---|
| Material | The shader that has been set, only Root&ID needs to be replaced, and the rest of the AOV will assist in rendering. |
| AOV | Arnold's rendering has been set, generally you don’t need to set it again. |
| Render settings | Set to 4K by default -adjust according to your needs. |
| Camera | For reference only -adjust according to your needs. |
| Model | For reference only -adjust according to your needs. |
Hair Card Production File (Base Selection)
Under normal circumstances, you should use the base figure that is provided for your specific project. If you have a gender neutral hairstyle, you can use a neutral base. The beard parts are all made with a male base. Under special circumstances, you should choose the body type that is suitable for the project at hand and insert the desired accessories after production.
Visual References
Some Reallusion content that have already passed visual inspection is provided for your consideration:


