Content Dev:CC Asset Production Precautions
Contents
- Main article: CC Asset Development.
General Mesh Precautions
High Poly Sculpt Precautions
Keep the following tips in mind when working with high poly sculpting (Zbrush, Mudbox, Sculptris, etc.):
- Under normal circumstances, use the Base Male/Female figure here as a reference.
- For customized figures, one can create the form inside CC first and then export either FBX (triangular faces) or OBJ (quadrangular faces) as a reference.
- Since procedurally generated Substance material will be applied to the final cloth, one would only need to sculpt wrinkles and seams, avoid sculpting fabric level details.
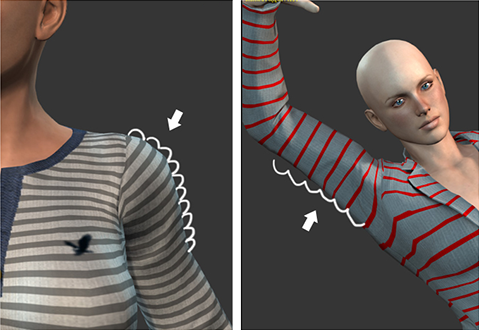
- Be aware of the shoulder areas, particularly the seams placement at the shoulder areas.
 ✘ Wrong: Incorrect shoulder seams placement is not apparent until the arms are angled down.
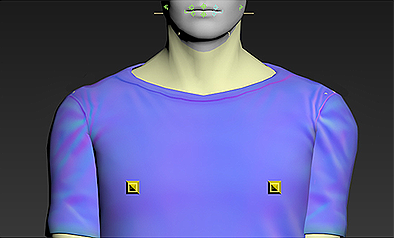 ✔ Right: Sculpt the seams at positions slightly closer and higher up to look better when the arms are angled down.
Low Poly Modeling Precautions
When creating the lowpoly model, keep the following points in mind:
- Make sure the positioning of the high and low poly models match to facilitate the texture baking process.
- Low poly model should maintain adequately large surface details of the high poly model.
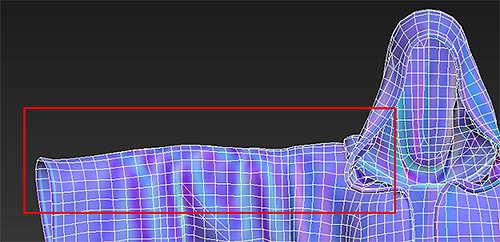 ✘ Wrong: Low poly here is too flat and not faithful to the larger forms.
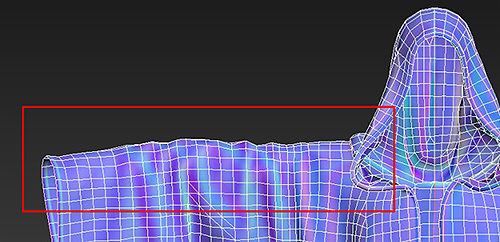 ✔ Right: Low poly here stays true to the large details of the high poly model.
- When creating an outfit, make sure there are not mesh penetrations at the default state to prevent further mesh penetration when morphs are applied or the body is in motion.
- In order to prevent the mesh penetration and deformation issues, pay attention to certain areas of the garment that has a tendency to bend and twist by copying the edge flow of the body geometry. In addition, clothing that is tight-fitting can also benefit by flowing with the edge looping of the body in order to guarantee a smoother problem-free skin binding.
Area Garment Types to Pay Attention to Chest Female underwear, vest. Crotch Skirt, underpants. Shoulder Shirt. Armpits Sleeveless shirts. Elbow Prevent the elbows of tight-fitting clothing from becoming round when they are bent. Knees Preserve the shape of the knees of tight-fitting pants when they are bent.
- When making loose fitting clothing, one does not necessarily have to follow the edge flow of the underlying body geometry. One should take more into account the garment flow itself.
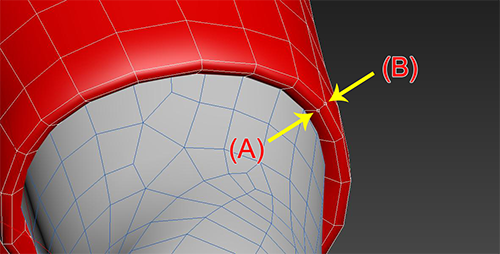
- General garment openings such as collars, sleeves, hems, etc. need to have some feeling of thickness. Therefore, one should model in thickness into the geometry by folding it inwards. However, proceed with caution with soft-cloth portions of the clothing by double checking with the Project Manager and Art Lead as, typically, thickness in geometry do poorly with soft-cloth physics.
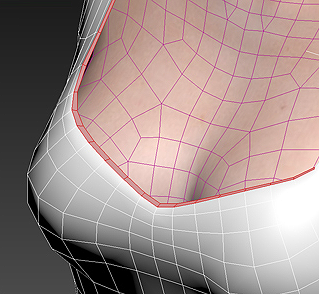 ✔ Right: Opening of this dress has a thickness (red).
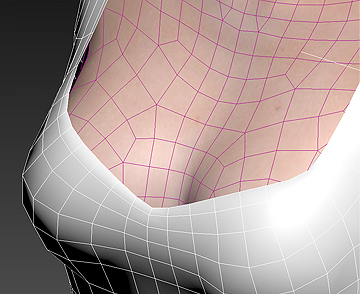 ✘ Wrong: The openings of this dress is impossibly thin.
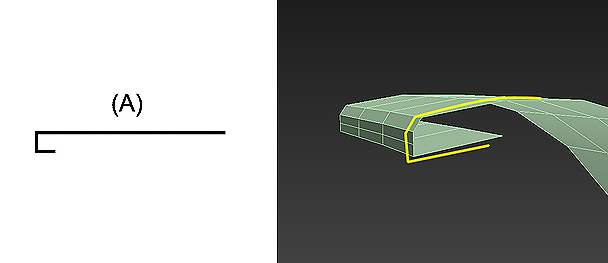 Example of the proper modeling of thickness with an inward hook
- Due to changes in the shape of the clothing after performing the Conform function inside CC, one can increase the likelihood of the clothing maintiaing its original shape by adding more geometry. However this technique has limits depending on what it's applied to i.e. jacket zippers.
- When morphing the character inside CC, usually its the chest, stomach, and buttocks areas that harbour the most drastic changes. Therefore, during construction, one should leave plenty of geometry in those areas. Avoid sparse mesh in those areas to prevent problems with the mesh faces and penetration issues when the shape of the body undergoes dramatic changes, particularly when those areas are magnified.
Low Poly Postprocessing
Apply the following steps as the final measures to make for a sound model:
- Perform vertex weld on the garment seams that hug closely together, that way, when Conform > Smooth is applied in CC, the seams do not fall slit and fall apart.
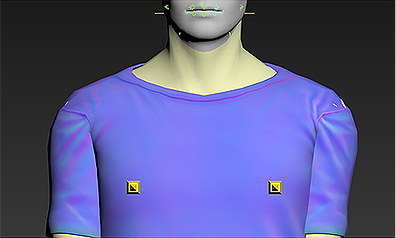
- One should set the surface normals in a 3rd party application before importing a mesh into CC, for majority of all cases, one can use a single smoothing group for the entire mesh set at the smoothest settings (180°).
-
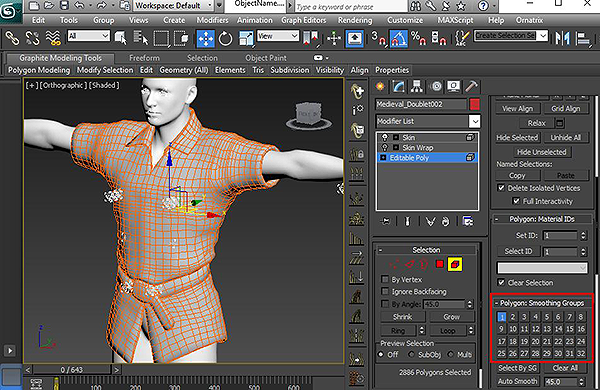 A single smoothing group will suffice for the entire T-shirt.
- After completion of the model and before dismantling the UVs and skin binding, one should go about resetting the transformations of the mesh. This is so when the mesh is modified, the changes gauged are accurate representations of the actual changes taking place and that the deforming the mesh will be free of problems. One can also perform freeze transformations along the way to periodically legitimize and sanitize the model.
-
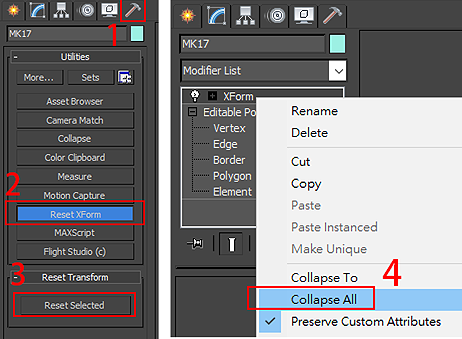 Inside Max, perform Tool > Rest XForm > Reset Selected > Collapse All.
Mesh Defects to Avoid
Before submission of your files, make sure the models do not contain the following defects:
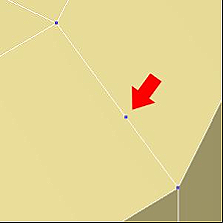 Superfluous vertex points.
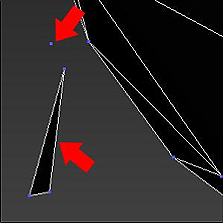 Floating vertex points and faces.
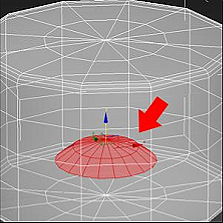 Unnecessary vertex points and faces.
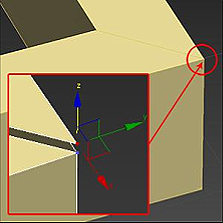 Unconnected vertex points and faces.
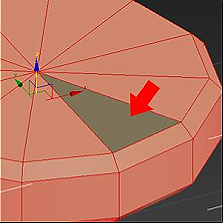 Inverted faces.
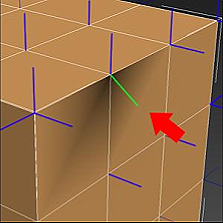 Normal direction defects.
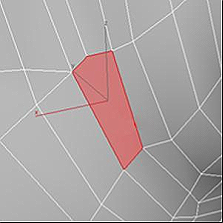 Ngons, faces with sides exceeding four.
Modeling for Soft-cloth Physics
Keep the following points in mind when creating garment models that will need soft-cloth physics:
- Portions of the cloth that extend beyond the waist to the hem are ideal for soft-cloth physics. These soft-cloth portions are not suitable for thick or voluminous geometry i.e. enclosed cylindrical forms. Therefore, always use single sided mesh with double sided shading for soft-cloth enabled geometry.
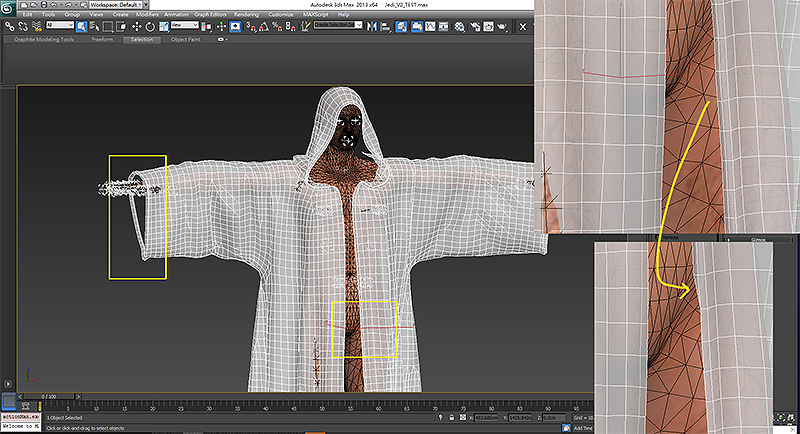 The sleeves for this robe needs to have soft-cloth physics, therefore, the sleeve openings do not need thickness. Since only the lower portion of the robe needs to flutter, the thickness of the robe begins to vanish at the crotch level turning into thin geometry.
- Soft-cloth enabled mesh should merge with the overlying accessories such as buttons, zippers, etc. to form a unified mesh. Another method is to include the accessories into the textures such as the normals. Thickness is also not needed at the openings of the garment such as the hems, cuffs, etc. Otherwise the aforementioned parts would split or fall apart.
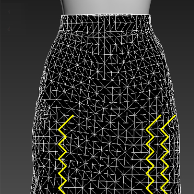 ✘ Wrong: Edge flow that zig-zag is not conducive to smooth simulation of soft-cloth physics.
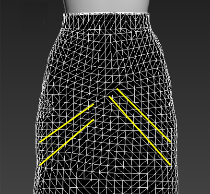 ✔ Right: Edge flow that flow linearly provides the best results for soft-cloth simulation.
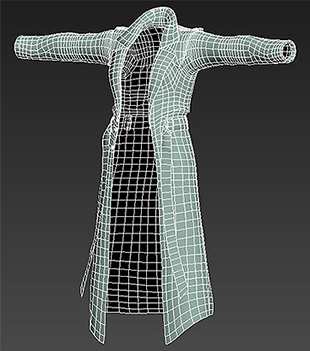 This trenchcoat benefits from the look of harder materials, therefore the mesh faces are broader.
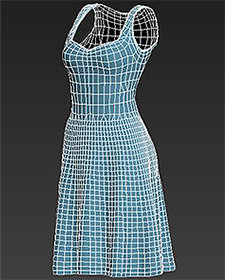 This dress will look particularly nice when fluttering softly in the wind. Therefore the mesh faces must be denser and smaller. Notice also that the non-soft-cloth portions of the dress e.g. the upper half needs not to have the density of the lower parts that do flutter.
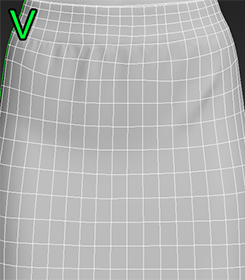 ✔ Right: The skirt here has a uniform grid-like tessellation conducive to animation and physics simulation.
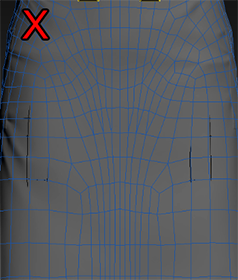 ✘ Wrong: The skirt here has irregular tessellation which increases the likelihood of visual artefacts when animated.
Normal Map Baking
Learn about the standard baking method for maximum compatibility with iClone and Character Creator. This article talks about the current baking problems, the standard normals baking process, and elucidates on some common pitfalls.
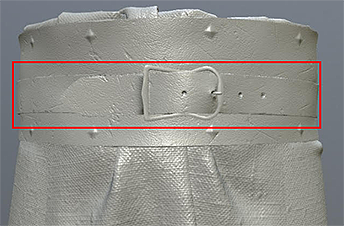 Before the application of skin weights.
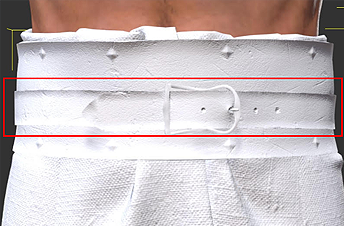 After the application of skin weights.
UV Dismantling for Appearance Editor (AE)
Keep the following points in mind when unwrapping UVs for compatibility with CC's AE:
- Sometimes when stuffing the UVs into a square aspect ratio, the resolution may become too course due to wasted space. Therefore, when necessary, one can arrange the UVs on a 2:1 aspect ratio to mitigate the wasted space. For wide aspect ratio textures, keep the short side no smaller than 2048 pixels with the total resolution at 4096x2048.
- Always orient the UVs in the positive direction from 0 to 1. Do not invert the U or V axis.
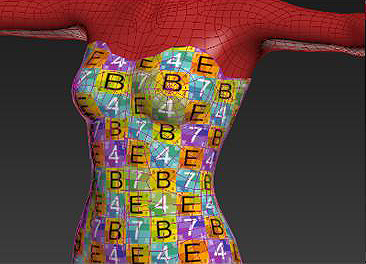 ✔ Right: UVs here are mapped in the correct positive direction.
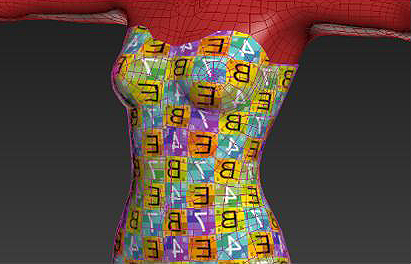 ✘ Wrong: UVs here are inverted in the U axis.
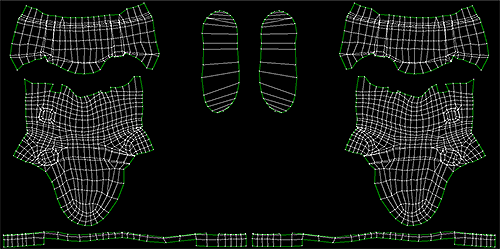
- UVs should maintain a uniform grid-like appearance. Make sure to eliminate strange distortions, pulls, and magnification.
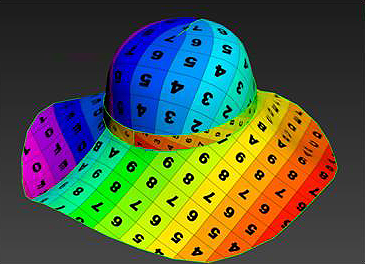 ✔ Right: Maintain nicely uniform flow for the UVs
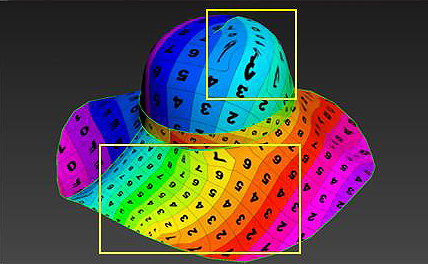 ✘ Wrong: Avoid unnecessary distortions in the UVs.
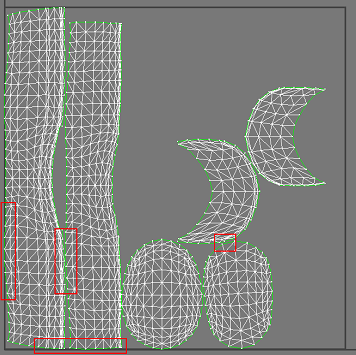 UV buffer distance violations are marked in red.
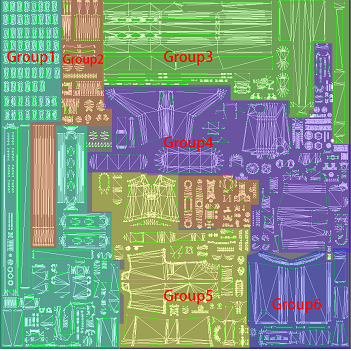 Groupings are highlighted with different colors.
- Don't let the UVs become too fragmented, otherwise seams will appear when the texture is downsampled or the AO is derived. Fragmented UVs may even be difficult to work with.
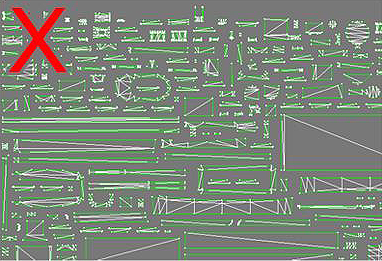 ✘ Wrong: Fragmented UVs can lead to visual artefacts.
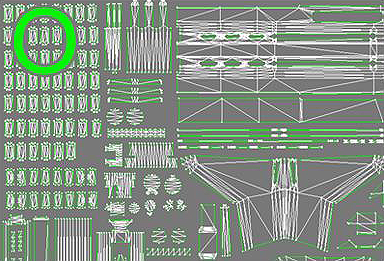 ✔ Right: Componentized UVs are easier to identify and work with.
- UV orientation should be vertical and horizontal and not angled, otherwise, the orientation may be not ideal when a Substance material is applied.
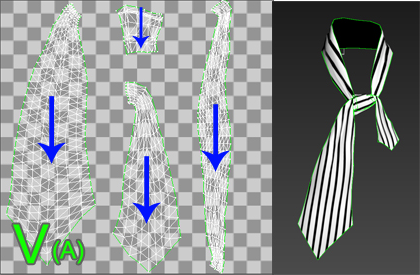 ✔ Right: This neck scarf has uniform UV directions creating a coherent look.
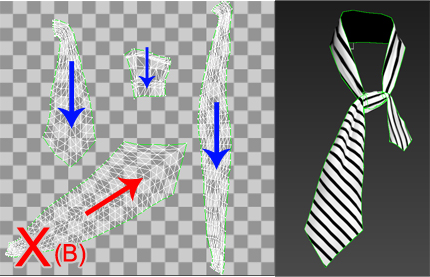 ✘ Wrong: UV facing different directions can lead to a disconcerted look.
- UV seams should match the seams of the high poly model in order for seams of the Substance material to line up exactly as it should.
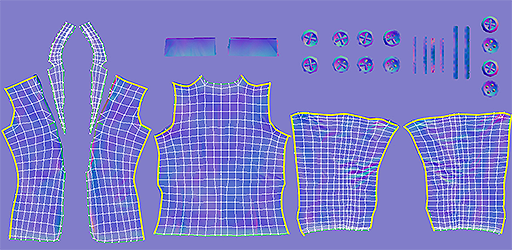 UV seams that line up with the model seams are marked in yellow.
- For shoes, gloves, and other mirrored geometry, do not overlap the UVs, instead keep the UV islands separated.
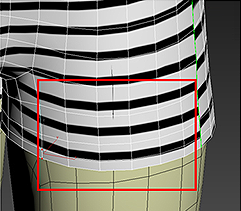 ✔ Right: The UV borders are parallel to the shorts hems.
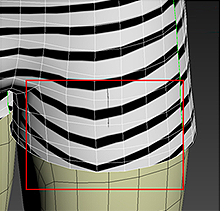 ✘ Wrong: When UV borders and garment openings don't align.
- UV regions in folds need to have deliberate distortions in order to look soft and flowy rather than hard and projected.
Material Settings
One should set the material settings in their 3D application of choice with the following (3ds Max):
- Ambient Color: 255 . 255 . 255
- Diffuse Color: 255 . 255 . 255
- Specular Color: 255 . 255 . 255
- Specular: 500
- Glossiness: 10
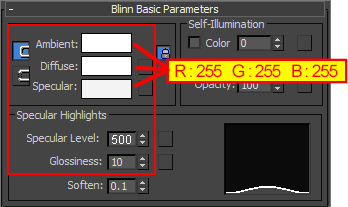 An example of material settings inside 3ds Max
Garment Binding Methods
- If you are using 3ds Max, perform Modify > Skin to start the rigging process.
- One can transfer the skin weight influence from the base mesh to the cloth as a starting step. Any leftover defects with the skin weights will need to be fixed manually, therefore do not just transfer the skin weights as the final and only step.
- Perform Modify > Skin warp inside 3ds Max to start the transfer skin weight process and don't forget to Convert to Skin when finished.
- Perform Rigging > Skin > Copy Skin Weights inside Maya to start the transfer skin weight process.
- Make sure to bind the garment to appropriate bones only as illegitimate bones will cause the garment to fail on import inside CC.
- Lest specifically instructed to do so or for special case scenarios, garment should not be bound to the bones of the head. This is because when the body is morphed, the parts of the garment skinned to the head do not scale in turn, unless the morphs of the head are adjusted to match the changes to the body.
