Difference between revisions of "Content Dev:CTA Accessories"
Chuck (RL) (Talk | contribs) m (→Content Creation Process) |
Chuck (RL) (Talk | contribs) m (→Drawing Precautions) |
||
| Line 55: | Line 55: | ||
#Make sure to have the style and tone determined beforehand. | #Make sure to have the style and tone determined beforehand. | ||
#Draw the vector art in Illustrator | #Draw the vector art in Illustrator | ||
| − | #Determine if the vector path needs to be set as '''Outline Stroke'''. | + | #Determine if the vector path needs to be set as '''Outline Stroke''' and set according to your needs. |
| + | #Bring the vector image into Flash and export a SWF file. | ||
| + | #Import the SWF file into CTA and open the '''Render Style''' menu to verify the '''Show outline''' settings. | ||
| + | |||
| + | ==== Outline Stroke vs Regular Path ==== | ||
You can enable '''Outline Stroke''' in Illustrator via '''Object > Path > Outline Stroke'''. | You can enable '''Outline Stroke''' in Illustrator via '''Object > Path > Outline Stroke'''. | ||
{{Single_Illustration|CTA_Acc_Before_After_Outline_Stroke.JPG|Outline Stroke turns the path into a shape.}} | {{Single_Illustration|CTA_Acc_Before_After_Outline_Stroke.JPG|Outline Stroke turns the path into a shape.}} | ||
| + | |||
| + | *When '''Outline Stroke''' is applied, the '''Show outline''' option will also be enabled inside CTA. | ||
| + | *The opposite is true when '''Outline Stroke''' not applied. | ||
| + | |||
| + | {{Single_Illustration|CTA_Acc_Hide_Outline.JPG|Before '''Outline Stroke''' the '''Show outline''' option in CTA is disabled.}} | ||
| + | |||
| + | {{Single_Illustration|CTA_Acc_Show_Outline.JPG|After '''Outline Stroke''' the '''show outline''' option in CTA is enabled.}} | ||
| + | |||
| + | *When '''Show outline''' is enabled, the stroke will not scale with the object. Instead, it will maintain the same thickness. | ||
| + | *When '''Show outline''' is disabled, the stroke will scale with the object; causing it to get thinner and thicker in line with the scale of the object. | ||
| + | |||
| + | {{Single_Illustration|CTA_Acc_Comparing_Strokes.JPG|Left side box has '''Show outline''' enabled; the right side box does not.}} | ||
=== Assembling the Parts === | === Assembling the Parts === | ||
Revision as of 02:37, 21 September 2017
- Main article: CTA Content Development.
Before you Begin
Introduction to Accessories
Previously, Accessories were considered the same as Props; wherein, it must be applied onto a parent bone inside the Composer to behave like an accessory. In contrast, the new Accessory format inside CTA 3.2 allows for quick application of accessories via double-clicking. For example: Double-clicking on a pair of glasses accessory will automatically apply it to the nose of the character.
| Comparison Table | Prop Format | Accessory Format |
|---|---|---|
| Extension Name | *.ctProp | *.ctAcc |
| Content Location | Content Manager > Prop | Content Manager > Actor > Accessory |
| Saves Positioning | NO: Needs to be dragged and dropped onto the character. |
YES: Double click to apply to a predetermined position on the body. |
| Method for Saving | Prop Tab > save as Prop: Positioning data will be cleared. |
Accessory Tab > save as Accessory: Positioning data will be recorded. |
Basic Workflow
- Prepare the art materials.
- Create motion and establish the visual style.
- Save the motion in the Action Menu.
- Save the file as (*.ctProp).
- Set the position of the Prop on the character.
- Save the Prop as (*.ctAcc).
Software & Tools
| Software | Version | Usage |
|---|---|---|
| Adobe Illustrator | CC and above | Create vector art. |
| Animate CC | Save the vector drawings as SWF. | |
| CTA3 | 3.2 and above | Create the Accessory and set the attachment point. |
Content Creation Process
Drawing Precautions
- Make sure to have the style and tone determined beforehand.
- Draw the vector art in Illustrator
- Determine if the vector path needs to be set as Outline Stroke and set according to your needs.
- Bring the vector image into Flash and export a SWF file.
- Import the SWF file into CTA and open the Render Style menu to verify the Show outline settings.
Outline Stroke vs Regular Path
You can enable Outline Stroke in Illustrator via Object > Path > Outline Stroke.
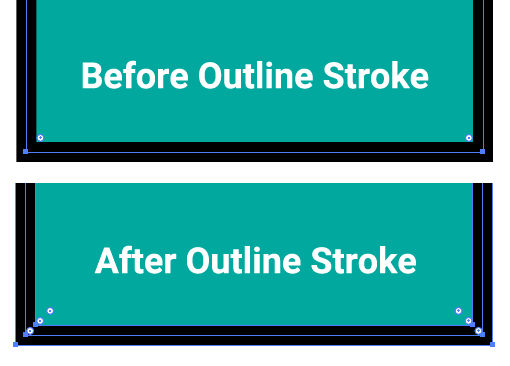 Outline Stroke turns the path into a shape.
- When Outline Stroke is applied, the Show outline option will also be enabled inside CTA.
- The opposite is true when Outline Stroke not applied.
 Before Outline Stroke the Show outline option in CTA is disabled.
 After Outline Stroke the show outline option in CTA is enabled.
- When Show outline is enabled, the stroke will not scale with the object. Instead, it will maintain the same thickness.
- When Show outline is disabled, the stroke will scale with the object; causing it to get thinner and thicker in line with the scale of the object.
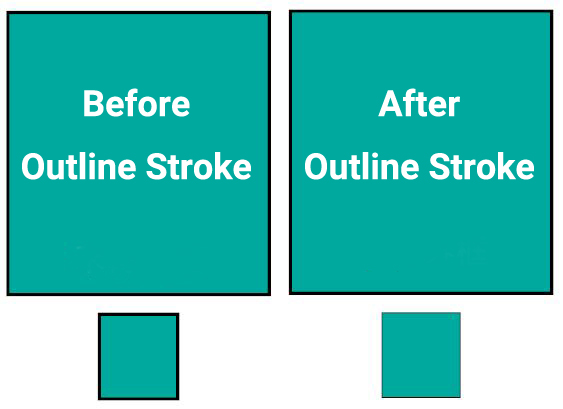 Left side box has Show outline enabled; the right side box does not.
Assembling the Parts
CTA 3.2 has a new tools for making composite Accessories with parts that carry motion. These motions can then be saved in the Action Menu with the ability of motions with the same names triggering at the same time. Parts creation process is the same as that of Props; for more details, take a look at the Prop Creation Article. A summary of the process is as follows:
- Drawn parts should be brought into Flash and exported as SWF.
- Bring the SWF file into CTA and save as a Prop.
- Create the motion for the parts according to your needs.
- Save the motion in the Action Menu.
- Save the file and create a thumbnail.
