Content Dev:CC Face Topology Guide
- Main article: CC Avatar.
Special thanks to Mike Sherwood.
The RL character base model has been developed to be a one-size-fits-all generic approach which allows for modeling and animating both realistic and stylized characters. Apart from the jaw, teeth and eyeballs, facial animation is purely morph driven – and as such it’s important to bear in mind when modeling that if the base mesh interpolation – its existing relative balance – is radically altered – that this can have negative effects on morph interaction. This is not an an issue of shape – it’s about vertex pattern and how, when modeling – it’s important to maintain good balance and the best possible relationship between the modeled mesh and the original base. Not do this – for example, simply to conform the mesh and reposition vertices without reference to the original base can create many issues which will need to be resolved later.
CC3.3+ Topology Checker (Head)
You can use the following files to make sure the edge-loops for the head mesh are properly placed.
Edge-loop Criterion
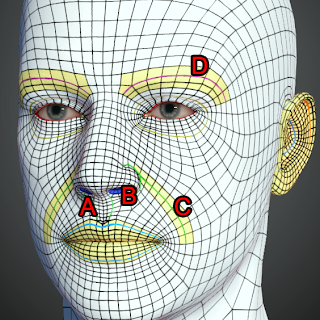
Common edge-loop problems:
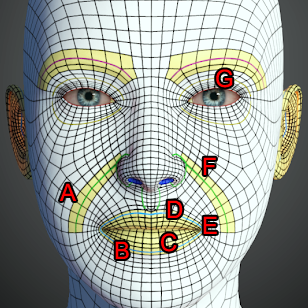
A: Make sure the sides of the mouth do not stick out when the corners of the mouth droop.
B: The inside of the mouth can easily distort.
C: Make sure the mesh is evenly distributed around the lips, so the upper and lower lips do not offset when the mouth is closed and the corners of the mouth droop.
D: Vermilion border - the edges of the lips, where the lip meets the surrounding skin - should be carefully placed.
E: The corners of the mouth has a tendency to intersect. Uneven mesh distribution will cause this area to distort.
F: Make sure the Nasolabial fold flows naturally from the wings of the nose to the sides of the mouth.
G: The edges of the eyelids should be vertically smooth, tear-line should hug the shape of the eyeballs, and the lacrimal caruncle should be properly positioned and sized.
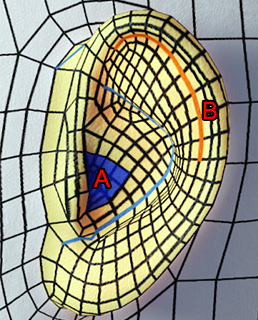
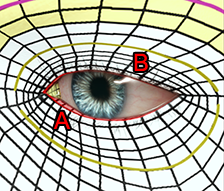
A: The tear-line should hug the shape of the eyeballs as much as possible.
B: The edges of the eyelids dictate the shape of the eyes.
Major Regions
The ideal way to ensure that mesh balance is retained is to, on a regular basis, morph the modeled CC mesh back to the base to see how the mesh pattern is affected – whether the mesh is becoming overly compressed or overly stretched in places. Particularly, issues will occur where the mesh becomes relatively bunched, stretched and/ or incorrectly occluded at areas such as the mouth corners, lip inner edges, eyelids, eyelids edges and eyelid corners – though issues may also be noticeable in the areas of the eye bags, under brows as well as nasal creases. Please do check these areas regularly throughout the modeling process. As well as checking via morph to base and back, please do test animation (ideally and most quickly via a short test sequence) on a regular basis during modeling as this will help reduce the amount of clean up which may be required later.
This section will cover the major regions of the face which can be further broken down into two subcategories:
| Regions of the Eyes | Regions of the Mouth |
|---|---|
Brow Ridge Apex
Eyelid Crease
Eyelid Rim
Eye-bag Crease |
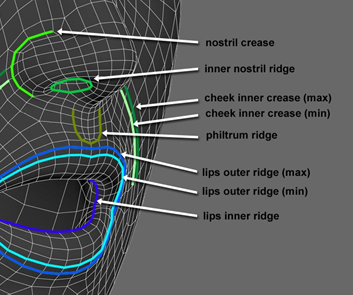
Nostril Crease
Inner Nostril Ridge Cheek Inner Crease
Philtrum Ridge Lips Outer Ridge
Lips Inner Ridge |
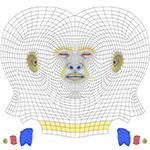
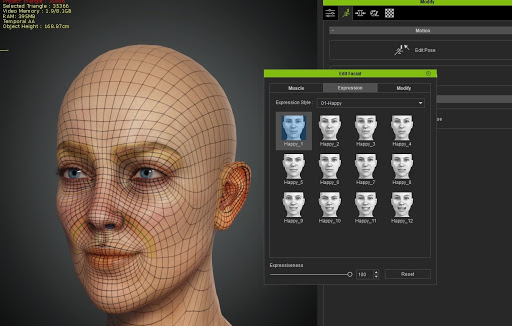
You can check the edge-loops of your iClone and CC character by applying the following texture file to the head material.
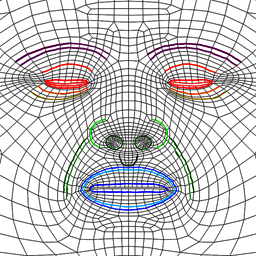 This is a preview image.
Click here to download the texture file.
Regions of the Eyes
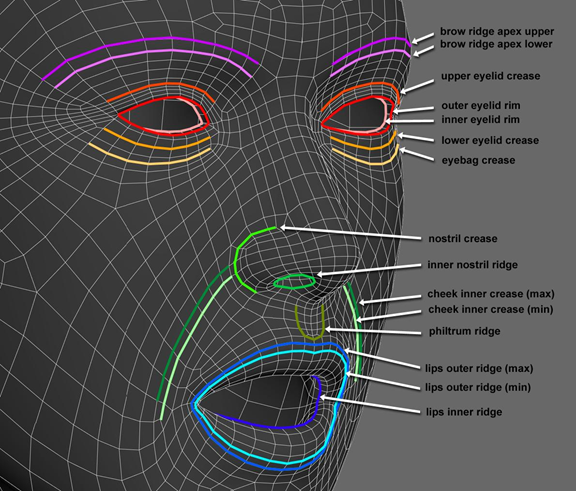
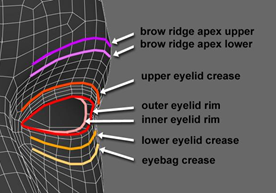
Brow ridge apex upper and lower
These vertices correspond to the upper and lower edges of the brow ridge at the skull. The faces between these vertices define the most prominent part of the brow where it becomes the forehead above, and the under brows/ upper eye socket area below. Whilst it is not a rule, generally speaking eyebrows follow the brow ridge apex to a greater or lesser extent – though depending on the subject being modeled, the eyebrows and hence the resulting textures may be slightly higher or lower, as well as at some angle to the subject’s brow ridge.
Upper eyelid crease
These vertices correspond to the point at which the under brow area transitions into the upper eyelid – and should be aligned to the subject’s upper eyelid creases.
Eyelid outer and inner rims
The outer rim vertices correspond to the absolute outer edge of the subject’s eyelids and it’s essential for these to be mapped well to achieve best animation results. The inner eyelid rims should be mapped to the inner edges of the subject’s eyelids – and if necessary given additional depth to more closely match the resulting character’s eyeball surface. These edges can be occluded (placed slightly inside the eyes) if needed to improve animation.
Lower eyelid and eye bag creases
These crease areas are generally less specific than the upper eyelid crease since in many cases these features may not be so prominent on a subject’s face, however they are important to animation and where they cannot be clearly aligned, good interpolation should be maintained.
Regions of the Mouth
Nostril creases
Generally prominent on most subjects, the nostril crease vertices should be matched to the deepest, most recessed part of the outer nostril contours.
Inner nostril ridges
These vertices can be easily confused with those occupying the next edge loop out, and whilst there is some tolerance especially where the nostril flesh is relatively thin, better modeling curvature as well as animation results will be achieved if these edges are specifically aligned to the contour at which the subject’s nostril shape changes most radically from the outer nostril flesh to the inner nostril.
Cheek inner creases
These vertices define the lowest points between the cheek and mouth area. Two edge lines are shown labeled ‘max’ and ‘min’, whereby the ‘max’ line is the line which is currently used by CC for cheek inner crease modeling – however in terms of scans and modeling specific subjects generally, there is some tolerance here and the lower ‘min’ edge line can be aligned to the subject if this is a more natural fit for their face shape. The terms ‘max;’ and min’ are used here to recommend that the cheek inner crease alignment should be generally at or within, rather than outside of these lines.
Philtrum ridge
This defines the most prominent part of the philtrum, spanning the recessed curve which forms this feature. Whilst alignment of the primary lateral edges is generally straightforward, the base of the philtrum, particularly the area defining the space between the recessed curve and the start of the upper lip can often be overlooked.
Lips outer ridge
Just as with the cheek inner creases, ‘max’ and ‘min’ options are presented here – where the ‘max’ edge loop is the edge CC currently uses to define lip edges for modeling. Again, in terms of modeling specific subjects, there is animation tolerance here and it is possible to use the inner ‘min’ edge if needed depending on the subject being modeled. The terms ‘max;’ and min’ are used here to recommend that the lip edge alignment should be generally at or within, rather than outside of these lines.
Eyeballs
Apart from corneal bulges, human eyeballs are often not actually round – and this means that it may be very difficult to align eyeballs correctly in the character model – where the eyelid rim shape can sometimes seem to defy naturalistic eyeball placement. However, for the purpose of CC modeling and animation, it’s important that, apart from scale and position – the eyeballs are not distorted to fit the head.
Hence some compromise may be necessary in terms of minimally adjusting the model’s eyelid shape – particularly for depth at the inner and potentially outer corners – to achieve good placement. Beyond this, the standard eye mapping proportions may not sufficiently match the subject’s eyes – and these should be manually edited if necessary.
Please note: it's important when preparing and aligning eyeballs to ensure that the corneas are not mapped, and are semi-transparent with high gloss and specularity for better placement as well as realism.
Teeth
Without reference scans or photos it’s virtually impossible to ensure that stock teeth are in any way accurate to the subject being modeled – though they can be roughly estimated in terms of general position and scale from the relative position of the mouth and the size of the subject’s jaw. Of course the job is much simpler with reference – potentially allowing the modeler to not only position and scale the teeth well – but to model and even texture map them too.
Lip inner edge
These vertices define the contour at which the upper and lower lip curves drop away to the inside of the mouth. Generally this contour will not be provided by a scan (unless of an open mouthed subject) and it is up to the modeler to ensure that these vertices are well placed. Importantly, they should be used to define the inner visible boundary of the lips when the character’s lips and/ or mouth are open – and not pulled away too far into the inner mouth as this will negatively affect animation.
Symmetry
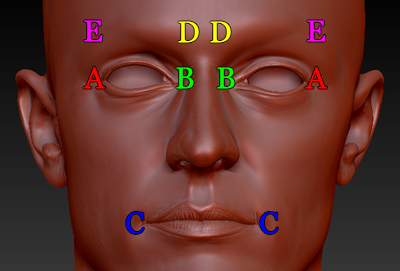
Human faces (and humans generally!) are rarely symmetrical and symmetry is not a requirement for scan derived RL character models. Assuming the model is well prepared as static mesh optimized for animation, RL’s generic morph – based animation approach is capable of handling both symmetrical and asymmetrical character faces. However in order to achieve reasonably good facial expressions, some parts of the face will need to stay as symmetrical as possible. These areas include the following parts as illustrated to the right:
- Lateral Canthi (Outer Eye Corners)
- Medial Canthi (Inner Eye Corners)
- Oral Commissures (Mouth Corners) / Labial commissures of the mouth
- Medial Brows (Inner Brows) / Origin of the brows
- Lateral Brows (Outer Brows) / Termination of the brows
Optimizing the Model for Animation
If the recommendations already made in this document regarding maintaining mesh balance in reference to the base model, good contextual vertex placement as well as ongoing testing have been applied – then there may be no need for further modification. However, if animation problems persist – whereby, for example –
- Eyebrows appear overly compressed or stretched on brows down or brows up
- Eyelids and/ or eyelashes appear overly stretched or compressed on blink and wide eye expressions, potentially with eyeballs showing through eyelids on blinks and squints
- Nostrils do not flare correctly, cheeks overly compress towards the eyes when raised
- Lips appear overly compressed or stretched in mouth animation, potentially with bunched, overlapping vertices at the mouth corners
- then further optimization is needed. This is really a final iteration of checking the base reference by morphing, and ensuring that context and interpolation remains as true as possible to the base model. In practice, this may mean making tiny edits to just a few individual vertices which are causing problems in an area - or even quite radical adjustments to the model in order to achieve better animation results.
Significant animation problems involving many vertices can be resolved relatively quickly by sub object soft selection morphing in base mesh vertex orientation to a problem part, such as eyelid rims, eyelashes or mouth corners, then generally realigning the affected area so that it fits the target model, but retains the vertex relationship. In order to save time in readjusting the part on the target model after morphing, it makes sense to first adjust a copy of the base to generally fit (in terms of scale and position) the target head problem area – then soft select the offending area on the target and morph in the base vertex positions directly.
General Interpolation
The ideal way to ensure that mesh balance is retained is to, on a regular basis, morph the modeled CC mesh back to the base to see how the mesh pattern is affected – whether the mesh is becoming overly compressed or overly stretched in places. Particularly, issues will occur where the mesh becomes relatively bunched, stretched and/ or incorrectly occluded at areas such as the mouth corners, lip inner edges, eyelids, eyelids edges and eyelid corners – though issues may also be noticeable in the areas of the eye bags, under brows as well as nasal creases. Please do check these areas regularly throughout the modeling process. As well as checking via morph to base and back, please do test animation (ideally and most quickly via a short test sequence) on a regular basis during modeling as this will help reduce the amount of clean up which may be required later.
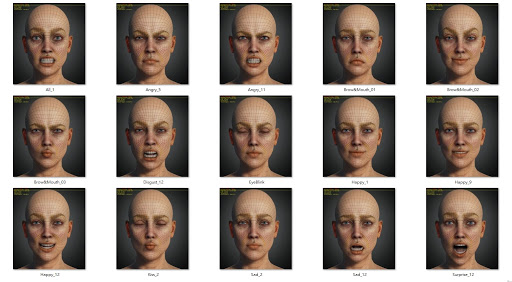
Testing Facial Expression
Facial expression testing tips:
- You'll need to use Character Creator to test for specific facial expressions.
- Make sure the mesh is smooth when expressions are applied, without intersections, distortions, and protrusions.
- Export the model in FBX to Maya to adjust the facial expression shapes.
- The shape of the head, the look of the eyes when they are shut, and the profile of the cheeks need to be smooth.
- When the eyes are shut, the eyeballs must not intersect with the eyelids when they turn in their sockets.
You can download a complete set of test expressions here.
Extra Learning Resources
3D scan re-topology pipeline with facial and body optimization:
Optimize3D Scanned Characters for Facial & Body Animation by Mike Sherwood
