Content Dev:Scan to CC3+ Preparation in Maya
- Main article: CC Avatar Content Production.
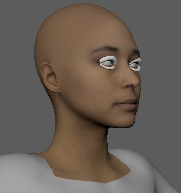
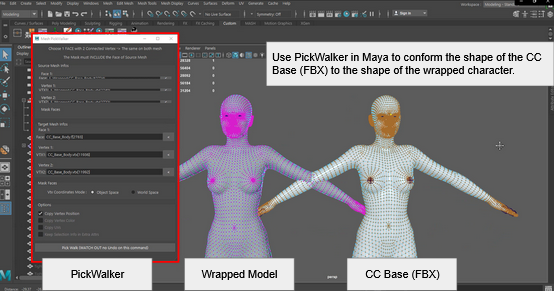
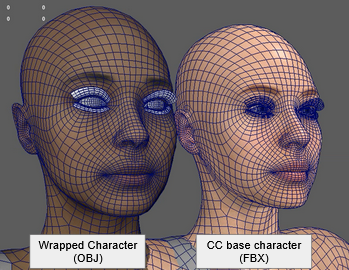
After the Wrap process, the exported wrapped character needs to be processed in Maya. The goal is to use Maya's PickWalker plugin to fix the wrapped OBJ mesh topology and vertex id order:
- Fix the mouth cavity and lip shapes.
- Use PickWalker to conform a CC base FBX to the wrapped character's shape (with the scan character's appearance) for export to CC.
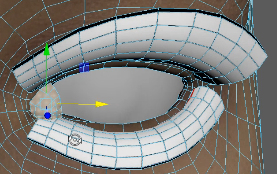
- Fix the eyelashes and reposition the caruncle (the red prominence at the inner corner of the eye).
You can download PickWalker from: http://olygraph.com/maya-mesh-reorder-transfer-vertex-position-tool/ and watch this tutorial video: https://www.youtube.com/watch?v=x5F6VKNxeCQ.
PickWalker does not support undo/redo, so you should save the file before executing the script.
Aligning the Eyelashes
Once the character is wrapped, the eyelashes will have been dislocated from the eyelids and will need to be fixed in Maya:
1) Import the wrapped CC base OBJ, mentioned in the previous Scan to CC3+ Wrap Procedures article, into Maya.
2) Create a lambert material and load the eyelash wire-frame guide texture to the Color channel.
3) Select all of the eyelash mesh faces -front and back included (4 pieces total)- and assign the newly made eyelash material.
The eyelash wire-frame guide will assist you in positioning the eyelashes and attach them to the eyelids in a way that looks natural.
4) Create another lambert material and load the baked diffuse map from Wrap into the Color channel.
5) Select the mesh faces for the head and neck (select by UV shell is the quickest) and apply the newly created head material.
6) Isolate one pair of eyelashes along with the head.
7) Select all of the eyelash mesh faces and realign them to the level of the eyelids.
8) Apply a Lattice deformer and adjust its division values in the Channel Box for flexible editing.
9) Modify the lattice points until the red line on the wire-frame guides are embedded into the eyelids in a way that appears natural.
10) Once editing is complete, delete history on the eyelashes to remove the lattice deformer and bake the results.
11) Perform the aforementioned steps for the other three eyelash mesh pairs.
Positioning the Caruncles
Select the caruncle mesh faces and position them into the inner corner of the eyes.
Try using mirror move along the x-axis to quickly place both caruncles into their respective positions.
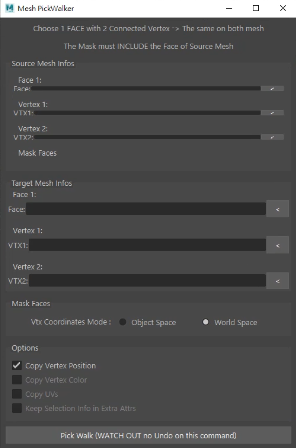
Using PickWalker
Now we'll need to have the CC base vertices take on the positions of the wrapped character so that the original vertex IDs can be maintained. This is crucial because every software relies on the vertex IDs to rebuild the model and perform (animated) deformations. For example, if a CC morph target relies on a set of IDs from 0 to 100 and they are mapped to the ear, but the OBJ format remapped the IDs, then the morph target is redirected to points peppered around the body and causes the character to "spike out".
Script Setup
1) Download geometryWalker and unzip the contents into your current version of Maya's Script folder, for example: C:\Users\John_Doe\Documents\maya\20XX\scripts.
2) Open Maya's Script Editor and enter the following the code under the Python tab but do not press enter:
Import geometryWalker.Qt.pickWalker_UI as pickWalker_UI

pickWalker_UI.pickWalkerUI()
3) Select the code snippet and drag and drop it into a custom shelf (bottom of the menu-bar) and a screen will appear requesting the settings for a new shelf menu item.
4) Enter a suitable Icon Label in the subsequent dialog window, i.e. "PW" and click on Save All Shelves.
5) Click on the newly created shelf menu item the Mesh PickWalker window should appear.
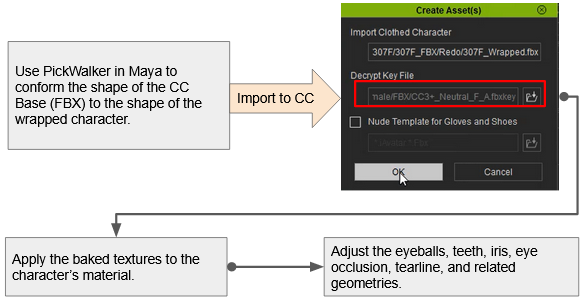
Process Flowchart
Processing Geometries with PickWalking
1) Delete the CC base character (OBJ) and import the CC base character (FBX). The imported FBX character is the model that will need to conform to the shape of the wrapped character mesh.
2) Move the entire wrapped character to the side so that the two bodies do not overlap.
Compared to the CC base OBJ, CC base FBX comes with rigging and pristine vertex data, as the OBJ format has a tendency to reorder vertex IDs.
3) Load PickWalker by clicking on its shelf button.
4) Isolate the caruncle meshes: Show > Isolate Select > View Selected .
5) Select a face on the scan mesh caruncle and set it to Source Mesh Infos > Face 1:.
6) Click on a border vertex of the mesh face, i.e. upper-right corner, and set it to Source Mesh Infos > Vertex 1:.
7) Going clockwise, select another border vertex, i.e. lower-right corner, and set it to Source Mesh Infos > Vertex2:.
8) Repeat steps 4 to 6 with the respective caruncle for the CC base FBX, this time setting Target Mesh Infos > Face 1:, Target Mesh Infos > Vertex 1:, and Target Mesh Infos > Vertex 2: respectively.
It is crucial to match the picked elements exactly in the same consistent order.
9) Make sure that Mask Faces > Vtx Coordinates Mode: is in Object Space.
10) Save a backup for the current scene.
11) Click on the Pick Walk (WATCH OUT no Undo on this command) button. You should see that the target geometry (on the character base FBX) will have changed in shape to be exactly the same as the wrapped character.
12) Exit view isolation to see the entire bodies.
You can save a backup of the scene at any point in the process, the point is to make a backup before or after, every time the script is executed.
13) Repeat steps 3 to 11 for the eyelashes and body.
14) Delete the entire wrapped character, leaving only the CC base FBX that has been conformed to the shape of the wrapped character.
15) Export the entire scene in FBX format.
Post-processing in Maya is now complete, see Scan to CC3+ Completion in CC for the next series of steps.
Fixing the Mouth Cavity
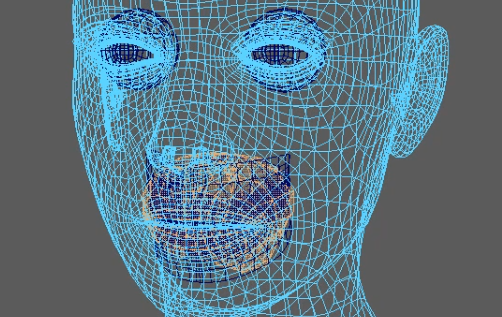
Having a unique mouth cavity for the wrapped character model is not necessary because the universal mouth cavity provided by the CC base character is sufficient for 99% of all cases. In fact, it is best to use the universal mouth cavity shape so to prevent unforeseen issues from occurring during animation.
1) Import the wrapped and CC base (OBJ) character into Maya and position them side by side.
2) Select the mouth cavity geometry of the CC base character by using the UV Shell selection mode.
3) Make sure Maya is in Modeling mode and perform Edit Mesh > Detach to detach the mouth cavity from the rest of the CC base body.
4) Select both mouth cavities of the CC base model (mesh faces) and the wrapped character and view isolate selected within the view-port: Show > Isolate Select > View Selected.
5) Load Mesh PickWalker and deselect everything, including the cavity mesh faces.
6) Select a single face on the CC base mouth cavity and set it to Source Mesh Infos > Face 1:.
7) Select a vertex that belongs to the mesh face and set it to Source Mesh Infos > Vertex 1:.
8) Select an adjoining vertex and set it to Source Mesh Infos > Vertex 2:.
9) Select the corresponding face on the wrapped mouth cavity and set it to Target Mesh Infos > Face 1:.
10) Select the corresponding vertex (step 7) and set it to Target Mesh Infos > Vertext 1:.
11) Select the second corresponding vertex (step 8) and set it to Target Mesh Infos > Vertext 2:.
12)Make sure Mask Faces > Vtx Coordinates Mode: is set to Object Space.
13) Click on the Pick Walk (WATCH OUT no Undo on this Command) to have the wrapped mouth cavity take on the shape of the base CC mouth cavity.
Fixing Frown Morph
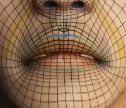
The frown morph target is very fastidious with the geometries around the mouth, often plagued by gaps around the lips.
1) Open the Edit Facial panel under Modify > Motion Pose > Motion > Edit Facial.
2) Maximize the Mouth Frown slider under Edit Facial > Modify > Mouth. Take note of the problems around the mouth like mesh intersections or gaps.
3) Load a neutral base character: Modify > Attribute > Avatar > Load Neutral Base.
4) Load the face wire-frame map into the Blend channel and export the neutral base character in OBJ format: File > Export > OBJ > Nude Character in Bind-Pose.
5) Repeat step 4 for the scan character.
6) Export the same character again in FBX format: File > Export > FBX (Clothed-Character).
7) Inside Maya, import the neutral base and scan OBJ files. Both geometries should import with the wire-frame texture applied.
You can move the figures side-by-side for better access.
8) For the scan mesh, fix all of the mesh defects around the mesh of the mouth like intersections and gaps.
9) Open UV Editor and use it to select the geometries for inner ring of the lips.
10) Detach the selected geometry from the rest of the body: Edit Mesh > Detach.
11) Initialize Mesh PickWalker.
12) Pick a mesh face on the separated lips, and set it as Source Mesh Infos > Face 1: within Mesh PickWalker.
13) Pick a vertex on the select mesh face and set it to Source Mesh Infos > Vertex 1.
14) Pick another vertex in connection to first vertex selection and set it as Source Mesh Infos > Vertex 2.
15) Repeat steps 11 to 13 for the scanned character for Mesh PickWalker > Target Mesh Infos.
16) Before starting the Pick Walk process, save the scene.
17) Set Mesh PickWalker > Mask Faces > Vtx Coordinates Mod : to Object Space.
18) Click on the Pick Walk (WATCH OUT no Undo on this command) button to finish the Pick Walk procedure. You'll notice that the geometry for the lips have shifted to resemble the shape of the seperated lips.
19) Move the shifted lip geometry to a proper position in respect to the positon of the mouth.

