Difference between revisions of "Content Dev:CC Avatar Morph Submission"
m (→Step 2) |
Chuck (RL) (Talk | contribs) m (→Slider Thumbnail Templates) |
||
| (6 intermediate revisions by one other user not shown) | |||
| Line 8: | Line 8: | ||
The morph slider you have created can contain a thumbnail when loaded in Character Creator. We have included two template files which you can freely use. You can find them under in the following places: | The morph slider you have created can contain a thumbnail when loaded in Character Creator. We have included two template files which you can freely use. You can find them under in the following places: | ||
| − | *\Reallusion\Character Creator 2 for iClone\Image\Thumbnail_Template_Blank.png | + | *CC Installation directory: \Reallusion\Character Creator 2 for iClone\Image\Thumbnail_Template_Blank.png |
| − | *\Reallusion\Character Creator 2 for iClone\Image\Thumbnail_Template_Male.png | + | *CC Installation directory: \Reallusion\Character Creator 2 for iClone\Image\Thumbnail_Template_Male.png |
== Converting to Sellable Format == | == Converting to Sellable Format == | ||
| Line 15: | Line 15: | ||
The process of Morph Slider submission involves the conversion of .ccCustomSlider file format to .ccSlider, and then uploading it to the marketplace for sale. It is during this process a unique DRM code is embedded onto the file itself: | The process of Morph Slider submission involves the conversion of .ccCustomSlider file format to .ccSlider, and then uploading it to the marketplace for sale. It is during this process a unique DRM code is embedded onto the file itself: | ||
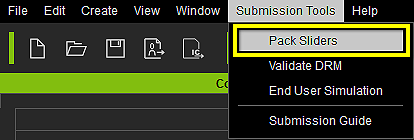
| − | + | '''Step 1)''' Select '''Pack Slider''' from the menu to enter '''Pack Slider Mode'''. | |
| − | + | ||
| − | + | ||
{{Single_Illustration|Create_01_pack-sliders.png}} | {{Single_Illustration|Create_01_pack-sliders.png}} | ||
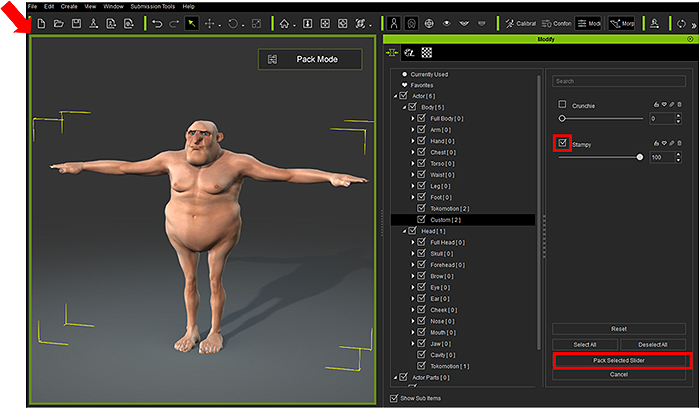
| − | + | '''Step 2)''' Once you entered the Pack Slider Mode, you will notice the viewport is now highlighted with green-colored outline. Under this mode, you can select the slider(s) you wish to pack for sale on Marketplace. | |
| − | + | '''Step 3)''' After you have selected all the desired Morph Sliders, click '''Pack Selected Slider''' and you will be prompt to choose a folder for the converted .ccSlider. | |
| − | + | {{Single_Illustration|Create_02_pack-slider-mode.png}} | |
| − | + | This is for batch conversion, instead of packing all selected Sliders into a single Slider. | |
| − | + | ||
| − | + | ||
== Using the Uploader == | == Using the Uploader == | ||
| Line 35: | Line 31: | ||
Currently, any content that is to be sold on the Marketplace needs to be sent via the [https://city.reallusion.com/upload.html Content Uploader]. You can edit and save your content information before uploading, and once you upload the content, it will be accessible from your Marketplace account backend so you don’t have to wait for approval before you begin selling. Aside from the content files, you can set the name, description and price of the specific content, and upload all the promotional materials at the same time. | Currently, any content that is to be sold on the Marketplace needs to be sent via the [https://city.reallusion.com/upload.html Content Uploader]. You can edit and save your content information before uploading, and once you upload the content, it will be accessible from your Marketplace account backend so you don’t have to wait for approval before you begin selling. Aside from the content files, you can set the name, description and price of the specific content, and upload all the promotional materials at the same time. | ||
| − | + | '''Step 1)''' Start the Uploader. | |
| − | + | '''Step 2)''' Add the content you are going to upload by drag-and-drop or clicking the "Add" button. | |
| − | + | ||
| − | + | ||
{{Text_Block|Assign the Subfolder, which will be the categorical placement of the asset inside CC's Content Manager to your local disk.}} | {{Text_Block|Assign the Subfolder, which will be the categorical placement of the asset inside CC's Content Manager to your local disk.}} | ||
| Line 47: | Line 41: | ||
{{Single_Illustration|Submit_02_local-disk.png|The file location on the local disk. The slider location in CC's '''Modify''' panel is decided upon the creation of the slider.}} | {{Single_Illustration|Submit_02_local-disk.png|The file location on the local disk. The slider location in CC's '''Modify''' panel is decided upon the creation of the slider.}} | ||
| − | + | '''Step 3)''' | |
{{Text_Block|Select the right category when uploading. | {{Text_Block|Select the right category when uploading. | ||
| Line 68: | Line 62: | ||
=== Validating your Files === | === Validating your Files === | ||
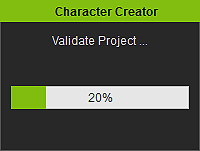
| − | + | '''Step 1)''' Validate your ccProject by going to Submission Tools -> Validate DRM. Select the folder which contains the ccProject that you wish to sell on the Marketplace. It should automatically start validating all the files in the chosen folder. | |
| − | + | ||
| − | Validate your ccProject by going to Submission Tools -> Validate DRM. Select the folder which contains the ccProject that you wish to sell on the Marketplace. It should automatically start validating all the files in the chosen folder. | + | |
{{Duo_Illustration|Simulation_01_simulate.png|||Sell_03_validate-processing.png}} | {{Duo_Illustration|Simulation_01_simulate.png|||Sell_03_validate-processing.png}} | ||
| − | + | '''Step 2)''' If all the Morph Sliders are DRM ready and can be found on the Marketplace, the following message will prompt. | |
| − | + | ||
| − | + | ||
{{Single_Illustration|Sell_03_validate-result-positive.png}} | {{Single_Illustration|Sell_03_validate-result-positive.png}} | ||
| Line 95: | Line 85: | ||
*'''Action''': The suggested next course of action. | *'''Action''': The suggested next course of action. | ||
| − | + | '''Step 3)''' Once finished validation, you can upload the ccProject & iAvatar to the Marketplace. | |
| − | + | ||
| − | Once finished validation, you can upload the ccProject & iAvatar to the Marketplace. | + | |
== End User Simulation == | == End User Simulation == | ||
| Line 105: | Line 93: | ||
You can find more details about End User Simulation in the [http://manual.reallusion.com/Character_Creator_2/ENU/2.0/default.html?page=06_Customizing_Morphing_Sliders/End_User_Simulation.htm Online Manual]. | You can find more details about End User Simulation in the [http://manual.reallusion.com/Character_Creator_2/ENU/2.0/default.html?page=06_Customizing_Morphing_Sliders/End_User_Simulation.htm Online Manual]. | ||
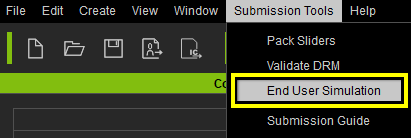
| − | + | '''Step 1)''' Go to Submission Tools and click on End User Simulation. | |
| − | + | ||
| − | + | ||
{{Single_Illustration|Simulation_01_simulate.png}} | {{Single_Illustration|Simulation_01_simulate.png}} | ||
| − | + | '''Step 2)''' Once activated, you will notice the viewport is now highlighted with a grey-colored outline. In this mode, all the .ccCustomSlider files you have created locally will be filtered out, leaving behind only .ccSlider files that have been downloaded from the Marketplace. | |
| − | + | ||
| − | Once activated, you will notice the viewport is now highlighted with a grey-colored outline. In this mode, all the .ccCustomSlider files you have created locally will be filtered out, leaving behind only .ccSlider files that have been downloaded from the Marketplace. | + | |
You can exit this mode by going to Submission Tools and click on End User Simulation again. | You can exit this mode by going to Submission Tools and click on End User Simulation again. | ||
{{Single_Illustration|Simulation_02_view-port.png}} | {{Single_Illustration|Simulation_02_view-port.png}} | ||
| − | |||
| − | |||
| − | |||
| − | |||
| − | |||
| − | |||
| − | |||
| − | |||
| − | |||
| − | |||
| − | |||
| − | |||
| − | |||
| − | |||
| − | |||
| − | |||
| − | |||
Latest revision as of 18:02, 2 August 2017
- Main article: CC Avatar.
The following information will help you convert the custom Morph Sliders to the sellable format, and use the Uploader to bring it into the Marketplace.
Slider Thumbnail Templates
The morph slider you have created can contain a thumbnail when loaded in Character Creator. We have included two template files which you can freely use. You can find them under in the following places:
- CC Installation directory: \Reallusion\Character Creator 2 for iClone\Image\Thumbnail_Template_Blank.png
- CC Installation directory: \Reallusion\Character Creator 2 for iClone\Image\Thumbnail_Template_Male.png
Converting to Sellable Format
The process of Morph Slider submission involves the conversion of .ccCustomSlider file format to .ccSlider, and then uploading it to the marketplace for sale. It is during this process a unique DRM code is embedded onto the file itself:
Step 1) Select Pack Slider from the menu to enter Pack Slider Mode.
Step 2) Once you entered the Pack Slider Mode, you will notice the viewport is now highlighted with green-colored outline. Under this mode, you can select the slider(s) you wish to pack for sale on Marketplace.
Step 3) After you have selected all the desired Morph Sliders, click Pack Selected Slider and you will be prompt to choose a folder for the converted .ccSlider.
This is for batch conversion, instead of packing all selected Sliders into a single Slider.
Using the Uploader
Currently, any content that is to be sold on the Marketplace needs to be sent via the Content Uploader. You can edit and save your content information before uploading, and once you upload the content, it will be accessible from your Marketplace account backend so you don’t have to wait for approval before you begin selling. Aside from the content files, you can set the name, description and price of the specific content, and upload all the promotional materials at the same time.
Step 1) Start the Uploader.
Step 2) Add the content you are going to upload by drag-and-drop or clicking the "Add" button.
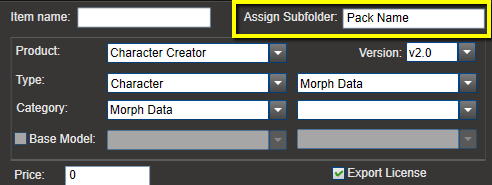 You can designate the item as part of a pack inside Assign Subfolder.
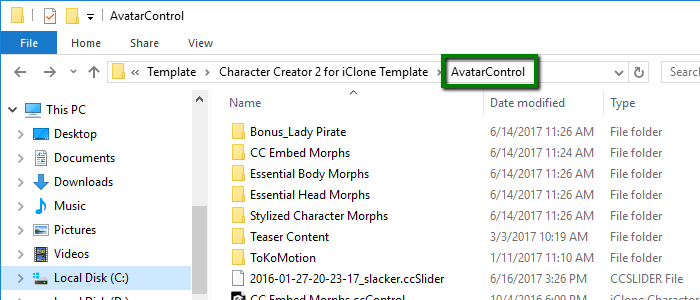 The file location on the local disk. The slider location in CC's Modify panel is decided upon the creation of the slider.
Step 3)
ccSliders can only be sold under the Export License.
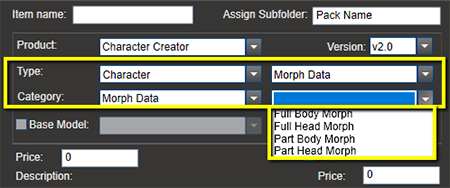 Type is the category of the asset when it is uploaded to the Marketplace.
Selling on the Marketplace
If you wish to sell .ccProject & iAvatar based on the .ccSlider (morph slider) you have created, you must re-download the .ccSlider that you have previously uploaded in order to associate the DRM information with the .ccProject & iAvatar. Only through this process can ccProject & iAvatar recognize which .ccSlider(s) is used. When customers buy your ccProject & iAvatar on the Marketplace, they will know which associated .ccSlider they will have to buy if they wish to make further customization.
Downloading the ccSlider
After packing and uploading the slider has described previously, your slider now has a DRM code embedded into the file itself. You will have to re-download this ccSlider (now with the DRM code), and associate it with your ccProject & iAvatar.
Simply go to your Marketplace backend, select the morph slider you have uploaded, and click on “Download Now” to download the .rld file. Execute the .rld file to download the Morph Slider. Overwrite file with the same name if necessary.
Validating your Files
Step 1) Validate your ccProject by going to Submission Tools -> Validate DRM. Select the folder which contains the ccProject that you wish to sell on the Marketplace. It should automatically start validating all the files in the chosen folder.
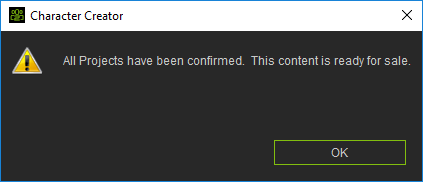
Step 2) If all the Morph Sliders are DRM ready and can be found on the Marketplace, the following message will prompt.
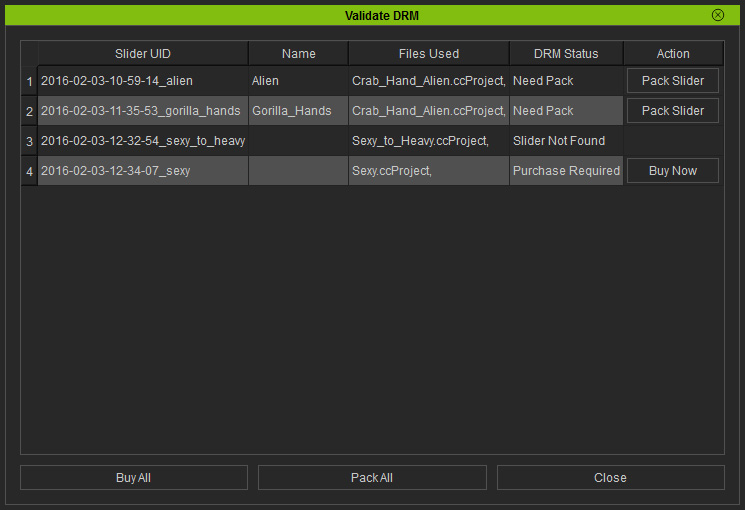
However, if the following dialogue box appears, it means there is something wrong with the DRM information, and will automatically suggest the next course of action.
- Slider UID: The ID number of morph slider used in your ccProject
- Name: Name of the morph slider used in your ccProject
- Used Files: Name of your ccProject
- DRM Status: The error associated with the morph slider used in your ccProject
- DRM Missing: This means the validate tool found a local copy of morph slider (.ccSlider) that is used in your Project in the local default directory, but without any DRM information associated with this Morph Slider. Please upload your Morph Slider to the Marketplace first using the Uploader.
- Need Pack: This means the validate tool cannot find the morph slider (.ccSlider) used in your ccProject on the Marketplace. Please pack the listed morph slider and upload it to your marketplace using the Uploader.
- Need Download: This means the validate tool cannot find morph slider (.ccSlider) that is used in your ccProject in the local default directory, but is available for sale on the Marketplace. You have to go to re-download the related morph slider again.
- Purchase Required: This means the validate tool cannot find morph slider (.ccSlider) that is used in your ccProject in the local default directory, but is available for sale on the Marketplace. You have to go to Marketplace and buy the related morph slider.
- Slider Not Found: This means the validate tool cannot find the morph slider (.ccSlider) locally and on the Marketplace. Please find the original morph slider file associated with the ccProject and move it to the default directory (C:\Users\Public\Documents\Reallusion\Custom\Character Creator 2 for iClone Custom). If the morph slider file (.ccSlider) cannot be found, then please do not upload this ccProject & iAvatar for sale on the Marketplace. Any users who have purchased this ccProject & iAvatar will have permanent watermark whenever they load this project since there are no associated ccSlider for them to buy on the Marketplace.
- Action: The suggested next course of action.
Step 3) Once finished validation, you can upload the ccProject & iAvatar to the Marketplace.
End User Simulation
This mode can help simulate what a typical end user will see when they purchase and download your Morph Slider from the Marketplace.
You can find more details about End User Simulation in the Online Manual.
Step 1) Go to Submission Tools and click on End User Simulation.
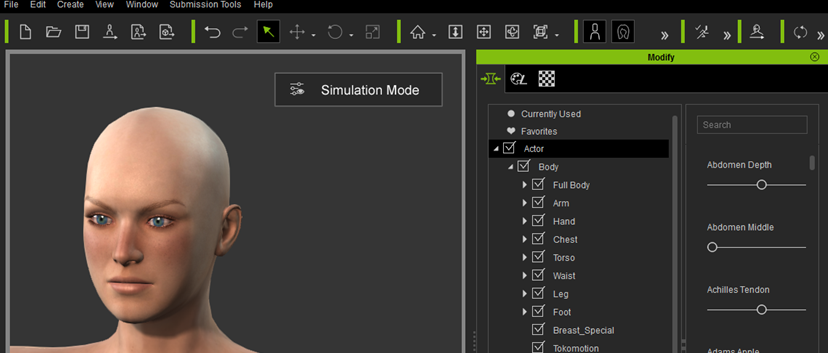
Step 2) Once activated, you will notice the viewport is now highlighted with a grey-colored outline. In this mode, all the .ccCustomSlider files you have created locally will be filtered out, leaving behind only .ccSlider files that have been downloaded from the Marketplace.
You can exit this mode by going to Submission Tools and click on End User Simulation again.
